It was one of those chaotic weekend afternoons when my phone buzzed with a last-minute invite to a neighborhood potluck. Honestly, I had zero plans and even less time, but I didn’t want to show up empty-handed. I rifled through my fridge and pantry, hoping for a quick fix. That’s when my eyes landed on a block of cream cheese and a can of pineapple tidbits—the humble beginnings of what would soon become my go-to Classic Sweet and Savory Pineapple Cheese Ball recipe.
I was a bit skeptical at first, thinking, “Cheese ball? Isn’t that something from the ’70s?” But, you know, sometimes those retro recipes sneak their way back for good reason. I mixed a few things, rolled it into a ball, and popped it in the fridge while getting ready. When I arrived, it was like a little magnet—everyone was curious, grabbing crackers, and asking for the recipe. It felt like a tiny victory born out of a rushed afternoon, yet it tasted like something carefully crafted over hours.
What caught me by surprise was how the sweet pineapple danced with the savory cheese, creating this delightful balance that made people pause and savor. It’s become my quiet little secret for casual gatherings and unexpected guests alike. The simplicity and charm of this pineapple cheese ball stuck with me because it’s the kind of recipe that feels like a warm hug on a plate—comforting, nostalgic, yet fresh enough to brighten any party table.
Why You’ll Love This Recipe
- Quick & Easy: Whips up in just 15 minutes, making it perfect for last-minute get-togethers or when you just don’t feel like fussing in the kitchen.
- Simple Ingredients: Uses pantry staples and common fridge items; no exotic shopping required.
- Perfect for Parties: Whether it’s a holiday gathering, casual potluck, or game day snack, this cheese ball fits right in.
- Crowd-Pleaser: Kids and adults alike adore the sweet-savory flavor combo—you’ll see the bowl empty fast!
- Unbelievably Delicious: The creamy texture combined with the pop of pineapple and crunchy nuts gives a satisfying bite every time.
- This isn’t just any cheese ball—it’s the one I’ve fine-tuned over years of testing, making sure the seasoning hits just right and the pineapple pieces are perfectly balanced so they’re juicy but not soggy.
- The recipe brings together nostalgia and freshness, so it’s a little throwback but still feels current and approachable.
- It’s the kind of dish that turns an ordinary snack into something special, and honestly, it’s one of those recipes I keep coming back to when I need a reliable, tasty crowd-pleaser.
What Ingredients You Will Need
This recipe uses simple, wholesome ingredients to deliver bold flavor and satisfying texture without the fuss. Most are pantry staples, and you can easily swap or skip a few depending on what you have on hand.
- Cream Cheese (8 oz / 225 g), softened – The base of your cheese ball, providing that creamy, tangy foundation. I prefer Philadelphia brand for consistent results.
- Sharp Cheddar Cheese (1 cup / 100 g), shredded – Adds a punch of flavor and a bit of bite; freshly shredded always tastes better than pre-shredded.
- Crushed Pineapple (½ cup / 120 ml), drained – This gives the sweet twist; make sure to drain well to avoid a soggy ball.
- Green Onions (2 tablespoons), finely chopped – Adds a mild oniony freshness without overpowering the other flavors.
- Worcestershire Sauce (1 teaspoon) – A little umami boost that deepens the savory notes.
- Garlic Powder (½ teaspoon) – Just enough to add warmth without being too garlicky.
- Salt and Pepper, to taste – Simple but essential for balancing flavors.
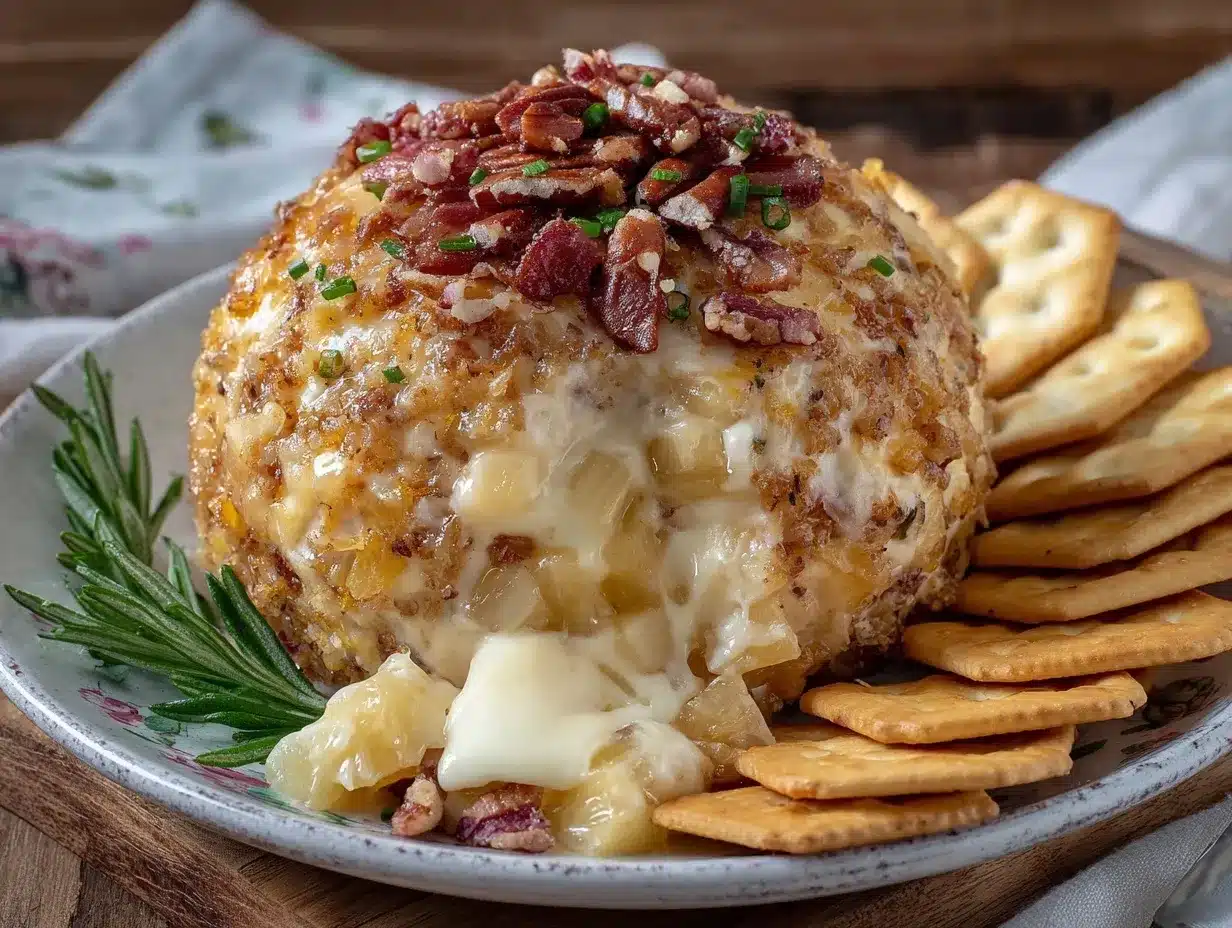
- Chopped Pecans or Walnuts (⅓ cup / 40 g) – For rolling the cheese ball, these add a crunchy, nutty contrast.
- Optional: Fresh Parsley or chives for garnish – Adds a pop of color and freshness.
If you want to keep it dairy-free, swapping cream cheese for a plant-based alternative works well here, and almond or cashew nuts can replace pecans.
Equipment Needed
- Mixing Bowl: A medium-sized bowl for combining ingredients. I like glass or stainless steel for easy cleanup.
- Electric Mixer or Hand Mixer: Helpful for getting the cream cheese super smooth, but you can also use a sturdy spoon and some elbow grease.
- Measuring Cups and Spoons: For precise ingredient amounts to keep the balance right.
- Spatula: To scrape down the sides and mix everything evenly.
- Plastic Wrap or Parchment Paper: For shaping and chilling the cheese ball.
- Serving Plate or Board: To present your finished cheese ball with crackers or veggies.
No fancy tools needed here—just the basics you probably already own. If you want a rustic look, shaping by hand is perfectly fine; just chill it well before serving so it holds up.
Preparation Method
- Soften the Cream Cheese: Let the cream cheese sit at room temperature for about 15–20 minutes before you start. This makes mixing smoother and easier.
- Mix the Base: In a mixing bowl, combine the softened cream cheese and shredded sharp cheddar cheese. Use an electric mixer or sturdy spoon to blend until creamy and well combined, about 2–3 minutes.
- Add Flavorings: Stir in the drained crushed pineapple, finely chopped green onions, Worcestershire sauce, garlic powder, salt, and pepper. Mix gently to keep the pineapple pieces intact but evenly distributed.
- Form the Cheese Ball: Using your hands or a spatula, shape the mixture into a compact ball roughly 6 inches (15 cm) in diameter. If it feels too sticky, chill the mixture for 10 minutes before shaping.
- Coat with Nuts: Spread the chopped pecans or walnuts on a plate. Roll the cheese ball around until fully coated with nuts, pressing lightly to help them stick.
- Chill: Wrap the cheese ball tightly in plastic wrap and refrigerate for at least 2 hours, preferably overnight. This helps flavors meld and firms up the ball for slicing.
- Serve: Place the chilled cheese ball on a serving plate. Garnish with fresh parsley or chives if desired. Serve with crackers, sliced baguette, or fresh veggies.
Tip: If your cheese ball seems too soft to roll, a brief stint in the freezer (10 minutes) can help it firm up without freezing solid. Also, when draining the pineapple, pressing it gently with paper towels helps reduce extra moisture, which keeps the texture just right.
Cooking Tips & Techniques
One thing I’ve learned from making this pineapple cheese ball multiple times is that texture is king. You want that perfect mix of creamy cheese and crunchy nuts, with pineapple bites that burst without making it soggy.
Always soften your cream cheese fully before mixing. Trying to mix cold cream cheese leads to clumps and uneven texture—trust me, I’ve been there on a rushed afternoon when the mixer just wouldn’t do its job.
Don’t skip draining the pineapple well. I once forgot this step, and the whole cheese ball turned watery, which was a bummer. Using a fine mesh strainer and pressing gently is your best bet.
Rolling the cheese ball in chopped nuts not only adds texture but also helps it hold shape. Toasting the nuts lightly can bring out more flavor, but watch carefully so they don’t burn.
Chilling is non-negotiable here. I’ve made the mistake of serving it too soon, and it just falls apart. A good chill time lets the flavors meld and the cheese firm up perfectly.
When serving, arrange crackers or veggies around the cheese ball for easy access. It’s a simple touch that makes your presentation inviting and fuss-free.
Variations & Adaptations
- Spicy Kick: Add 1–2 teaspoons of finely chopped jalapeño or a pinch of cayenne pepper to the cheese mixture for a sweet-heat contrast.
- Herb-Infused: Mix in fresh herbs like dill, basil, or thyme to give the cheese ball a fresh, garden-inspired twist.
- Gluten-Free Option: Use gluten-free crackers or sliced veggies for serving to accommodate dietary needs.
- Dairy-Free Version: Swap cream cheese with dairy-free cream cheese and cheddar with a plant-based shredded cheese alternative. The flavor won’t be 100% the same but still delicious.
- Nut-Free Coating: Roll the cheese ball in toasted sesame seeds, crushed pretzels, or finely chopped crispy bacon if nuts aren’t your thing.
- Personal Twist: I once tried adding a handful of finely chopped dried cranberries along with pineapple—gave it a lovely tart-sweet balance that guests really enjoyed.
Serving & Storage Suggestions
This pineapple cheese ball is best served chilled or at cool room temperature, so take it out of the fridge about 15 minutes before serving to soften slightly for easy spreading.
Pair it with an assortment of crackers—water crackers, buttery ones, or even rye crisps work beautifully. Fresh veggies like celery sticks, bell pepper strips, or cucumber rounds add a refreshing crunch.
Leftovers can be wrapped tightly in plastic wrap and stored in the refrigerator for up to 4 days. Because of the fresh ingredients, it’s best eaten sooner rather than later.
Reheat? Not really necessary here, but if you want the cheese ball softer, simply let it sit at room temperature before serving.
Flavors tend to deepen overnight, so if you can prepare it a day in advance, you’ll be rewarded with a more harmonious blend of sweet and savory notes.
Nutritional Information & Benefits
Each serving of this pineapple cheese ball (about 2 tablespoons) contains approximately:
| Calories | 120 kcal |
|---|---|
| Protein | 4 g |
| Fat | 10 g |
| Carbohydrates | 3 g |
| Fiber | 0.5 g |
The cream cheese and cheddar provide calcium and protein, while pineapple adds a touch of vitamin C and natural sweetness without added sugar. The nuts contribute healthy fats and a bit of fiber.
This recipe fits well into low-carb and gluten-free diets (when served with appropriate crackers or veggies). Just be mindful of nut allergies and dairy intolerance; alternatives can be used to accommodate most dietary restrictions.
From a wellness perspective, this cheese ball offers a balanced snack that feels indulgent but doesn’t rely on processed ingredients or added sugars, making it a satisfying choice that keeps you coming back for more.
Conclusion
Looking back, it’s funny how this Classic Sweet and Savory Pineapple Cheese Ball recipe came together almost by accident but ended up as a staple in my entertaining arsenal. It’s simple, quick, and has that perfect balance of flavors that keeps everyone reaching for more.
Feel free to make this recipe your own by adjusting the sweetness, adding herbs, or switching up the nuts. That’s the beauty of it—there’s room to play without losing the essence that makes it so comforting and crowd-pleasing.
Honestly, it’s one of those dishes that brings people together with minimal effort but maximum flavor, and I hope it becomes a favorite for you as well. If you try it out or have your own tweaks, I’d love to hear about it—sharing recipes and stories is half the fun!
So, grab your cream cheese and pineapple, and get ready to impress without the stress.
FAQs
How long can I store the pineapple cheese ball?
Wrapped tightly and refrigerated, it stays fresh for up to 4 days. Avoid freezing as it can change the texture.
Can I make this cheese ball ahead of time?
Absolutely. Preparing it a day in advance actually helps the flavors meld for a tastier result.
What can I use instead of pecans for the coating?
Try walnuts, almonds, toasted sesame seeds, crushed pretzels, or crispy bacon bits for different textures and flavors.
Is there a way to make this recipe dairy-free?
Yes, use dairy-free cream cheese and a plant-based shredded cheese alternative to keep it creamy and delicious.
Can I add other fruits besides pineapple?
Sure! Diced dried cranberries or chopped mango can add a nice twist, but be mindful of moisture content to avoid sogginess.
Pin This Recipe!

Classic Sweet and Savory Pineapple Cheese Ball

A quick and easy party appetizer combining creamy cheese with sweet pineapple and crunchy nuts, perfect for casual gatherings and potlucks.
- Prep Time: 15 minutes
- Cook Time: 0 minutes
- Total Time: 2 hours 15 minutes
- Yield: 12 servings 1x
- Category: Appetizer
- Cuisine: American
Ingredients
- 8 oz (225 g) cream cheese, softened
- 1 cup (100 g) sharp cheddar cheese, shredded
- ½ cup (120 ml) crushed pineapple, drained
- 2 tablespoons green onions, finely chopped
- 1 teaspoon Worcestershire sauce
- ½ teaspoon garlic powder
- Salt and pepper, to taste
- ⅓ cup (40 g) chopped pecans or walnuts
- Optional: fresh parsley or chives for garnish
Instructions
- Soften the cream cheese by letting it sit at room temperature for 15–20 minutes.
- In a mixing bowl, combine the softened cream cheese and shredded sharp cheddar cheese. Mix until creamy and well combined, about 2–3 minutes.
- Stir in the drained crushed pineapple, finely chopped green onions, Worcestershire sauce, garlic powder, salt, and pepper. Mix gently to keep pineapple pieces intact.
- Shape the mixture into a compact ball about 6 inches (15 cm) in diameter. If too sticky, chill for 10 minutes before shaping.
- Spread chopped pecans or walnuts on a plate and roll the cheese ball until fully coated.
- Wrap the cheese ball tightly in plastic wrap and refrigerate for at least 2 hours, preferably overnight.
- Before serving, place on a serving plate and garnish with fresh parsley or chives if desired. Serve with crackers, sliced baguette, or fresh veggies.
Notes
Soften cream cheese fully before mixing to avoid clumps. Drain pineapple well to prevent sogginess. Chill cheese ball for at least 2 hours to firm up and meld flavors. Toast nuts lightly for extra flavor if desired. If too soft to roll, chill or freeze briefly (10 minutes).
Nutrition
- Serving Size: About 2 tablespoons
- Calories: 120
- Fat: 10
- Carbohydrates: 3
- Fiber: 0.5
- Protein: 4
Keywords: pineapple cheese ball, party appetizer, sweet and savory, easy cheese ball, potluck recipe, holiday appetizer


