“Hey, did you try that lemon cheesecake bar yet? It’s insanely good!” I remember my coworker’s text popping up just as I was heading out for a hectic afternoon. Honestly, I wasn’t expecting much—I mean, no-bake desserts always seemed a bit suspect to me. But something about the bright, zesty promise of lemon caught my attention. That night, after juggling emails and dinner prep, I finally gave these creamy no-bake lemon cheesecake bars a shot.
The first bite surprised me. The texture was silky smooth, like the kind of cheesecake that melts in your mouth but without the fuss of the oven. The lemon tang wasn’t overpowering—just a fresh, springy zing that lifted the whole thing. I kept sneaking bites, thinking about how simple the ingredients were and how perfect this recipe is when you want something sweet but light, especially after a long day.
I’ve made these bars multiple times since then, tweaking little things here and there—sometimes adding a touch more zest or swapping out the crust for a nutty twist. But the core of this recipe stuck with me, mainly because it delivers creamy, citrusy comfort without the heat or hassle. It feels like that quiet, refreshing moment you crave on a busy spring evening, calming and satisfying in equal measure.
What’s more, these bars have become a bit of a secret weapon for me when unexpected guests drop by or when I want a simple, elegant treat to pair with afternoon tea. Their charm lies in the balance: rich cream cheese, bright lemon, and a buttery crust that holds everything together. It’s funny how the easiest recipes sometimes leave the biggest impression.
If you like desserts that feel homemade but don’t require hours of work, these bars will probably sneak their way into your weekly rotation like they did mine. Plus, they’re a nice change from the usual heavy cakes or puddings—light, creamy, and exactly the kind of treat that fits the spirit of spring.
Why You’ll Love This Recipe
After testing this creamy no-bake lemon cheesecake bars recipe several times, I can say it really hits the mark for quick, delicious springtime desserts. Here’s why it stands out:
- Quick & Easy: You can have these bars ready in under 30 minutes, no oven required—perfect for busy evenings or last-minute gatherings.
- Simple Ingredients: There’s nothing fancy here—just staples like cream cheese, lemon, and graham crackers, so no extra grocery trips.
- Perfect for Spring: The bright lemon flavor and creamy texture make these bars ideal for warm-weather treats or celebrations like Easter and Mother’s Day.
- Crowd-Pleaser: Whether it’s kids, coworkers, or neighbors, this dessert always gets rave reviews for being refreshing yet indulgent.
- Unbelievably Delicious: The texture is ultra-smooth and creamy, with a buttery crust that adds just the right crunch.
This isn’t just another lemon cheesecake bar recipe. What sets it apart is the balance of flavors and textures. The crust is buttery but not greasy, the filling is tangy yet sweetened just enough, and the no-bake method keeps everything light. Plus, blending the cream cheese until perfectly smooth creates that velvety mouthfeel that makes you close your eyes after the first bite.
It’s the kind of dessert that feels homemade and thoughtful, but without any stress. Honestly, it’s been my go-to when I want to impress guests without spending hours, and it pairs beautifully with a cup of tea or coffee—like how I sometimes enjoy my easy cheesy poor man’s tater tot casserole for cozy dinners.
What Ingredients You Will Need
This recipe uses simple, wholesome ingredients that come together to create a bold lemon flavor and satisfyingly creamy texture without fuss. Most are pantry staples or easy to find, with a few optional swaps for dietary needs.
- For the crust:
- 1 ½ cups graham cracker crumbs (about 10 full sheets, finely crushed)
- 6 tablespoons unsalted butter, melted (I prefer Kerrygold for richness)
- 2 tablespoons granulated sugar (balances the tartness)
- For the filling:
- 16 ounces (450g) cream cheese, softened (Philadelphia brand gives great consistency)
- ½ cup powdered sugar (for that smooth sweetness)
- 1 teaspoon vanilla extract (adds depth)
- 1 tablespoon lemon zest (freshly grated for best flavor)
- ¼ cup freshly squeezed lemon juice (about 2 lemons; avoid bottled for brightness)
- 1 cup heavy cream, cold (whipped to soft peaks for fluffiness)
Ingredient tips: Look for small-curd cream cheese for the smoothest texture. If you want a lighter version, swapping heavy cream with full-fat coconut cream works well for a dairy-free option. For the crust, almond flour can replace graham crackers for gluten-free needs, although the classic crunch is hard to beat. In spring, I sometimes add a handful of fresh raspberries on top for a seasonal twist.
Equipment Needed
- 9×9-inch (23×23 cm) square baking pan – I use a glass pan because it makes slicing easier, but metal works fine too.
- Mixing bowls – one large and one medium-sized.
- Electric hand mixer or stand mixer – essential for whipping the cream and smoothing the cream cheese.
- Rubber spatula – perfect for folding whipped cream gently into the cheesecake filling without deflating it.
- Citrus zester or fine grater – to get that fresh lemon zest.
- Measuring cups and spoons – accurate measurements make all the difference.
If you don’t have a mixer, a sturdy whisk will work; it just takes more elbow grease to whip the cream to soft peaks. For the crust, a food processor can speed up crushing the graham crackers, but placing them in a ziplock bag and smashing with a rolling pin is a tried-and-true, budget-friendly method I often rely on.
Preparation Method

- Prepare the crust: In a medium bowl, combine 1 ½ cups graham cracker crumbs, 6 tablespoons melted butter, and 2 tablespoons sugar. Mix until all crumbs are evenly coated and the mixture feels like wet sand. This usually takes around 3 minutes.
- Press crust into pan: Transfer the mixture to your 9×9-inch pan. Using the back of a spoon or your fingers, press firmly and evenly across the bottom. The firmer you press, the better it will hold without crumbling. Chill the crust in the fridge while you make the filling (about 10-15 minutes).
- Beat the cream cheese: In a large bowl, beat the softened cream cheese with an electric mixer on medium speed until completely smooth and creamy—no lumps. This step takes about 2-3 minutes and is key to that silky texture.
- Add powdered sugar and vanilla: Gradually add ½ cup powdered sugar and 1 teaspoon vanilla extract, beating until fully incorporated.
- Mix lemon zest and juice: Stir in 1 tablespoon lemon zest and ¼ cup fresh lemon juice by hand. The mixture will thicken slightly and smell wonderfully fresh.
- Whip the cream: In a separate bowl, whip 1 cup cold heavy cream to soft peaks. This usually takes 3-5 minutes on high speed. You want the cream to hold its shape but still be pliable.
- Fold whipped cream into filling: Using a rubber spatula, gently fold the whipped cream into the cream cheese mixture in thirds. Be careful not to overmix—you want to keep it light and airy.
- Assemble the bars: Pour the filling over the chilled crust and spread evenly with the spatula. Smooth the top as best you can.
- Chill to set: Refrigerate for at least 4 hours, preferably overnight. This step is crucial as it allows the bars to firm up for clean slicing.
- Slice and serve: Once set, use a sharp knife dipped in hot water to slice into 12 bars. Wipe the knife clean between cuts for neat edges.
Pro tip: If your cream cheese isn’t soft enough, it can lead to lumps—let it sit out a bit longer before mixing. Also, don’t rush the chilling time; tempting as it is, the texture improves dramatically with patience.
Cooking Tips & Techniques
Getting that perfect creamy texture without baking can be tricky, but here’s what I’ve learned over repeated tries:
- Softened cream cheese is non-negotiable. I usually leave mine out for about 30 minutes before starting. If you forget, 10-second bursts in the microwave work wonders.
- Whip the cream to the right stage. Soft peaks mean the cream holds shape but still folds easily. Over-whipping turns it grainy, which messes with your filling’s smoothness.
- Folding gently is key. Mixing whipped cream too vigorously will deflate it, and your bars might turn dense. Patience here pays off.
- Press the crust well. A loosely packed crust leads to crumbly bars. I press it down with a measuring cup base to get an even, firm layer.
- Chill thoroughly. I once skipped the overnight chill and regretted it—the bars were too soft to cut cleanly and lost their shape.
- Use fresh lemons. Bottled juice can taste flat and affect the brightness. Fresh juice and zest really lift the flavor.
- For easy slicing, warm your knife under hot water between cuts. It cleanly glides through without tearing.
Honestly, this recipe has become my springtime fallback because it’s quick to prepare yet feels special. If you want to try a no-bake dinner companion, the creamy texture reminds me a bit of the deliciousness in the creamy keto crack chicken with bacon —comforting, creamy, and easy to make.
Variations & Adaptations
While this lemon cheesecake bar recipe is fantastic as is, here are some ways to switch it up based on your preferences or what’s in season:
- Berry Bliss: Swirl in ½ cup of raspberry or blueberry puree into the filling before chilling for a fruity twist. Fresh berries on top brighten up the presentation too.
- Gluten-Free Crust: Replace graham crackers with almond flour mixed with melted butter and a touch of sugar. Press firmly, and you’ll get a nutty, crumbly base perfect for gluten-sensitive pals.
- Dairy-Free Version: Use coconut cream instead of heavy cream and a dairy-free cream cheese alternative. I’ve tried this with good success using brands like Kite Hill.
- Herbal Notes: Add 1 teaspoon finely chopped fresh basil or mint to the filling for a sophisticated herbal hint that pairs well with lemon.
One personal favorite variation is topping the bars with a thin layer of lemon curd before chilling, adding an extra punch of citrusy richness that guests always ask about. It’s like a little spring sunshine in every bite.
Serving & Storage Suggestions
These cheesecake bars are best served chilled, straight from the fridge. Letting them sit at room temperature for 5-10 minutes softens them slightly, which I find perfect for that creamy melt-in-your-mouth feel.
For presentation, dust a little powdered sugar or garnish with thin lemon slices or fresh mint leaves. They pair wonderfully with a cup of hot tea or light white wine during a spring brunch.
Store leftover bars tightly covered in the refrigerator—an airtight container or tightly wrapped with plastic wrap works well. They keep beautifully for up to 4 days. If you want to keep them longer, you can freeze the bars individually wrapped; thaw overnight in the fridge before serving.
Interestingly, the lemon flavor intensifies a bit after a day or two, making the bars taste even brighter. This slow flavor development is one reason I sometimes make them a day ahead for parties.
Nutritional Information & Benefits
Each bar (assuming 12 servings) roughly contains:
| Calories | 250-270 kcal |
|---|---|
| Fat | 18g (mostly from cream cheese and butter) |
| Carbohydrates | 18g (includes sugars and graham cracker carbs) |
| Protein | 4g |
The use of real lemon juice and zest provides vitamin C, and the cream cheese offers calcium and protein. While this isn’t a low-calorie dessert, it balances indulgence with fresh flavors, making it less heavy than baked cheesecakes often loaded with sugars and fats.
For those mindful of gluten, swapping the crust to almond flour keeps it gluten-free, and the dairy-free version makes it accessible for lactose intolerance. It’s a dessert that feels like a treat but doesn’t weigh you down—a little spring sunshine for your plate.
Conclusion
If you’re looking for a dessert that’s fresh, creamy, and simple to make, these creamy no-bake lemon cheesecake bars for spring are a winner every time. They combine the brightness of lemon with the richness of cheesecake but without the oven or fuss. I love how versatile and approachable this recipe is—perfect for last-minute guests or a quiet weeknight treat.
Feel free to tweak the zest, add berries, or try a dairy-free version to make it your own. It’s the kind of dessert that welcomes your personal touch and still impresses. I keep coming back to these bars because they remind me that sometimes the easiest recipes are the most satisfying.
If you enjoy making this, I’d love to hear what variations you try or how you serve it! Share your thoughts in the comments below, and let’s keep the spring baking vibes going strong. After all, good food is better when shared.
Frequently Asked Questions
Can I make these lemon cheesecake bars ahead of time?
Yes! They actually taste better after chilling overnight, which helps the flavors meld and the bars firm up perfectly.
What if I don’t have graham crackers?
You can substitute with digestive biscuits or even crushed vanilla wafers. For a gluten-free option, almond flour or gluten-free cookies work well.
Can I use bottled lemon juice instead of fresh?
Fresh lemon juice is best for flavor brightness, but in a pinch, bottled lemon juice will work—just expect a milder tang.
How do I store leftover bars?
Keep them covered in the refrigerator for up to 4 days. For longer storage, freeze them individually wrapped and thaw in the fridge before serving.
Is it possible to make these bars vegan?
With substitutions like vegan cream cheese, coconut cream, and a vegan crust, you can make a vegan version, though the texture and flavor will differ slightly.
Pin This Recipe!
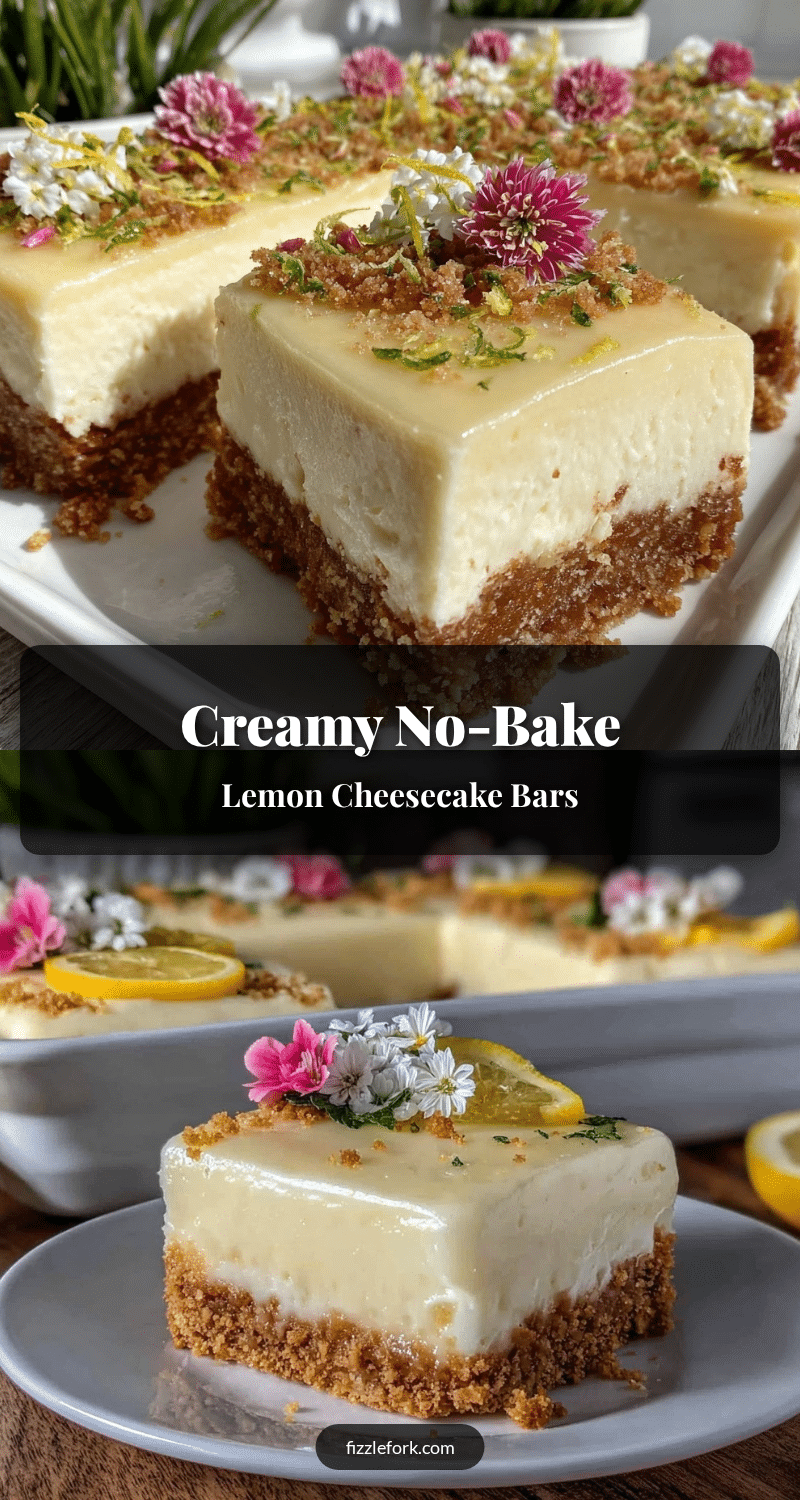
Creamy No-Bake Lemon Cheesecake Bars
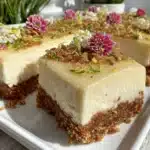
These creamy no-bake lemon cheesecake bars offer a silky smooth texture with a bright, fresh lemon flavor. Perfect for a quick, light spring dessert without the need for an oven.
- Prep Time: 15 minutes
- Cook Time: 0 minutes
- Total Time: 4 hours 15 minutes
- Yield: 12 servings 1x
- Category: Dessert
- Cuisine: American
Ingredients
- 1 ½ cups graham cracker crumbs (about 10 full sheets, finely crushed)
- 6 tablespoons unsalted butter, melted
- 2 tablespoons granulated sugar
- 16 ounces (450g) cream cheese, softened
- ½ cup powdered sugar
- 1 teaspoon vanilla extract
- 1 tablespoon lemon zest (freshly grated)
- ¼ cup freshly squeezed lemon juice (about 2 lemons)
- 1 cup heavy cream, cold
Instructions
- In a medium bowl, combine graham cracker crumbs, melted butter, and sugar. Mix until crumbs are evenly coated and mixture feels like wet sand.
- Press the crust mixture firmly and evenly into the bottom of a 9×9-inch square baking pan. Chill in the refrigerator for 10-15 minutes.
- In a large bowl, beat the softened cream cheese with an electric mixer on medium speed until smooth and creamy.
- Gradually add powdered sugar and vanilla extract, beating until fully incorporated.
- Stir in lemon zest and freshly squeezed lemon juice by hand until mixture thickens slightly.
- In a separate bowl, whip cold heavy cream to soft peaks (3-5 minutes on high speed).
- Gently fold the whipped cream into the cream cheese mixture in thirds, being careful not to overmix.
- Pour the filling over the chilled crust and spread evenly with a spatula.
- Refrigerate for at least 4 hours or preferably overnight to set.
- Use a sharp knife dipped in hot water to slice into 12 bars, wiping the knife clean between cuts.
Notes
Use softened cream cheese for a smooth texture. Whip cream to soft peaks and fold gently to keep filling light and airy. Chill bars overnight for best texture and clean slicing. Fresh lemon juice and zest provide the best flavor. For gluten-free crust, substitute graham crackers with almond flour. For dairy-free, use coconut cream and dairy-free cream cheese alternatives.
Nutrition
- Serving Size: 1 bar (1/12 of recip
- Calories: 260
- Sugar: 12
- Sodium: 150
- Fat: 18
- Saturated Fat: 11
- Carbohydrates: 18
- Fiber: 0.5
- Protein: 4
Keywords: lemon cheesecake bars, no-bake dessert, spring dessert, creamy cheesecake, easy lemon bars, quick dessert, no oven cheesecake