Let me tell you, the scent of sizzling garlic and ginger wafting from my skillet, mingled with the faint crisp of golden gyoza skins, is enough to make anyone’s mouth water instantly. The first time I made these crispy Japanese gyoza, I was instantly hooked—the kind of moment where you pause, take a deep breath, and just smile because you know you’re onto something truly special. Years ago, when I was knee-high to a grasshopper, I used to watch my grandma carefully fold dumplings, her fingers dancing with practiced ease. It wasn’t until a rainy weekend not too long ago that I decided to try my hand at making these pan-fried beauties myself. Honestly, I wish I’d discovered this recipe years ago—it’s dangerously easy and offers pure, nostalgic comfort with every bite.
My family couldn’t stop sneaking them off the cooling rack (and I can’t really blame them). Let’s face it, these crispy Japanese gyoza are perfect for potlucks, a sweet treat for your kids, or even to brighten up your Pinterest cookie board—well, more like your Pinterest dinner board! After testing this recipe multiple times in the name of research, of course, it’s become a staple for family gatherings and gifting. This gyoza recipe feels like a warm hug from the kitchen, and you’re going to want to bookmark this one.
Why You’ll Love This Recipe
Honestly, this crispy Japanese gyoza recipe isn’t just another dumpling—it’s the best version you’ll find, tested and approved by my family and friends after many delicious trials. Here’s why you’ll want to try it ASAP:
- Quick & Easy: Comes together in under 45 minutes, perfect for busy weeknights or last-minute cravings.
- Simple Ingredients: No fancy grocery trips needed; you likely already have everything in your kitchen.
- Perfect for Any Occasion: Great for casual dinners, potlucks, or even a cozy weekend snack.
- Crowd-Pleaser: Always gets rave reviews from kids and adults alike, with no leftovers in sight.
- Unbelievably Delicious: The crispy bottom paired with a juicy, savory filling is next-level comfort food.
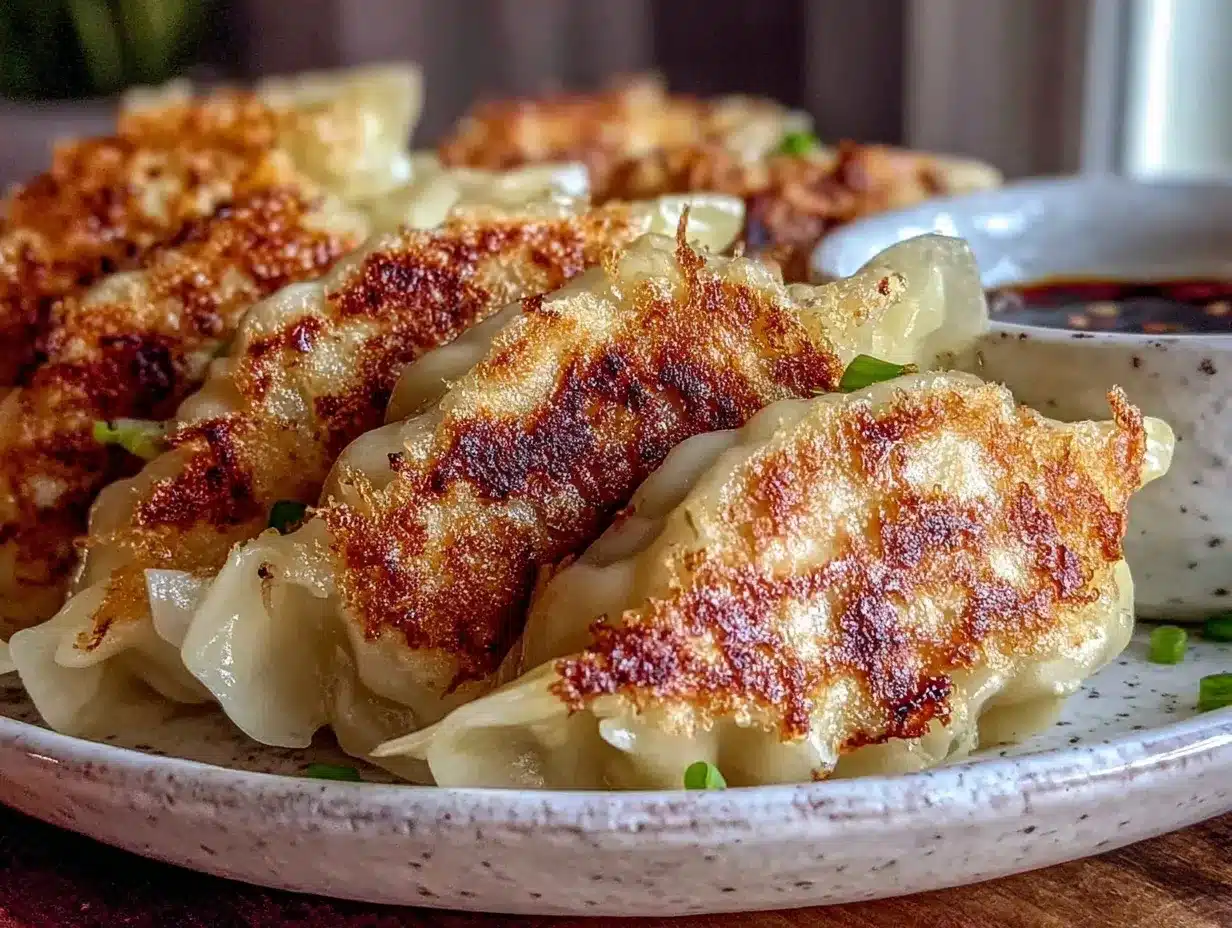
What sets this recipe apart is the perfectly balanced seasoning—garlic, ginger, and soy sauce combine to give the filling a savory punch without overpowering. Plus, the careful pan-frying technique produces that signature crispiness on the bottom while keeping the top tender and steamed. This recipe isn’t just good—it’s the kind that makes you close your eyes after the first bite. It’s comfort food that’s easy to make, healthier than takeout, and guaranteed to impress your guests without stress.
What Ingredients You Will Need
This recipe uses simple, wholesome ingredients to deliver bold flavor and satisfying texture without the fuss. Most are pantry staples, and substitutions are easy if you’re feeling adventurous.
- For the filling:
- 300g (10.5 oz) ground pork (or ground chicken for a lighter option)
- 100g (3.5 oz) finely chopped cabbage (squeeze out excess water for better texture)
- 2 green onions, finely chopped
- 2 cloves garlic, minced (adds that classic aromatic base)
- 1 tablespoon fresh ginger, grated
- 1 tablespoon soy sauce (I prefer Kikkoman for a balanced flavor)
- 1 teaspoon sesame oil (to add a subtle nutty aroma)
- 1 teaspoon sugar (balances out the savory notes)
- Salt and pepper to taste
- For assembling:
- 40 gyoza wrappers (round, thin dumpling skins—found in most Asian markets or frozen sections)
- 2 tablespoons vegetable oil (for frying)
- 120 ml (½ cup) water (for steaming during frying)
- For the dipping sauce:
- 3 tablespoons soy sauce
- 1 tablespoon rice vinegar
- ½ teaspoon chili oil or a few chili flakes (optional, for a spicy kick)
Looking for gluten-free options? You can swap the regular gyoza wrappers with rice paper or gluten-free dumpling wrappers. For a vegetarian twist, replace the pork with finely chopped mushrooms and tofu, seasoned just the same. I’ve found that squeezing out the cabbage’s moisture is key—otherwise, your filling gets soggy, and nobody wants that.
Equipment Needed
- Non-stick frying pan with a lid (a 10-inch/25 cm pan works perfectly)
- Mixing bowl (for combining the filling)
- Chopping board and sharp knife (for finely chopping cabbage, green onions, and garlic)
- Spoon or small scoop (to portion the filling evenly)
- Small bowl of water (to wet the edges of the wrappers for sealing)
- Tongs or spatula (to carefully flip and remove gyoza)
If you don’t have a non-stick pan, a well-seasoned cast iron skillet works too—just be extra careful when flipping to keep the crispy crust intact. For sealing the gyoza, some folks swear by a dumpling press, but honestly, your fingers do the job just fine (and it’s a bit more satisfying). I keep a small spray bottle handy to mist a little water during cooking if the pan gets too dry.
Preparation Method
- Prepare the filling: In a large mixing bowl, combine 300g ground pork, 100g finely chopped cabbage (warmed and squeezed dry), 2 chopped green onions, minced garlic, grated ginger, 1 tablespoon soy sauce, 1 teaspoon sesame oil, 1 teaspoon sugar, and a pinch of salt and pepper. Mix everything thoroughly with your hands or a spoon until well combined and slightly sticky. (This helps the filling hold together.) Allow it to rest for 10 minutes. Time: 15 minutes.
- Set up your workspace: Lay out your gyoza wrappers on a clean surface. Keep a small bowl of water nearby for sealing. Have your non-stick frying pan ready with the lid close by. Time: 5 minutes.
- Assemble the gyoza: Place one wrapper in your palm. Spoon about 1 tablespoon (15g) of filling into the center. Dip your finger in water and moisten the edge of the wrapper. Fold the wrapper over the filling to create a half-moon shape. Start pleating from one end, pinching each pleat so the dumpling seals tightly. Repeat until all filling is used. (Don’t overfill—you want them to hold shape!) Time: 15-20 minutes.
- Cook the gyoza: Heat 2 tablespoons vegetable oil in your non-stick pan over medium-high heat. Place the dumplings flat side down in the pan, spacing them so they don’t touch. Fry for 2-3 minutes or until bottoms are golden brown and crispy.
- Steam the gyoza: Carefully pour 120 ml (½ cup) water into the pan (watch out for splatter). Immediately cover with a lid to trap the steam. Cook for 5-6 minutes until the water has evaporated and gyoza wrappers appear translucent and tender.
- Finish crisping: Remove the lid and continue cooking for another 1-2 minutes until the bottoms regain crispness. Transfer to a serving plate using a spatula or tongs. Time: 10-12 minutes.
- Make the dipping sauce: Mix 3 tablespoons soy sauce, 1 tablespoon rice vinegar, and optional chili oil in a small bowl. Serve alongside the gyoza.
Pro tip: If you notice any gyoza sticking to the pan during cooking, gently slide a silicone spatula under them and loosen before flipping. Also, don’t rush the steaming step—that’s what makes the filling juicy and the wrapper perfectly tender.
Cooking Tips & Techniques
Pan-frying gyoza to crispy perfection can feel a bit intimidating, but I’ve learned some tricks that make it a breeze. First off, never skip the step of squeezing water from the cabbage; too much moisture leads to soggy dumplings. When sealing, make sure you moisten the wrapper edges well—dry edges just won’t stick.
One common mistake is crowding the pan. Let your gyoza have a little breathing room for even cooking and crispiness. I like to use medium-high heat at first to get that golden crust, then lower the heat slightly when steaming so the wrappers don’t burn or dry out.
Another tip? Use a lid with a tight seal to trap steam properly—trust me, the difference is noticeable. If you’re multitasking, prepare the filling ahead and refrigerate it; the flavors actually deepen after resting. Also, flipping gyoza can be nerve-wracking, but a gentle touch with a spatula or tongs works wonders.
Variations & Adaptations
- Vegetarian Gyoza: Swap ground pork with finely chopped shiitake mushrooms and crumbled firm tofu. Add a splash of soy sauce and a pinch of five-spice powder for a delicious twist.
- Spicy Kick: Mix chili garlic sauce or Sriracha directly into the filling for a fiery version. Serve with extra chili oil on the side.
- Seafood Delight: Use finely chopped shrimp or crab meat in place of pork. Add a little grated ginger and garlic for a fresh, ocean-inspired flavor.
- Cooking Method Swap: Instead of pan-frying, try steaming gyoza for a softer, more delicate texture. Just steam for about 8-10 minutes until cooked through.
- Gluten-Free Option: Use rice paper wrappers or seek out gluten-free gyoza skins. Fillings remain the same but watch your soy sauce choice—tamari is a great gluten-free alternative.
I once tried a cheesy gyoza version (don’t laugh!) by adding a small cube of mozzarella inside each dumpling. It was oddly addictive and fun for a party snack.
Serving & Storage Suggestions
Serve your crispy Japanese gyoza hot, fresh from the pan with that irresistible golden crust facing up. They pair wonderfully with steamed jasmine rice, a light cucumber salad, or miso soup. For drinks, cold green tea or a crisp lager complements the savory flavors beautifully.
If you have leftovers (rare, but possible), store gyoza in an airtight container in the refrigerator for up to 2 days. To reheat, pan-fry them again for a couple of minutes on each side to bring back the crisp, or microwave covered with a damp paper towel for a quicker option (though they lose some crunch).
For longer storage, freeze uncooked gyoza on a tray lined with parchment paper until solid. Transfer to a freezer bag and freeze up to 1 month. Cook from frozen following the same pan-fry and steam method, adding a couple of extra minutes to the cooking time.
Flavors tend to deepen and meld beautifully when the filling rests, so if you can spare the time, let your filling sit in the fridge for 30 minutes before assembling.
Nutritional Information & Benefits
Each serving (about 8 gyoza) contains approximately 250-300 calories, depending on the meat choice. The recipe packs a good amount of protein from the pork and vitamins from the cabbage and green onions. Garlic and ginger not only add fantastic flavor but also support digestion and immunity.
This recipe can be moderately low in carbs if you limit the dipping sauce or choose gluten-free wrappers. It’s naturally low in sugar and can be made healthier by using lean meats or plant-based fillings. Just watch the sodium in soy sauce if you’re monitoring salt intake.
For those with nut allergies, this recipe is safe, as sesame oil is used sparingly and can be omitted or substituted with a neutral oil. Overall, this dish balances comfort and nutrition nicely, making it a guilt-free treat you can feel good about.
Conclusion
This crispy Japanese gyoza recipe is worth trying because it brings together simple ingredients, straightforward techniques, and unbeatable flavor that feels like a warm embrace. I love how easy it is to customize, whether you want to make it vegetarian or spice it up a bit. Honestly, it’s become one of my go-to recipes when I want something tasty without fuss.
Give it a try, make it your own, and don’t forget to tell me how your gyoza turned out! I’d love to hear your favorite variations or any tips you’ve picked up along the way. Happy cooking, and remember—nothing beats that satisfying crunch with a savory, juicy filling!
FAQs About Crispy Japanese Gyoza
1. Can I freeze gyoza before cooking?
Absolutely! Just freeze them on a tray until solid, then transfer to a bag. Cook from frozen by adding a few extra minutes to the pan-fry and steam time.
2. What’s the best way to keep gyoza crispy after cooking?
Serve immediately after frying. If reheating, pan-fry again briefly rather than microwaving to maintain crispness.
3. Can I use store-bought gyoza wrappers?
Yes, many Asian markets sell fresh or frozen wrappers. Just thaw frozen ones before use. Rice paper wrappers can be used for gluten-free versions.
4. How do I prevent gyoza from sticking to the pan?
Use a non-stick pan and enough oil. Also, don’t move the gyoza too soon—wait until the bottoms are nicely browned before flipping or steaming.
5. Can I make gyoza without pork?
Definitely! Ground chicken, shrimp, or a mix of vegetables and tofu all work well. Adjust seasoning to taste for best results.
Pin This Recipe!
Crispy Japanese Gyoza Recipe Easy Pan-Fried Dumplings to Make at Home

This crispy Japanese gyoza recipe features pan-fried dumplings with a savory pork and cabbage filling, delivering a perfect balance of crispy bottoms and tender steamed tops. Easy to make and perfect for any occasion, these gyoza are a family favorite and crowd-pleaser.
- Prep Time: 35 minutes
- Cook Time: 12 minutes
- Total Time: 47 minutes
- Yield: 8 servings (about 8 gyoza per serving) 1x
- Category: Main Course
- Cuisine: Japanese
Ingredients
- 300g (10.5 oz) ground pork (or ground chicken for a lighter option)
- 100g (3.5 oz) finely chopped cabbage (squeeze out excess water for better texture)
- 2 green onions, finely chopped
- 2 cloves garlic, minced
- 1 tablespoon fresh ginger, grated
- 1 tablespoon soy sauce
- 1 teaspoon sesame oil
- 1 teaspoon sugar
- Salt and pepper to taste
- 40 gyoza wrappers (round, thin dumpling skins)
- 2 tablespoons vegetable oil
- 120 ml (½ cup) water
- 3 tablespoons soy sauce (for dipping sauce)
- 1 tablespoon rice vinegar (for dipping sauce)
- ½ teaspoon chili oil or a few chili flakes (optional, for dipping sauce)
Instructions
- Prepare the filling: In a large mixing bowl, combine ground pork, finely chopped cabbage (warmed and squeezed dry), chopped green onions, minced garlic, grated ginger, soy sauce, sesame oil, sugar, salt, and pepper. Mix thoroughly until well combined and slightly sticky. Allow to rest for 10 minutes.
- Set up your workspace: Lay out gyoza wrappers on a clean surface. Keep a small bowl of water nearby for sealing. Have your non-stick frying pan ready with the lid close by.
- Assemble the gyoza: Place one wrapper in your palm. Spoon about 1 tablespoon (15g) of filling into the center. Dip your finger in water and moisten the edge of the wrapper. Fold the wrapper over the filling to create a half-moon shape. Pleat and pinch each pleat to seal tightly. Repeat until all filling is used.
- Cook the gyoza: Heat vegetable oil in the non-stick pan over medium-high heat. Place dumplings flat side down, spacing them apart. Fry for 2-3 minutes until bottoms are golden brown and crispy.
- Steam the gyoza: Pour water into the pan carefully and immediately cover with a lid. Cook for 5-6 minutes until water evaporates and wrappers become translucent and tender.
- Finish crisping: Remove lid and cook for another 1-2 minutes until bottoms regain crispness. Transfer to a serving plate.
- Make the dipping sauce: Mix soy sauce, rice vinegar, and optional chili oil in a small bowl. Serve alongside the gyoza.
Notes
Squeeze excess moisture from cabbage to avoid soggy filling. Use a lid with a tight seal for steaming. Do not overcrowd the pan to ensure even cooking and crispiness. For gluten-free, substitute wrappers with rice paper or gluten-free dumpling skins. Filling can rest in fridge for 30 minutes to deepen flavors. Reheat by pan-frying to maintain crispness.
Nutrition
- Serving Size: About 8 gyoza per se
- Calories: 275
- Sugar: 2
- Sodium: 600
- Fat: 15
- Saturated Fat: 4
- Carbohydrates: 18
- Fiber: 2
- Protein: 14
Keywords: gyoza, Japanese dumplings, pan-fried dumplings, crispy gyoza, easy gyoza recipe, homemade dumplings, Asian appetizer