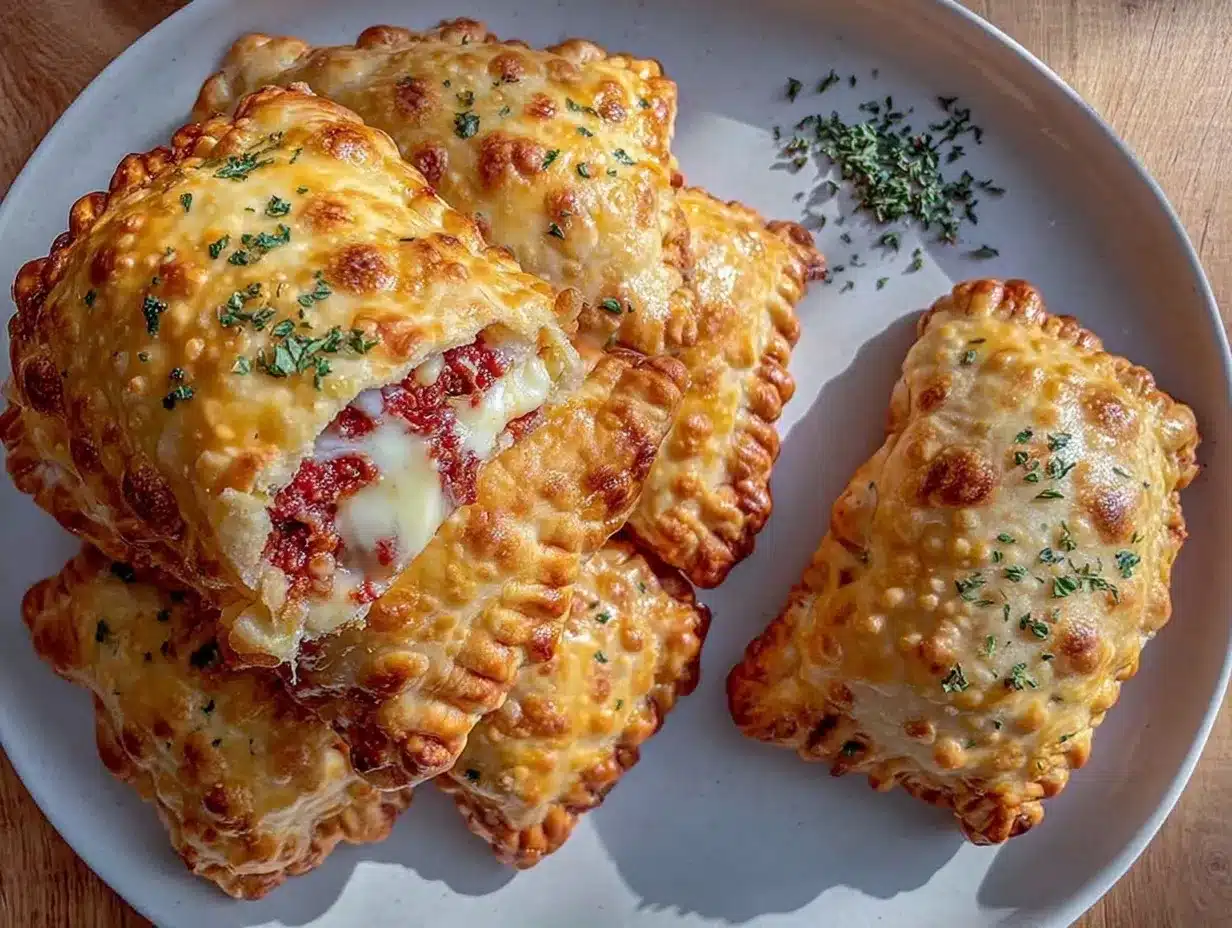
Let me tell you, the scent of melted mozzarella mingling with tangy tomato sauce and a hint of oregano wafting from my oven is enough to make anyone’s mouth water. The first time I baked these easy crispy homemade pizza rolls, I was instantly hooked—the kind of moment where you pause, take a deep breath, and just smile because you know you’re onto something truly special. It all started years ago when I was knee-high to a grasshopper, watching my grandma roll out dough in her cozy kitchen. I wanted to recreate that nostalgic comfort food but in a form that’s perfect for lunch boxes. Honestly, these pizza rolls are dangerously easy to make and offer pure, nostalgic comfort in every bite.
My family couldn’t stop sneaking them off the cooling rack (and I can’t really blame them). You know what? They’re perfect for potlucks, a sweet treat for your kids’ school lunches, or just brightening up your Pinterest cookie board with something savory and fun. After testing this recipe multiple times (in the name of research, of course), it’s become a staple for family gatherings and gifting. It feels like a warm hug, and trust me, you’re going to want to bookmark this one.
Why You’ll Love This Recipe
This easy crispy homemade pizza rolls recipe is a keeper, and here’s why:
- Quick & Easy: Comes together in under 30 minutes, perfect for busy weeknights or last-minute lunchbox ideas.
- Simple Ingredients: No fancy grocery trips needed; you likely have everything in your kitchen already.
- Perfect for Lunch Boxes: Portable, mess-free, and loved by kids and adults alike.
- Crowd-Pleaser: Always gets rave reviews at parties and family get-togethers.
- Unbelievably Delicious: Crispy on the outside, gooey cheese and savory filling inside—a combo that’s pure comfort food.
What sets this recipe apart? It’s the crispy outer shell paired with a perfectly balanced seasoning inside, not too salty and not bland—just right. Plus, I’ve found that using a blend of mozzarella and a little parmesan gives it that extra flavor punch. It’s not just another pizza roll recipe; it’s your best version, tested and loved. Honestly, after the first bite, you might just close your eyes and savor the moment. This recipe turns a simple lunch into something memorable, without the stress.
What Ingredients You Will Need
This recipe uses simple, wholesome ingredients to deliver bold flavor and satisfying texture without the fuss. Most are pantry staples, and substitutions are easy if needed.
- Pizza Dough: 1 package (about 13.8 oz / 390 g) store-bought or homemade dough (I recommend Bob’s Red Mill for texture)
- Tomato Sauce: 1/2 cup (120 ml), preferably a smooth pizza sauce or marinara (homemade or store-bought works)
- Mozzarella Cheese: 1 cup (120 g), shredded (whole milk mozzarella melts best)
- Parmesan Cheese: 1/4 cup (25 g), finely grated (adds a savory sharpness)
- Pepperoni Slices: 1/2 cup (about 25 slices), chopped (optional, but classic and kid-approved)
- Dried Oregano: 1 tsp (adds authentic Italian flavor)
- Garlic Powder: 1/2 tsp (for subtle depth)
- Olive Oil: 1 tbsp (for brushing the rolls, adds crispiness)
- All-Purpose Flour: For dusting the surface when rolling out the dough
Substitution tips: Use dairy-free cheese if needed for allergies, or swap pepperoni for cooked sausage or veggies for a vegetarian twist. For gluten-free, almond or cauliflower dough works but may alter texture slightly.
Equipment Needed
- Baking Sheet: A rimmed sheet works best to keep everything contained.
- Parchment Paper or Silicone Baking Mat: Prevents sticking and makes cleanup a breeze.
- Rolling Pin: Helps roll out dough evenly; a wine bottle can substitute if you’re in a pinch.
- Sharp Knife or Pizza Cutter: For slicing rolls evenly.
- Mixing Bowl: To toss ingredients together if making your own dough or sauce mix.
If you’re on a budget, a basic rolling pin and a sturdy baking sheet from any store will do just fine. I’ve tried fancy silicone mats, but honestly, parchment paper gives just as good a result and is less to clean. Keeping your knife sharp makes slicing the rolls a lot safer and cleaner.
Preparation Method
- Preheat your oven: Set it to 400°F (200°C) and line a baking sheet with parchment paper. This usually takes about 10 minutes.
- Prepare the dough: Lightly flour your work surface and roll out the pizza dough into a rectangle about 12 x 8 inches (30 x 20 cm). It should be about 1/8 inch (3 mm) thick. If the dough resists rolling, let it rest for 5 minutes to relax the gluten.
- Spread the sauce: Using the back of a spoon, spread the tomato sauce evenly over the dough, leaving about a 1/2 inch (1.25 cm) border around the edges. This helps prevent leaks when rolling.
- Add the fillings: Sprinkle shredded mozzarella and parmesan evenly over the sauce. Scatter the chopped pepperoni slices on top. Then, sprinkle with dried oregano and garlic powder for that perfect flavor punch.
- Roll it up: Starting at the longer edge, gently roll the dough into a tight log. Pinch the seam to seal it well so the rolls don’t unravel during baking.
- Slice the rolls: Using a sharp knife or pizza cutter, slice the log into 12 equal rolls—each about 1 inch (2.5 cm) thick. Try to keep them uniform so they bake evenly.
- Arrange and brush: Place the rolls cut-side up on the baking sheet, leaving a little space between each. Brush the tops lightly with olive oil to get that crispy, golden finish.
- Bake: Pop the rolls in the preheated oven for 15-18 minutes, or until golden brown and the cheese is bubbling inside. Keep an eye on them around 15 minutes to avoid overbaking.
- Cool slightly: Remove from the oven and let cool on the baking sheet for 5 minutes before transferring to a wire rack. This helps keep the bottoms crispy and prevents sogginess.
- Serve or pack: These pizza rolls are perfect warm but also taste great at room temperature—ideal for lunch boxes!
Pro tip: If the dough seems sticky at any point, dust it lightly with flour but avoid over-flouring to keep it tender. And if you’re short on time, prepping the rolls ahead and refrigerating them before baking works well too.
Cooking Tips & Techniques
Getting those pizza rolls crispy and flavorful isn’t rocket science, but there are a few tricks I’ve picked up along the way. First, don’t skip brushing the tops with olive oil; it’s the secret to that golden, crispy crust you crave. You know, sometimes I’ve baked these without oil—big mistake! The texture just isn’t the same.
Rolling the dough evenly is key. If your dough is too thick, the rolls can be doughy inside; too thin and they dry out. Aim for that nice 1/8 inch thickness, and use a rolling pin with gentle pressure. Let the dough rest if it springs back too much. Also, sealing the seam tightly keeps all that delicious filling from escaping during baking.
Another common hiccup is uneven baking. To avoid this, arrange the rolls with enough space to let heat circulate. If your oven tends to run hot, rotate the tray halfway through baking. And listen—don’t overbake! That burnt edge taste is no one’s friend.
When multitasking, I usually prepare the dough and fillings while the oven preheats. Then, slice and bake right away. This way, everything stays fresh and the cheese melts perfectly.
Variations & Adaptations
These pizza rolls are super adaptable, so feel free to make them your own!
- Vegetarian Version: Skip the pepperoni and add sautéed mushrooms, bell peppers, or olives instead. I once tried spinach and feta—deliciously different!
- Gluten-Free Option: Use a gluten-free pizza dough mix or make your own cauliflower crust dough. Keep in mind texture will be slightly different but still tasty.
- Spicy Twist: Add red pepper flakes to the sauce or mix in some chopped jalapeños with the cheese for a little kick.
- Cheese Variations: Swap mozzarella with provolone or add a handful of shredded cheddar for sharper flavor.
- Cooking Methods: These roll well in an air fryer for a crispier finish in less time (about 10-12 minutes at 375°F / 190°C). Or bake on a pizza stone if you want an extra-crispy bottom.
Serving & Storage Suggestions
These pizza rolls are best served warm, fresh from the oven, but honestly, they hold up great at room temperature too—perfect for lunch boxes. Present them on a colorful plate garnished with fresh basil leaves or a sprinkle of parmesan for a simple but inviting look. Pair with a crisp side salad or some crunchy carrot sticks to round out the meal.
To store, place leftover rolls in an airtight container in the refrigerator for up to 3 days. For longer storage, freeze them individually wrapped in plastic wrap and then foil for up to 2 months. When ready to enjoy, reheat frozen rolls in a preheated oven at 375°F (190°C) for about 10 minutes until warmed through and crispy again.
Flavors actually deepen after a day, so if you can resist, letting them sit overnight in the fridge makes the tomato sauce and herbs meld beautifully.
Nutritional Information & Benefits
Each pizza roll contains approximately 150-180 calories, depending on the exact size and ingredients used. They provide a good source of protein from the cheese and pepperoni, plus calcium for bone health. The tomato sauce adds lycopene, an antioxidant that’s great for heart health.
This recipe can easily fit into a balanced diet. You can make it lower-carb by using cauliflower crust dough or dairy-free by switching cheeses. Just a heads up—these do contain gluten and dairy unless you adapt accordingly. Personally, I appreciate that these rolls satisfy my comfort food cravings without feeling overly heavy or greasy.
Conclusion
If you’re looking for an easy, crispy homemade pizza rolls recipe perfect for lunch boxes, this one’s a winner. It’s quick, uses simple ingredients, and brings that perfect balance of crispy outside and melty cheesy inside. I love how versatile it is—you can customize it however you like, and it never disappoints.
Honestly, this recipe has become a favorite in my house, and I hope it will be in yours too. Why not give it a try and let me know how yours turn out? Share your tweaks, your favorite fillings, or even your creative twists—I love hearing from you. Go ahead and make some memories with these pizza rolls. You won’t regret it!
Frequently Asked Questions
Can I make pizza rolls ahead of time?
Absolutely! You can assemble them, refrigerate for a few hours, and bake just before serving. Freezing before baking also works great for meal prep.
How do I keep pizza rolls from getting soggy?
Brushing olive oil on top before baking and making sure not to overfill the rolls helps keep them crispy. Also, avoid stacking them when cooling.
Can I use homemade pizza dough?
Yes, homemade dough works wonderfully. Just make sure it’s well rested and rolled evenly for best results.
What’s the best cheese for pizza rolls?
Mozzarella is classic for meltiness, but mixing in parmesan or provolone adds great flavor and texture.
Are these pizza rolls kid-friendly?
Definitely! Kids love the gooey cheese and familiar flavors. You can customize fillings to suit their tastes.
Pin This Recipe!

Easy Crispy Homemade Pizza Rolls Recipe Perfect for Lunch Boxes

These easy crispy homemade pizza rolls are quick to make, perfect for lunch boxes, and loved by kids and adults alike. Crispy on the outside with gooey cheese and savory filling inside, they offer nostalgic comfort in every bite.
- Prep Time: 10 minutes
- Cook Time: 15-18 minutes
- Total Time: 25-28 minutes
- Yield: 12 rolls 1x
- Category: Snack
- Cuisine: Italian-American
Ingredients
- 1 package (about 13.8 oz / 390 g) store-bought or homemade pizza dough
- 1/2 cup (120 ml) tomato sauce, preferably smooth pizza sauce or marinara
- 1 cup (120 g) shredded mozzarella cheese (whole milk recommended)
- 1/4 cup (25 g) finely grated parmesan cheese
- 1/2 cup (about 25 slices) chopped pepperoni slices (optional)
- 1 tsp dried oregano
- 1/2 tsp garlic powder
- 1 tbsp olive oil (for brushing)
- All-purpose flour (for dusting surface when rolling out dough)
Instructions
- Preheat your oven to 400°F (200°C) and line a baking sheet with parchment paper.
- Lightly flour your work surface and roll out the pizza dough into a 12 x 8 inch (30 x 20 cm) rectangle about 1/8 inch (3 mm) thick. Let rest 5 minutes if dough resists rolling.
- Spread the tomato sauce evenly over the dough, leaving a 1/2 inch (1.25 cm) border around the edges.
- Sprinkle shredded mozzarella and parmesan evenly over the sauce. Scatter chopped pepperoni slices on top. Sprinkle with dried oregano and garlic powder.
- Starting at the longer edge, roll the dough into a tight log and pinch the seam to seal.
- Slice the log into 12 equal rolls about 1 inch (2.5 cm) thick using a sharp knife or pizza cutter.
- Place rolls cut-side up on the baking sheet with space between each. Brush tops lightly with olive oil.
- Bake for 15-18 minutes until golden brown and cheese is bubbling. Watch closely around 15 minutes to avoid overbaking.
- Remove from oven and let cool on the baking sheet for 5 minutes before transferring to a wire rack.
- Serve warm or at room temperature, perfect for lunch boxes.
Notes
Brush tops with olive oil for a crispy golden crust. Let dough rest if it resists rolling. Arrange rolls with space to ensure even baking. Can prepare ahead and refrigerate before baking. For gluten-free, use almond or cauliflower dough. For vegetarian, omit pepperoni and add vegetables.
Nutrition
- Serving Size: 1 pizza roll
- Calories: 150180
- Sugar: 2
- Sodium: 350
- Fat: 8
- Saturated Fat: 3.5
- Carbohydrates: 15
- Fiber: 1
- Protein: 7
Keywords: pizza rolls, homemade pizza rolls, lunch box recipe, crispy pizza rolls, easy pizza snack, kid-friendly pizza