Let me tell you, the sight of colorful little compartments filled with crunchy crackers, savory meats, and melty cheese slices is enough to make any kid’s eyes light up like it’s Christmas morning. The first time I put together these Easy DIY Lunchables Snack Packs, I was instantly hooked. I mean, there’s something about building your own mini meal that feels like a tiny celebration – the kind of moment where you pause, take a deep breath, and just smile because you know you’re onto something truly special.
Years ago, when I was knee-high to a grasshopper, my grandma would make these fun snack boxes filled with all sorts of goodies for family picnics. It wasn’t until last summer, on a rainy weekend when the kids were bored out of their minds, that I decided to recreate that nostalgia for my own little tribe. Honestly, I wish I’d discovered this easy DIY Lunchables snack pack recipe years ago because it’s dangerously easy and brings pure, nostalgic comfort to our afternoons.
My family couldn’t stop sneaking bites off the trays while I was still assembling them (and I can’t really blame them). It’s perfect for everything from school lunches to spontaneous picnics or even as a sweet treat for your kids after a long day. You know what’s great? These snack packs brighten up your Pinterest cookie board with their colorful charm and simplicity. After testing this recipe multiple times in the name of research, of course, it’s become a staple for family gatherings, gifting, and just everyday fun. Trust me, this recipe feels like a warm hug you’re going to want to bookmark.
Why You’ll Love This Recipe
Honestly, there’s just something about these Easy DIY Lunchables Snack Packs that makes snack time feel effortless and exciting. I’ve tried plenty of variations, and here’s why this one stands out:
- Quick & Easy: Comes together in under 15 minutes, perfect for busy weeknights or last-minute cravings.
- Simple Ingredients: No fancy grocery trips needed; you likely already have everything in your kitchen.
- Perfect for Kids’ Lunches: Great for school, playdates, or cozy afternoons at home.
- Crowd-Pleaser: Always gets rave reviews from kids and adults alike — they can’t get enough!
- Unbelievably Delicious: The combo of crunchy, creamy, and savory is next-level comfort food.
What makes this recipe different from the rest? It’s the little touches that count — like layering your cheese just right so it melts perfectly if warmed, or choosing the best quality crackers that stay crisp. I even blend in some fun dips and fresh fruits to keep things exciting. This isn’t just another version of a snack pack; it’s my best version, tested and kid-approved.
It’s not just good—it’s the kind of snack that makes you close your eyes after the first bite and smile. It’s comfort food reimagined—healthier, faster, but with the same soul-soothing satisfaction. If you want to impress guests without the stress or just turn a simple snack into something memorable, this recipe is your new go-to.
What Ingredients You Will Need
This recipe uses simple, wholesome ingredients to deliver bold flavor and satisfying texture without the fuss. Most of these are pantry staples or easy to grab from your local store, making your snack pack assembly a breeze.
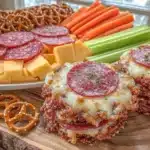
- Crackers: Choose your favorite variety — buttery, whole grain, or gluten-free options. I personally recommend Carr’s Table Water Crackers for the best texture.
- Cheese Slices: Sharp cheddar, mozzarella, or Colby jack — sliced thin for easy stacking. Use dairy-free cheese if needed.
- Deli Meats: Turkey, ham, or roast beef — thinly sliced. Opt for nitrate-free options when possible.
- Fresh Veggies: Cherry tomatoes, cucumber slices, or baby carrots add crunch and color.
- Fruit: Grapes, apple slices (tossed in lemon juice to prevent browning), or berries for a sweet touch.
- Dips and Spreads: Hummus, ranch dressing, or honey mustard for dipping or spreading on crackers.
- Extras: Small pickles, olives, or nuts (check for allergies) to add variety.
If you want to swap things up seasonally, in summer, fresh berries or watermelon chunks make a fantastic swap for heavier fruits. For a gluten-free option, almond or rice crackers work beautifully. And if you’re serving picky eaters, stick to milder cheeses and simple meats to keep them happy.
Equipment Needed
- Snack Containers or Bento Boxes: Compartments help keep everything neat and separated — I like using reusable plastic or glass boxes with dividers.
- Sharp Knife: For slicing cheese and meats thinly; a serrated knife helps with fruits.
- Cutting Board: Preferably one dedicated to veggies to avoid cross-contamination.
- Small Bowls or Ramekins: Perfect for dips or smaller items like olives and pickles.
- Measuring Cups or Spoons: Useful if you want to portion dips or spreads precisely.
If you don’t have fancy snack containers, no worries — small reusable silicone bags or even muffin tins work in a pinch. I’ve found that keeping knives sharp makes prep quicker and safer, so a good-quality knife is worth the investment. Budget-wise, you can find decent bento boxes online for less than $15, which makes snack time way more fun and organized.
Preparation Method
- Gather and Prep Ingredients (10 minutes): Start by washing fresh fruits and veggies thoroughly. Slice cucumbers and apples into thin rounds or wedges; toss apples in a little lemon juice to keep them from browning.
- Slice Cheese and Meat (5 minutes): Using a sharp knife, slice your cheese and deli meats thinly. Aim for bite-sized pieces that fit nicely on crackers. If you want to get fancy, cut some cheese into fun shapes with small cookie cutters — kids love that!
- Arrange Crackers (2 minutes): Lay out your crackers in one compartment or section of your snack container. Make sure they’re not overcrowded to avoid breakage.
- Assemble Meat and Cheese (5 minutes): Neatly place slices of meat and cheese in separate compartments. Layering cheese under meat can prevent the crackers from getting soggy later.
- Add Fruits and Veggies (3 minutes): Fill another compartment with fresh fruits and veggies. Mixing colors keeps it visually appealing and more inviting for kids.
- Include Dips or Spreads (2 minutes): Spoon your chosen dips into small containers or ramekins. Place them securely so they don’t spill during transport.
- Extras and Final Touches (2 minutes): Add nuts, olives, or pickles to small sections for variety. Double-check everything fits snugly to avoid shifting in lunchboxes.
Pro tip: Pack the snack packs fresh the morning you intend to serve them for the best taste and texture. If you need to prep in advance, store components separately and assemble just before serving. Watch out for soggy crackers — layering cheese between meat and crackers helps a lot!
Cooking Tips & Techniques
Honestly, the trick to these DIY Lunchables snack packs is keeping it fresh and fun. Here are some tips I’ve picked up over countless snack pack preps:
- Keep Ingredients Cool: Deli meats and cheeses stay safest and freshest when kept chilled until packing time.
- Choose the Right Crackers: Thicker crackers hold up better against spreads and dips. Avoid overly thin or flaky ones unless they’ll be eaten immediately.
- Slice Ingredients Uniformly: Thin, even slices help with layering and make the snack easier to eat.
- Prevent Sogginess: If adding spreads, place them in separate containers rather than directly on crackers.
- Personalize Portions: Adjust amounts based on your child’s appetite to avoid waste.
One time, I tried packing everything the night before, and the crackers turned soggy by lunchtime — lesson learned! Now, I prep all ingredients ahead but assemble the packs fresh. Also, multitasking helps; while your fruit is washing, you can slice cheese and meats to speed things up.
Variations & Adaptations
This recipe is super flexible, so you can tailor it to your family’s tastes and dietary needs. Here are some of my favorite variations:
- Vegetarian Version: Swap deli meats for plant-based slices or add hummus and extra cheese varieties.
- Gluten-Free Option: Use gluten-free crackers or rice cakes as a base.
- Seasonal Fruits & Veggies: Swap in fresh mango, strawberries, or snap peas depending on the season.
- Spicy Twist: Add a little sriracha mayo or pickled jalapeños for a kick.
- Mini Sandwich Style: Instead of crackers and separate slices, make tiny sandwiches with meat and cheese stacked on mini rolls.
Personally, I’ve tried adding a little cream cheese spread under smoked salmon for a fancy snack pack treat that my kids surprisingly loved. Feel free to get creative — the sky’s the limit with this easy DIY lunchable snack pack recipe!
Serving & Storage Suggestions
These snack packs are best served chilled or at room temperature. If you want to impress, arrange the packs with colorful napkins or fun picks to make snack time feel special. Pair them with a cold glass of milk, a smoothie, or a small juice box for a complete mini meal.
For storage, keep the packs in the refrigerator for up to 24 hours. If you need to prep ahead, store crackers separately in an airtight container to maintain crunch, then add just before serving. Leftovers can be wrapped tightly and refrigerated, but some ingredients like fresh fruits are best eaten fresh.
To reheat cheese or meat slices slightly, pop them in the microwave for 10-15 seconds — just enough to bring out the flavors without melting everything. Keep in mind, the flavors often develop nicely if you let the snack pack sit for a bit, but crackers may lose some crunch over time.
Nutritional Information & Benefits
Each Easy DIY Lunchables Snack Pack provides a balanced mix of protein, healthy fats, and carbohydrates, making it a smart snack choice to keep kids energized. Typical nutrition per serving (one snack pack) is approximately 300-350 calories, with about 15 grams of protein and 8-12 grams of fat, depending on your ingredient choices.
Key benefits include calcium from cheese for strong bones, lean protein from deli meats for muscle repair, and fiber from fresh fruits and veggies to aid digestion. This snack pack can easily be adjusted to be gluten-free, low-carb, or dairy-free by swapping ingredients.
As someone who’s mindful of my family’s wellness, I love that these snack packs are wholesome and fun — a true win-win for picky eaters and health-conscious parents alike.
Conclusion
This Easy DIY Lunchables Snack Pack recipe is a total game-changer for anyone looking to add a dash of homemade fun to snack time. It’s quick, customizable, and downright delicious, perfect for kids and adults who appreciate a little hands-on meal building. Honestly, I love how it brings back those childhood memories while fitting perfectly into our modern busy lives.
Feel free to tweak the ingredients and portion sizes to suit your family’s tastes and dietary needs — that’s the beauty of this recipe! If you give it a try, I’d love to hear how you customize your packs or any creative additions you come up with.
Go ahead, try these snack packs out, share this recipe with friends, and leave a comment below telling me your favorite combos. Remember, homemade snacks don’t have to be complicated to be memorable. Happy packing!
FAQs
Can I make these snack packs ahead of time?
Yes, but it’s best to prepare ingredients ahead and assemble the packs fresh to keep crackers crisp and fruits fresh.
Are these snack packs suitable for toddlers?
Absolutely, just cut items into smaller, bite-sized pieces to prevent choking hazards.
How long will the snack packs stay fresh?
Stored properly in the fridge, they’re good for up to 24 hours, but crackers are best if added last minute.
What are good dairy-free cheese alternatives?
Look for plant-based cheese slices made from nuts or soy, available in most grocery stores.
Can I freeze any parts of the snack packs?
It’s not recommended to freeze assembled snack packs, but you can freeze meats or breads separately and thaw before use.
Pin This Recipe!
Easy DIY Lunchables Snack Packs Recipe for Homemade Kids Snacks
A quick and customizable snack pack recipe featuring crackers, deli meats, cheese, fresh fruits, veggies, and dips, perfect for kids’ lunches, picnics, or anytime snacks.
- Prep Time: 15 minutes
- Cook Time: 0 minutes
- Total Time: 15 minutes
- Yield: 1 snack pack (adjustable)
- Category: Snack
- Cuisine: American
Ingredients
- Crackers (buttery, whole grain, or gluten-free options like Carr’s Table Water Crackers)
- Cheese slices (sharp cheddar, mozzarella, or Colby jack, thinly sliced; dairy-free cheese optional)
- Deli meats (turkey, ham, or roast beef, thinly sliced; nitrate-free preferred)
- Fresh veggies (cherry tomatoes, cucumber slices, baby carrots)
- Fruit (grapes, apple slices tossed in lemon juice, berries)
- Dips and spreads (hummus, ranch dressing, honey mustard)
- Extras (small pickles, olives, nuts – check for allergies)
Instructions
- Gather and wash fresh fruits and veggies thoroughly. Slice cucumbers and apples into thin rounds or wedges; toss apples in lemon juice to prevent browning.
- Using a sharp knife, slice cheese and deli meats thinly into bite-sized pieces. Optionally, cut cheese into fun shapes with cookie cutters.
- Arrange crackers in one compartment of your snack container without overcrowding.
- Place slices of meat and cheese in separate compartments, layering cheese under meat to prevent sogginess.
- Fill another compartment with fresh fruits and veggies, mixing colors for visual appeal.
- Spoon chosen dips into small containers or ramekins and place securely.
- Add extras like nuts, olives, or pickles to small sections. Ensure everything fits snugly to avoid shifting.
Notes
Pack snack packs fresh the morning of serving for best taste and texture. Store components separately if prepping ahead to avoid soggy crackers. Layer cheese under meat to keep crackers crisp. Keep deli meats and cheeses chilled until packing. Adjust portions based on appetite to reduce waste.
Nutrition
- Serving Size: One snack pack
- Calories: 300350
- Sugar: 36
- Sodium: 400600
- Fat: 812
- Carbohydrates: 2030
- Fiber: 24
- Protein: 15
Keywords: DIY Lunchables, kids snacks, homemade snack packs, easy snacks, lunchbox ideas, healthy snacks, gluten-free snacks, vegetarian options