Let me tell you, the scent of fresh strawberries mingling with warm buttery crumble straight from the oven is enough to make anyone’s mouth water. The first time I baked these Easy Irresistible Strawberry Crumble Bars, I was instantly hooked—the kind of moment where you pause, take a deep breath, and just smile because you know you’re onto something truly special. It all started years ago on a rainy weekend when I was knee-high to a grasshopper, helping my grandma in her cozy kitchen. Those memories of her soft hands kneading dough and the sweet aroma filling the house have stayed with me ever since.
Honestly, these strawberry crumble bars bring back that pure, nostalgic comfort with every bite. My family couldn’t stop sneaking them off the cooling rack (and I can’t really blame them). Whether you’re looking for a sweet treat to brighten up your Pinterest cookie board, a perfect snack for summer afternoons, or a crowd-pleaser for potlucks, these bars fit the bill. Dangerously easy to make and packed with juicy strawberry goodness, this recipe has become a staple for family gatherings and gifting in my circle. You’re going to want to bookmark this one, trust me.
Why You’ll Love This Recipe
Having tested and retested this recipe in the name of research, of course, I’m confident this is one strawberry crumble bar recipe that stands out from the rest. Here’s why you’ll keep coming back to it:
- Quick & Easy: Comes together in under 45 minutes, perfect for busy weeknights or last-minute cravings.
- Simple Ingredients: No fancy grocery trips needed; you likely already have everything in your kitchen.
- Perfect for Summer Snacks: Juicy strawberries and buttery crumble make it an ideal treat for warm days.
- Crowd-Pleaser: Always gets rave reviews from kids and adults alike, perfect for potlucks and backyard barbecues.
- Unbelievably Delicious: The texture and flavor combo is next-level comfort food—sweet, tart, and crumbly all at once.
What sets this recipe apart? It’s all in the perfectly balanced crumble topping—crispy yet tender—and the generous layer of fresh strawberry filling that isn’t overly sweet but just right. Plus, the crust has a lovely buttery snap that holds everything together without being too dense. This isn’t just another strawberry bar; it’s the best version you’ll find, tested by my family’s very picky sweet tooth. The first bite? You might just close your eyes and savor that pure summer joy.
What Ingredients You Will Need
This recipe uses simple, wholesome ingredients to deliver bold flavor and satisfying texture without the fuss. Most are pantry staples, and the star here is, of course, fresh strawberries—though frozen works in a pinch.
- For the Crust and Crumble:
- All-purpose flour – 2 ½ cups (312g), for that perfect tender base and crunchy topping
- Granulated sugar – ¾ cup (150g), adds sweetness and helps with crispness
- Brown sugar – ½ cup (100g), for a subtle molasses flavor in the crumble
- Unsalted butter – 1 cup (227g), cold and cubed (I recommend Kerrygold for rich flavor)
- Baking powder – 1 teaspoon, to give the crust a slight lift
- Salt – ½ teaspoon, to balance sweetness
- For the Strawberry Filling:
- Fresh strawberries – 4 cups (about 600g), hulled and sliced (in summer, swap in fresh berries for best flavor)
- Granulated sugar – ⅓ cup (67g), to sweeten the fruit
- Cornstarch – 2 tablespoons, to thicken the juicy filling
- Lemon juice – 1 tablespoon, brightens up the strawberries
- Vanilla extract – 1 teaspoon, adds warmth and depth
If you want gluten-free bars, swap the all-purpose flour for almond flour or a gluten-free flour blend. For dairy-free options, use coconut oil or vegan butter instead of unsalted butter. Frozen strawberries can be used if fresh aren’t in season, though the texture will be slightly softer.
Equipment Needed
- 9×13 inch (23×33 cm) baking pan – essential for the right thickness of bars; a glass or metal pan works fine
- Mixing bowls – at least two, one for the crumble and one for the filling
- Pastry cutter or fork – handy for cutting cold butter into flour (a food processor speeds this up, but isn’t necessary)
- Measuring cups and spoons – for accurate ingredient amounts
- Spatula or wooden spoon – to mix the strawberry filling gently
- Cooling rack – lets the bars cool evenly without sogginess
Personally, I’ve used both a pastry cutter and my hands to mix the crumble; hands are messier but you get a better feel for the texture. A food processor can make the crumble topping super quick but be careful not to over-process or you’ll lose that crumbly texture.
Preparation Method
- Preheat the oven to 350°F (175°C). Line your 9×13 inch baking pan with parchment paper, leaving an overhang for easy removal later. This step prevents sticking and makes clean-up a breeze. (5 minutes)
- Make the crumble base: In a large bowl, whisk together 2 ½ cups (312g) all-purpose flour, ¾ cup (150g) granulated sugar, ½ cup (100g) brown sugar, 1 teaspoon baking powder, and ½ teaspoon salt. Add 1 cup (227g) cold, cubed unsalted butter.
- Cut the butter into the dry ingredients using a pastry cutter or your fingertips until the mixture resembles coarse crumbs with some pea-sized bits. The texture is key here—too fine and the bars get dense; too chunky and they won’t hold together well. (7-10 minutes)
- Press about two-thirds of the crumble mixture firmly into the prepared pan to form the crust. Use the bottom of a glass or your fingers to get an even layer. Bake for 15 minutes or until lightly golden. This pre-baking helps the crust set so it won’t get soggy later. (15 minutes)
- Prepare the strawberry filling: While the crust bakes, combine 4 cups (600g) sliced fresh strawberries, ⅓ cup (67g) granulated sugar, 2 tablespoons cornstarch, 1 tablespoon lemon juice, and 1 teaspoon vanilla extract in a bowl. Mix gently to coat all the fruit evenly. The cornstarch thicken the juices as it bakes, so don’t skip this step.
- Remove the crust from the oven and evenly spread the strawberry filling over it. Don’t worry if it looks juicy—that’s a good thing! Now crumble the remaining third of the crumble mixture over the top, covering the filling. (5 minutes)
- Bake again for 35-40 minutes, or until the topping is golden brown and the strawberry filling is bubbling around the edges. (35-40 minutes)
- Cool completely in the pan on a wire rack. This step is crucial—cutting too soon will cause the filling to spill out. Once cooled, use the parchment overhang to lift the bars out and cut into squares. (1-2 hours)
Pro tip: If your crumble topping browns too fast, loosely tent the pan with foil halfway through baking. Also, let the bars sit overnight for even better flavor melding (if you can wait that long!).
Cooking Tips & Techniques
- Keep butter cold: Cold butter is the secret to flaky, crumbly texture. If it melts too soon, your topping turns greasy instead of crisp.
- Don’t overmix the crumble: Mix just until you see pea-sized bits. Overworking develops gluten and toughens the crust.
- Use fresh, ripe strawberries: They provide the best natural sweetness and texture. If berries are too tart, add a bit more sugar but be cautious.
- Thicken that filling: Cornstarch is your friend here. Without it, the strawberry juice can run and make cutting messy.
- Watch your oven temperature: Every oven is different, so keep an eye on the bars in the last 10 minutes to avoid burning the topping.
- Multitask smartly: While the crust bakes, prep your filling to save time. Efficiency is key when you’re hungry for a sweet snack!
I once forgot to pre-bake the crust and ended up with soggy bars—lesson learned the hard way! Also, letting the bars cool fully has saved me many crumbly messes when slicing. Trust the process; it’s worth the wait.
Variations & Adaptations
- Berry Mix-Up: Swap half the strawberries for blueberries or raspberries for a mixed berry crumble bar.
- Gluten-Free Version: Use almond flour or a store-bought gluten-free blend instead of all-purpose flour. The texture will be a bit different but still delicious.
- Vegan Adaptation: Replace butter with coconut oil or vegan butter sticks. Use maple syrup in place of sugar for a natural sweetener twist.
- Spiced Twist: Add ½ teaspoon cinnamon or a pinch of nutmeg to the crumble for a warm, cozy flavor.
- Nutty Crunch: Stir in ½ cup chopped walnuts or pecans into the crumble topping for extra texture and flavor.
Personally, I tried making these with a gluten-free almond flour crust once, and while the texture was a touch more crumbly, the flavor was just as irresistible. It’s a great way to enjoy the bars if you’re avoiding gluten. For a less sweet version, reduce the sugar in the filling by a tablespoon or two.
Serving & Storage Suggestions
These strawberry crumble bars are best served at room temperature or slightly chilled, letting the flavors shine through without being too mushy or cold. They pair beautifully with a scoop of vanilla ice cream or a dollop of whipped cream on the side for an extra-special treat.
For storage, keep bars in an airtight container in the refrigerator for up to 4 days. They also freeze wonderfully—wrap bars individually in plastic wrap, then place in a freezer-safe container for up to 3 months. To enjoy, thaw overnight in the fridge and warm briefly in the oven or microwave.
Interestingly, the flavors deepen after a day or two as the filling settles and the crumble softens just enough to be perfectly tender. So, if you can wait, these bars get even better with time.
Nutritional Information & Benefits
Each serving of these strawberry crumble bars (about 2-inch square) contains roughly:
| Calories | 220 |
|---|---|
| Fat | 11g |
| Carbohydrates | 30g |
| Protein | 2g |
| Fiber | 2g |
Strawberries are packed with vitamin C and antioxidants, supporting immune health and glowing skin. Using fresh fruit rather than jams cuts down on added sugars and preservatives. While these bars aren’t low-calorie, they make a wholesome indulgence with real fruit and no artificial ingredients.
For dietary needs, this recipe can be adapted for gluten-free and vegan diets as mentioned. Be mindful of nut allergies if adding nuts to the crumble.
Conclusion
These Easy Irresistible Strawberry Crumble Bars are more than just a sweet snack—they’re a bite of summer happiness you can make any time of year. With a tender buttery crust, luscious strawberry filling, and that crisp crumble topping, it’s a recipe that’s as simple as it is satisfying. You can tweak it to fit your mood or dietary needs, but honestly, I love it just as is.
Give this recipe a try and make it your own—swap berries, play with spices, or add nuts to suit your taste. I’d love to hear how you customize it, so please drop a comment or share your photos! These bars have brought so much joy to my family’s table, and I know they’ll do the same for yours. Happy baking, and here’s to sweet summer moments (or anytime really) with strawberry crumble bars that never disappoint.
FAQs
Can I use frozen strawberries for these crumble bars?
Yes, frozen strawberries work in a pinch. Just thaw and drain excess juice before mixing to avoid soggy bars.
How do I prevent the crumble topping from burning?
If the topping browns too quickly, loosely cover the bars with foil halfway through baking to protect it.
Can I make these bars ahead of time?
Absolutely! They taste great the next day and can be stored in the fridge for up to 4 days or frozen for months.
What’s the best way to cut these bars cleanly?
Make sure the bars are completely cooled—ideally chilled—before slicing. Use a sharp knife and wipe it clean between cuts.
Are there any substitutions for the butter?
You can use coconut oil or vegan butter for a dairy-free version, but keep it cold and solid for the best crumble texture.
Pin This Recipe!

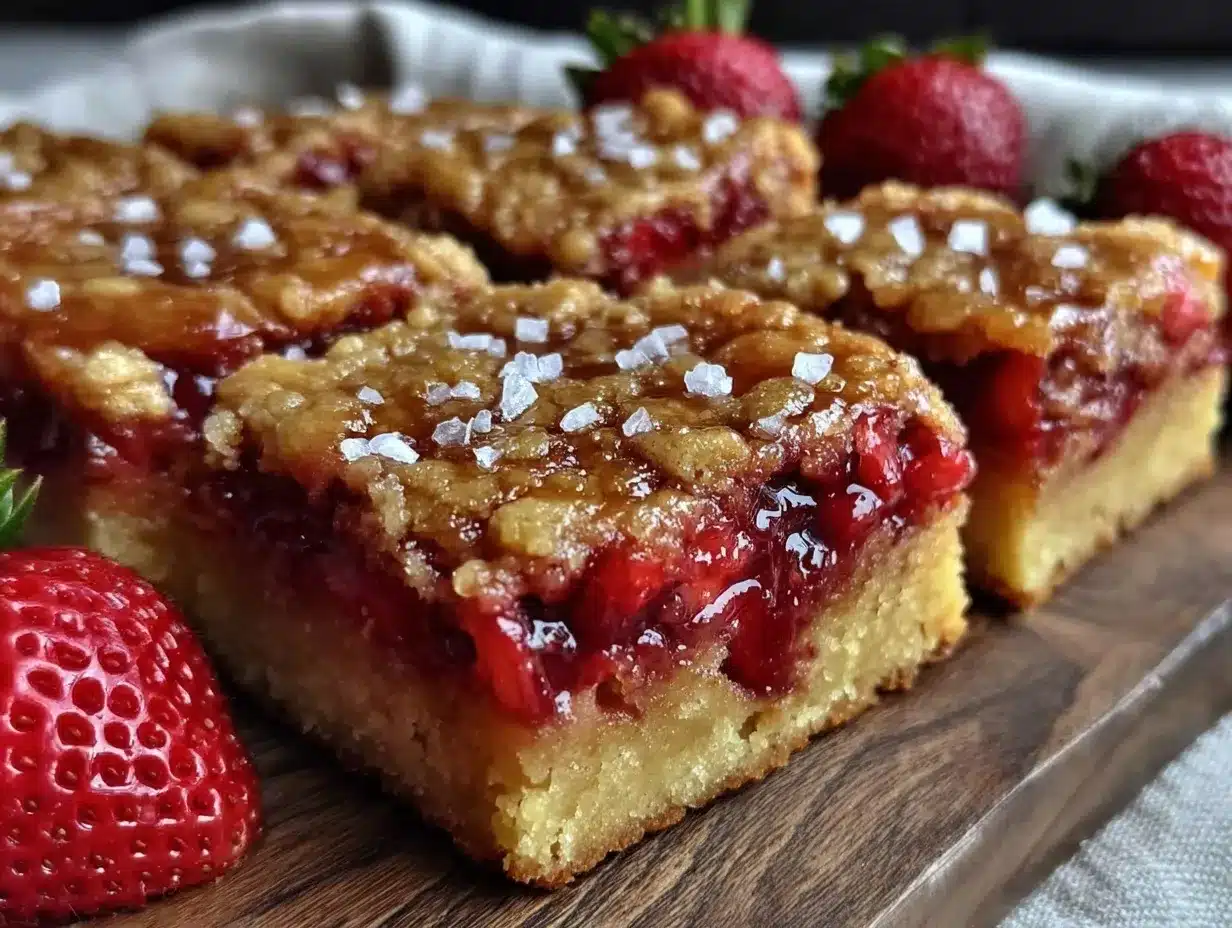
Easy Irresistible Strawberry Crumble Bars
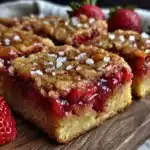
These strawberry crumble bars feature a tender buttery crust, luscious strawberry filling, and a crisp crumble topping, perfect for summer snacks and crowd-pleasing treats.
- Prep Time: 15 minutes
- Cook Time: 50 minutes
- Total Time: 1 hour 5 minutes plus 1-2 hours cooling
- Yield: 12 servings 1x
- Category: Dessert
- Cuisine: American
Ingredients
- 2 ½ cups (312g) all-purpose flour
- ¾ cup (150g) granulated sugar
- ½ cup (100g) brown sugar
- 1 cup (227g) unsalted butter, cold and cubed
- 1 teaspoon baking powder
- ½ teaspoon salt
- 4 cups (about 600g) fresh strawberries, hulled and sliced
- ⅓ cup (67g) granulated sugar
- 2 tablespoons cornstarch
- 1 tablespoon lemon juice
- 1 teaspoon vanilla extract
Instructions
- Preheat the oven to 350°F (175°C). Line a 9×13 inch baking pan with parchment paper, leaving an overhang for easy removal.
- In a large bowl, whisk together flour, granulated sugar, brown sugar, baking powder, and salt. Add cold, cubed unsalted butter.
- Cut the butter into the dry ingredients using a pastry cutter or fingertips until the mixture resembles coarse crumbs with some pea-sized bits.
- Press about two-thirds of the crumble mixture firmly into the prepared pan to form the crust. Bake for 15 minutes or until lightly golden.
- While the crust bakes, combine sliced strawberries, granulated sugar, cornstarch, lemon juice, and vanilla extract in a bowl. Mix gently to coat evenly.
- Remove the crust from the oven and evenly spread the strawberry filling over it. Crumble the remaining third of the crumble mixture over the top.
- Bake again for 35-40 minutes, or until the topping is golden brown and the filling is bubbling around the edges.
- Cool completely in the pan on a wire rack before cutting into squares.
Notes
Keep butter cold to ensure a flaky, crumbly texture. Do not overmix the crumble to avoid tough crust. Use fresh ripe strawberries for best flavor. If topping browns too fast, tent with foil halfway through baking. Let bars cool completely before cutting to prevent filling from spilling. Bars taste better after sitting overnight.
Nutrition
- Serving Size: 1 bar (about 2-inch
- Calories: 220
- Fat: 11
- Carbohydrates: 30
- Fiber: 2
- Protein: 2
Keywords: strawberry crumble bars, summer snacks, easy dessert, crumble topping, strawberry bars, potluck dessert, berry bars