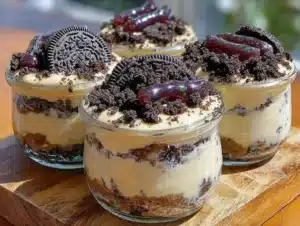
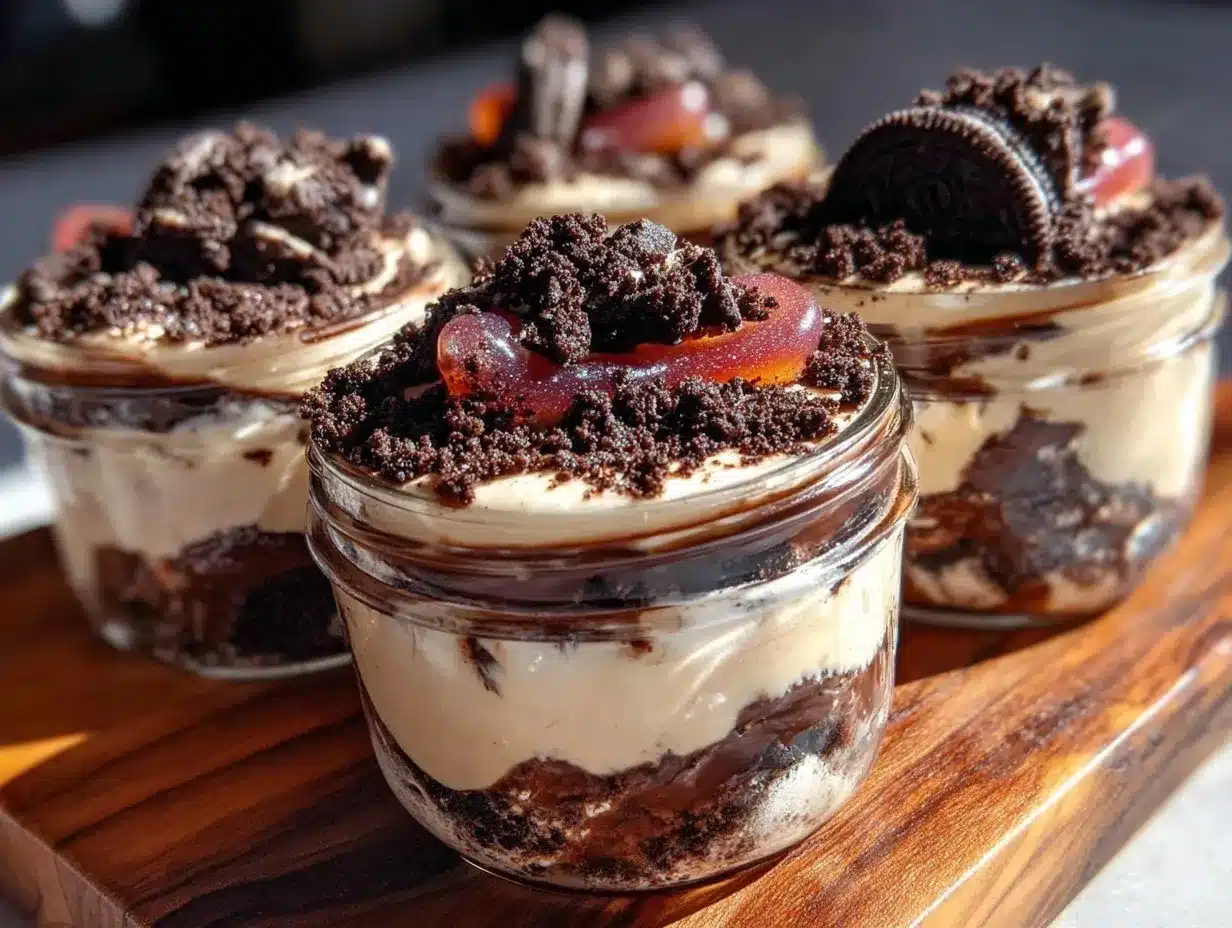
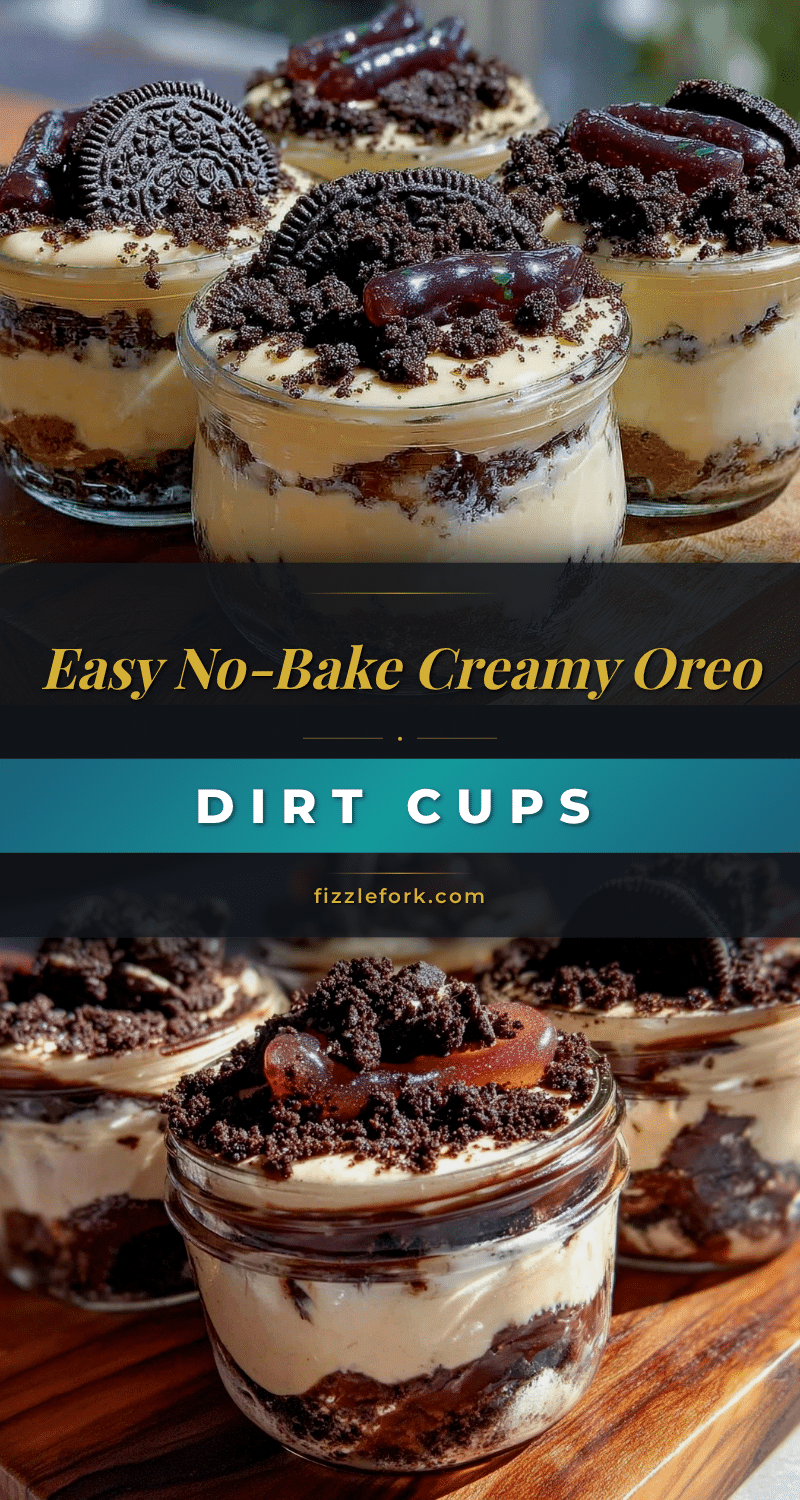
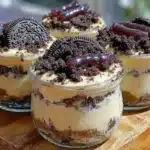
“You’ve got dirt in your pudding!” That’s what my niece exclaimed with that mischievous grin, right as I handed her this bowl of Easy No-Bake Oreo Dirt Pudding Cups with Gummy Worms. Honestly, I wasn’t expecting much when I threw this together on a whim one rainy afternoon, but it quickly became our unexpected hit. I’d been juggling a hectic day, and dessert needed to be fast, kid-approved, and, well, a little fun. Oreo crumbs gave the perfect crumbly “dirt” texture, and the gummy worms—oh, those vibrant, squiggly little guys—sealed the deal.
It wasn’t a fancy recipe night or a carefully planned party treat. Just a simple, spontaneous idea that turned into a repeat request. What surprised me most was how this no-bake dessert captured that playful spirit—just the sort of thing kids and adults alike can’t resist. Plus, no oven? Yes, please. After a few tries, I nailed the balance between creamy pudding, crunchy Oreos, and that cheeky gummy worm twist. The best part? It’s ridiculously easy to make, especially when you’re pressed for time but still want to impress.
So, if you’re looking for a dessert that’s quick, mess-free, and guaranteed to bring out some smiles around the table, these pudding cups are your new go-to. There’s something quietly satisfying about dirt that you can eat, and I’m pretty sure you’ll understand why once you take your first spoonful.
Why You’ll Love This Recipe
This Easy No-Bake Oreo Dirt Pudding Cups recipe with gummy worms has been tested and tweaked through many casual kitchen experiments (and a few “oops” moments). Here’s why it stands out in my dessert lineup:
- Quick & Easy: Ready in under 20 minutes, it’s perfect for busy parents or last-minute dessert emergencies.
- Simple Ingredients: No fancy shopping needed—Oreos, pudding mix, milk, and gummy worms are probably already in your pantry or local store.
- Kid-Friendly Fun: The gummy worms make it playful and irresistible, especially for birthday parties or after-school treats.
- No-Bake Convenience: No oven time means less heat in the kitchen and less fuss overall.
- Texture Magic: The crushed Oreos mimic dirt perfectly, adding a crumbly crunch that contrasts beautifully with silky pudding.
- Customizable: You can swap flavors or toppings to suit your mood or the season (think chocolate pudding or mini marshmallows).
This isn’t just any pudding cup—it’s the one that turns snack time into a little celebration. The creamy smoothness combined with crunchy cookie bits and chewy worms hits all the right textures. Honestly, it’s the kind of dessert that makes you pause and smile after the first bite. If you want a quick, crowd-pleasing dessert that’s both nostalgic and a little whimsical, this recipe nails it every single time.
What Ingredients You Will Need
This recipe keeps things straightforward, using pantry staples and a few fun extras to bring the “dirt” pudding concept to life. Here’s what you’ll gather for these easy no-bake pudding cups:
- Instant chocolate pudding mix (1 package, about 3.9 ounces / 110 grams) – the base for that rich, creamy texture.
- Cold milk (2 cups / 480 ml) – helps the pudding set quickly and smoothly.
- Oreos (about 15-20 cookies) – crushed into fine crumbs; I like using the classic Oreo for that perfect chocolatey “dirt” flavor.
- Whipped topping (about 1 cup / 240 ml, like Cool Whip or homemade whipped cream) – adds lightness and a fluffy finish.
- Gummy worms (1 small bag, roughly 4 ounces / 113 grams) – the playful surprise that brings the dirt cups to life.
- Optional: A sprinkle of mini chocolate chips or edible candy eyes for a fun twist (great for Halloween or themed parties).
If you want to switch things up, try vanilla pudding instead of chocolate or swap the Oreos for gluten-free cookies to keep it allergy-friendly. For dairy-free options, almond or oat milk works well, and there are plenty of dairy-free puddings and whipped toppings available. Personally, I recommend using Oreos because their crisp texture holds up nicely and the flavor is unbeatable, but feel free to experiment with sandwich cookies you love.
Equipment Needed
Luckily, this recipe requires minimal kitchen gear—ideal for whipping this up anytime.
- Mixing bowls: One large for the pudding, another for the crushed Oreos if you want to keep things tidy.
- Whisk or electric mixer: To blend the pudding mix and milk smoothly without lumps.
- Measuring cups and spoons: For precise liquid and dry ingredient amounts.
- Individual serving cups or small bowls: Clear plastic cups work great for layering and showing off the “dirt” effect.
- Spatula or spoon: For folding in whipped topping and layering ingredients.
- Plastic resealable bag and rolling pin (optional): To crush Oreos quickly without a mess.
I’ve made these pudding cups with just a basic whisk and a bowl, but using an electric mixer speeds things up, especially if you want the pudding extra smooth. The plastic cups are my favorite; they’re easy to serve and cute for parties. For crushing Oreos, either toss them in a bag and smash them with a rolling pin or pulse briefly in a food processor if you have one handy. No fancy gadgets needed—just a bit of fun and patience.
Preparation Method
- Prepare the pudding: In a large bowl, whisk together the instant chocolate pudding mix and 2 cups (480 ml) of cold milk. Whisk vigorously for about 2 minutes until the mixture thickens and is smooth with no lumps. (If using an electric mixer, beat on medium speed.) This step sets the creamy base. Be sure to work quickly before the pudding thickens too much.
- Crush the Oreos: Place the Oreos in a resealable plastic bag and gently crush them with a rolling pin until you have mostly fine crumbs with some small chunks for texture. You want it to resemble dirt, so don’t pulverize them into powder. Set aside about 1/3 of the crumbs for topping later.
- Fold in the whipped topping: Gently fold 1 cup (240 ml) of whipped topping into the pudding mixture. Use a spatula and a light hand to keep it airy. This adds a fluffy texture and balances the rich chocolate flavor.
- Layer the pudding cups: Spoon a layer of Oreo crumbs into the bottom of each serving cup (about 2 tablespoons). Add a layer of pudding mixture on top (about 1/4 cup / 60 ml per cup). Repeat layering once more, ending with a generous sprinkle of Oreo crumbs on top.
- Add the gummy worms: Place 2-3 gummy worms on the top of each cup, letting them peek out like they’re wriggling through the “dirt.” It adds whimsy and that signature look!
- Chill before serving: Refrigerate the cups for at least 30 minutes to set and let the flavors meld. They’re best served cold and fresh but hold up well for a few hours.
If the pudding feels too thick, you can stir in a tablespoon of milk to loosen it slightly. Also, if you find the Oreos aren’t crumbly enough, just crush a bit more; the texture is key to nailing the “dirt” effect. I often prepare the pudding and crush cookies ahead of time, then assemble just before serving to keep the crumbs crisp.
Cooking Tips & Techniques
Making these pudding cups is straightforward, but a few insider tips can really push the result from “meh” to memorable.
- Whisk well: Instant pudding can clump easily. Whisking for a full 2 minutes ensures smoothness. I sometimes sift the pudding mix before adding milk to avoid lumps.
- Don’t overmix the whipped topping: Folding gently keeps the pudding light and fluffy. Overmixing can deflate it, making the texture dense.
- Crush Oreos with care: You want a mix of fine crumbs and a few chunkier bits. Too fine and it looks dusty; too chunky and it loses that dirt-like look.
- Layering matters: Alternate crumbs and pudding for visual appeal and texture contrast. This layering makes each bite a surprise.
- Chill time: Even though it’s no-bake, chilling helps the pudding set and flavors blend. If you’re in a rush, 20 minutes is the bare minimum, but I prefer at least 30.
- Gummy worm placement: Stick the worms partway into the pudding to keep them from sliding off and to give that “just found” effect.
Once, I forgot to chill the pudding cups, and the gummy worms sank right in—lesson learned! Also, if you’re prepping for a party, assembling just before serving keeps the Oreos from getting soggy. When I’m pressed for time, I make a batch and pop them in the fridge overnight—they’re just as delicious the next day.
Variations & Adaptations
This recipe is a playground for creativity. Here are a few ways to make it your own:
- Flavor swaps: Use vanilla or butterscotch instant pudding instead of chocolate for a new twist. Each flavor changes the vibe completely.
- Seasonal fun: Add crushed peppermint candies on top for winter holidays or swap gummy worms for candy pumpkins in the fall.
- Dietary adjustments: Substitute Oreos with gluten-free sandwich cookies, and use dairy-free pudding and whipped topping for allergy-friendly versions.
- Extra texture: Mix in some chopped nuts or mini marshmallows between layers for a little chew and crunch.
- Adult version: Add a splash of coffee or a dash of liqueur like Kahlúa to the pudding mix for grown-up dessert cups.
Personally, I once made these with mint-flavored Oreos and swapped gummy worms for fresh raspberries—surprisingly refreshing! You might also enjoy pairing this fun dessert with a creamy homemade Cheeseburger Helper for an easy family meal or finish with a batch of fudgy small-batch brownies for serious chocolate lovers.
Serving & Storage Suggestions
These pudding cups are best served chilled, straight from the fridge. The cold temperature enhances the creamy texture and keeps the gummy worms delightfully chewy. I like to serve them in clear cups so everyone gets a good look at the “dirt” layers and those wriggling worms, which always sparks giggles.
For a party, arrange the cups on a platter with extra gummy worms and cookie crumbs scattered around for a playful display. Pair with a cold glass of milk or a simple iced tea to balance the sweetness.
Leftovers can be stored in an airtight container or covered tightly with plastic wrap in the refrigerator for up to 2 days. The Oreo crumbs may soften slightly but still taste great. Avoid freezing, as pudding texture changes drastically when thawed. To reheat slightly, let them sit at room temperature for 10 minutes, but honestly, they’re best enjoyed cold.
Nutritional Information & Benefits
While this dessert is definitely a treat, it has some redeeming qualities thanks to its simple ingredients. Here’s a rough estimate for one pudding cup (serving size about 1/2 cup / 120 ml):
| Calories | 250-300 kcal |
|---|---|
| Fat | 10-12 grams |
| Sugar | 25-30 grams |
| Protein | 3-4 grams |
Oreos provide a bit of iron and calcium fortification, while pudding offers some protein depending on the milk used. Using low-fat milk or sugar-free pudding mix can reduce calories and sugar. The gummy worms are obviously candy, so moderation is key. This dessert fits well as an occasional indulgence, especially when you want to make dessert fun and fuss-free.
From a wellness angle, I appreciate that this recipe avoids any artificial cooking methods like baking, making it accessible and quick. If you’re watching carbs, try pairing this with one of the savory recipes like the creamy keto crack chicken to keep meals balanced and satisfying.
Conclusion
Easy No-Bake Oreo Dirt Pudding Cups with Gummy Worms are a sweet, playful treat that brings smiles with minimal effort. Whether you’re making them for a kid’s birthday, a casual afternoon snack, or a whimsical dessert, they’re bound to be a hit. The recipe’s simplicity and adaptability make it a staple in my kitchen, especially when time is tight but I still want something memorable.
Feel free to tweak the layers, flavors, and toppings to suit your tastes—it’s a dessert that invites creativity. I love how it turns a few humble ingredients into something that feels special without the stress. If you give it a try, I’d love to hear how you made it your own or what fun twists you added.
Happy pudding making, and may your “dirt” always be delicious!
FAQs
- Can I make these pudding cups ahead of time?
Yes, you can prepare and assemble them up to a day in advance. Just keep them covered in the fridge to prevent the Oreo crumbs from getting soggy. - What if I don’t have gummy worms?
No worries! You can use other gummy candies, mini marshmallows, or even fresh berries for a different fun topping. - Can I use homemade pudding instead of instant mix?
Absolutely. Homemade pudding works fine but may require longer chilling time to set properly. - How do I keep the Oreo crumbs crunchy?
Crush Oreos just before assembling and layer them carefully. Avoid mixing them with wet ingredients until serving time for best texture. - Is this dessert suitable for gluten-free diets?
You can make it gluten-free by using gluten-free sandwich cookies instead of Oreos and checking that your pudding mix is gluten-free.
Pin This Recipe!
Easy No-Bake Oreo Dirt Pudding Cups Recipe with Gummy Worms for Kids
A quick, kid-friendly no-bake dessert featuring creamy chocolate pudding layered with crushed Oreos and topped with playful gummy worms. Perfect for parties or last-minute treats.
- Prep Time: 10 minutes
- Cook Time: 0 minutes
- Total Time: 40 minutes
- Yield: 6 servings 1x
- Category: Dessert
- Cuisine: American
Ingredients
- 1 package (3.9 ounces) instant chocolate pudding mix
- 2 cups (16 fl oz) cold milk
- 15–20 Oreos, crushed into fine crumbs
- 1 cup (8 fl oz) whipped topping (like Cool Whip or homemade whipped cream)
- 1 small bag (4 ounces) gummy worms
- Optional: mini chocolate chips or edible candy eyes for topping
Instructions
- In a large bowl, whisk together the instant chocolate pudding mix and 2 cups of cold milk for about 2 minutes until thickened and smooth.
- Place Oreos in a resealable plastic bag and crush with a rolling pin until mostly fine crumbs with some small chunks remain. Set aside about 1/3 of the crumbs for topping.
- Gently fold 1 cup of whipped topping into the pudding mixture using a spatula to keep it airy.
- Spoon a layer of Oreo crumbs (about 2 tablespoons) into the bottom of each serving cup.
- Add a layer of pudding mixture (about 1/4 cup) on top of the crumbs.
- Repeat layering once more, finishing with a generous sprinkle of Oreo crumbs on top.
- Place 2-3 gummy worms on top of each cup, letting them peek out.
- Refrigerate the cups for at least 30 minutes before serving to set and meld flavors.
Notes
Whisk pudding mix thoroughly to avoid lumps. Fold whipped topping gently to keep texture light. Crush Oreos to a mix of fine crumbs and small chunks for best ‘dirt’ effect. Chill at least 30 minutes for best flavor and texture. Assemble just before serving to keep Oreo crumbs crunchy. Can be made ahead and stored covered in fridge up to 1 day.
Nutrition
- Serving Size: About 1/2 cup (120 m
- Calories: 275
- Sugar: 28
- Sodium: 150
- Fat: 11
- Saturated Fat: 5
- Carbohydrates: 35
- Fiber: 1
- Protein: 3.5
Keywords: no-bake dessert, Oreo pudding cups, gummy worms, kid-friendly dessert, quick dessert, easy pudding recipe