There was this one Monday—typical mad dash morning, juggling emails and breakfast, when I realized my usual soggy salad disaster wasn’t going to cut it anymore. You know the kind: leaves all wilted, dressing turned the whole thing into a sad, soggy mess by noon. That’s when I stumbled upon the magic of fresh mason jar salads that stay crisp and vibrant. Honestly, I was skeptical at first. How could tossing layers of greens, veggies, and dressing into a jar keep everything from turning into a swamp?
But after a few tries (and a bit of trial and error), the results were undeniable. These salads not only looked beautiful—like little edible rainbows in glass—but they also tasted fresh hours later, whether at my desk or out on a park bench. The layering trick changed everything, creating a barrier between the dressing and delicate greens, locking in crunch and color. It felt like having a restaurant-quality salad ready to go, without the fuss or sogginess. I found myself making these jars multiple times a week, swapping ingredients to keep things interesting. It became my quiet little lunch ritual, turning chaotic days into moments of calm and nourishment.
It’s funny how something so simple can feel like a small win in a hectic routine. That’s why these fresh mason jar salads stuck with me—they’re reliable, vibrant, and just plain satisfying. You’ll find yourself looking forward to lunchtime again, with a salad that’s as crisp as the moment it was packed. No soggy disappointments here, just fresh flavors and textures that make healthy eating feel effortless and even a little exciting.
Why You’ll Love This Recipe
From my own experience juggling busy days and unpredictable schedules, fresh mason jar salads that stay crisp and vibrant have been a game-changer. Here’s why this recipe has earned its place in my weekly rotation:
- Quick & Easy: Comes together in under 15 minutes—perfect for busy mornings or prepping ahead for the week.
- Simple Ingredients: Uses everyday veggies and pantry staples, no fancy or hard-to-find items needed.
- Perfect for On-the-Go: Whether you’re packing lunch for work, school, or a picnic, these jars travel well without losing freshness.
- Crowd-Pleaser: Kids, coworkers, or friends all appreciate the vibrant colors and fresh crunch; it’s a salad everyone wants to try.
- Unbelievably Delicious: The layering technique keeps each bite crisp, with flavors that stay bright and never watery or bland.
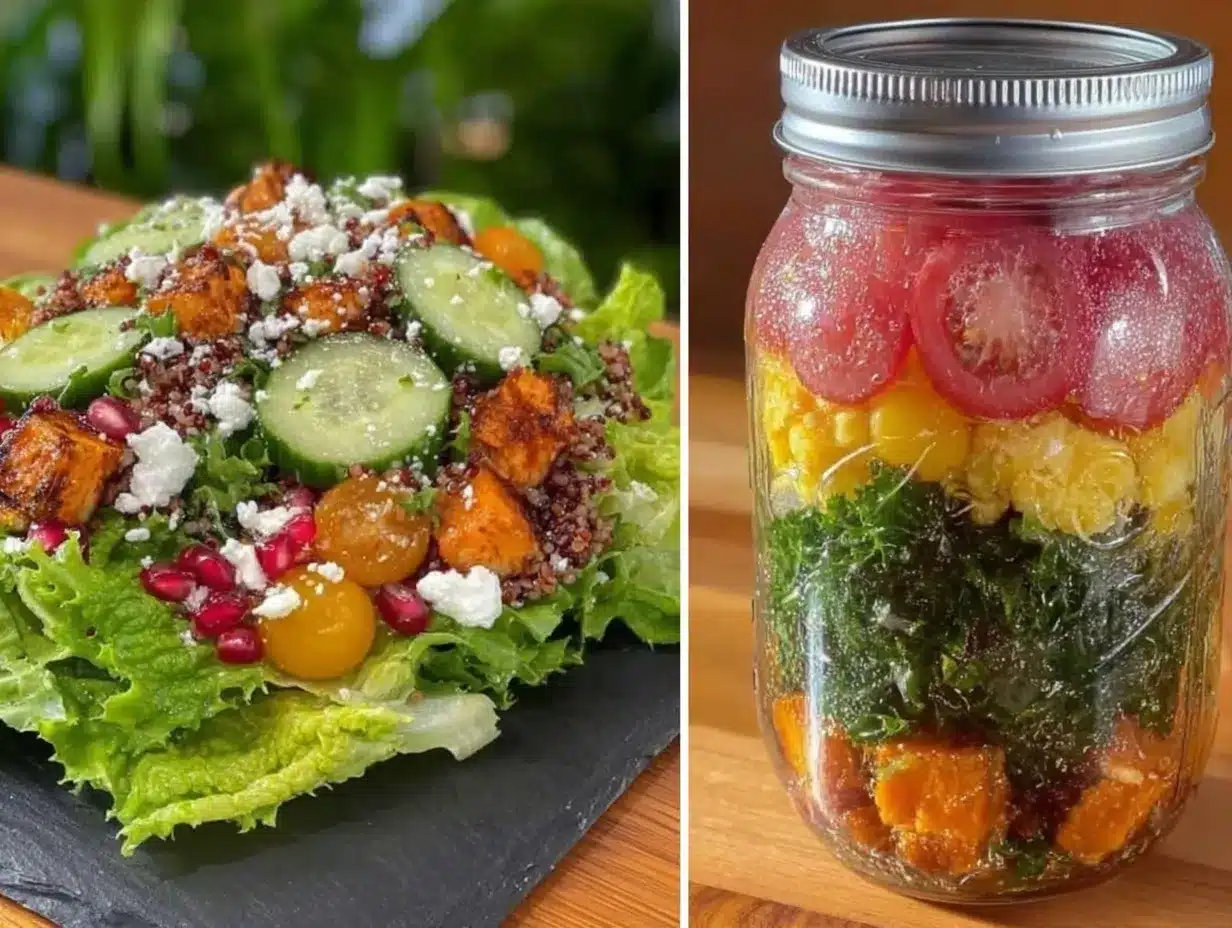
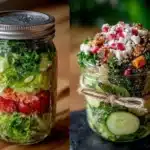
This isn’t just another salad tossed into a bowl. The trick lies in how the ingredients are arranged—dressing on the bottom, sturdy veggies next, and tender greens on top—making a perfect balance of texture and taste. I’ve tweaked this over several weeks to find the right combos that don’t just look good but hold up beautifully until you eat them. It’s comfort food in a jar, but fresh and lively, perfect for those who want nutrition without the hassle.
It’s also a little celebration of simplicity. No fuss, no soggy surprises—just a fresh, vibrant lunch you can trust to be as good hours after making it as the moment you packed it. Honestly, it’s become my go-to for feeling nourished and energized, even on the busiest days.
What Ingredients You Will Need
This recipe uses simple, wholesome ingredients to deliver bold flavor and satisfying texture without the fuss. Most are pantry or fridge staples, and the layering makes it easy to mix and match based on what you have.
- Dressing (choose your favorite): Olive oil, balsamic vinegar, lemon juice, or a light vinaigrette (homemade or store-bought like Bragg’s or Newman’s Own for best results)
- Hearty veggies (layer after dressing):
- Cherry tomatoes, halved
- Cucumber, sliced or diced
- Bell peppers, thinly sliced
- Carrots, shredded or thin sticks
- Red onion, finely sliced (optional, for a little bite)
- Proteins and extras (optional, add for bulk):
- Cooked chickpeas or black beans
- Grilled chicken breast, diced
- Feta cheese or shredded cheddar
- Hard-boiled eggs, sliced
- Toasted nuts or seeds (pumpkin seeds or almonds)
- Greens (top layer):
- Spinach leaves (baby or regular)
- Mixed lettuce (romaine, butter lettuce, or spring mix)
- Kale, massaged lightly with a pinch of salt
- Fresh herbs (optional): Parsley, basil, or cilantro for a flavor pop
Pro tip: Use firm, fresh greens and veggies for the best crunch. If you want to swap for gluten-free or vegan options, just skip the cheese or use a dairy-free alternative like almond feta. In summer, swapping in fresh berries or avocado adds a fun twist. I often pick vegetables from my local market that are in season to keep the flavors vibrant and budget-friendly.
Equipment Needed
- Mason jars: Wide-mouth quart (32 oz / 946 ml) jars work best for layering and easy eating.
- Measuring spoons and cups: For precise dressing and ingredient amounts.
- Sharp knife and cutting board: Essential for prepping veggies quickly and safely.
- Mixing bowls: Useful for tossing ingredients before layering, especially proteins or grains.
- Salad spinner (optional): Helps dry greens thoroughly to keep them crisp longer.
Don’t have mason jars? Reusable plastic containers with tight lids can work, but glass jars are best for preserving freshness and avoiding unwanted flavors. I once tried regular Tupperware, but the salad didn’t stay quite as crisp by midday. Also, investing in a good salad spinner has been a small but mighty upgrade—it really keeps those greens dry, which is key here.
Preparation Method
- Prepare the dressing: Whisk together 3 tablespoons (45 ml) olive oil, 1 tablespoon (15 ml) balsamic vinegar, 1 teaspoon (5 ml) lemon juice, a pinch of salt and pepper. Adjust to taste. (5 minutes)
- Chop and prep veggies: Slice cherry tomatoes, cucumbers, bell peppers, and shred carrots. Make sure everything is bite-sized. (10 minutes)
- Layer the jars starting with dressing: Pour about 2 tablespoons (30 ml) of dressing into the bottom of each mason jar. This keeps the greens from getting soggy. (2 minutes)
- Add hearty veggies: Spoon in a layer of chopped tomatoes, cucumbers, and bell peppers. These sturdy veggies sit well in the dressing without wilting. (3 minutes)
- Include proteins and extras: Add chickpeas, grilled chicken, or cheese on top of the veggies. This adds substance and flavor. (3 minutes)
- Top with greens: Add a generous handful of washed, dried spinach or mixed lettuce. Don’t pack too tight—leave a bit of air for freshness. (2 minutes)
- Seal and refrigerate: Screw on the lid tightly and store the jars upright in the fridge. They’re ready to grab-and-go for up to 4 days. (1 minute)
Tips: Make sure your greens are completely dry before layering on top—excess moisture is the enemy of crispness. If your dressing has herbs or garlic, let it sit for a few minutes before layering so flavors meld nicely. When you’re ready to eat, just shake the jar gently or pour the contents into a bowl and enjoy.
Cooking Tips & Techniques
One thing I learned the hard way was that soggy salads happen when dressing meets the greens too soon. That’s why the layering order is crucial. Always keep the dressing at the bottom and delicate greens at the top. It’s a simple trick but makes all the difference.
Drying greens thoroughly is another must. If you skip this, you’ll notice the salad wilting faster than you want. A salad spinner is a handy tool here—worth every penny if you make salads regularly.
When choosing proteins or extras, pre-cook and cool them before adding—hot ingredients can steam the greens, ruining that crisp texture. Also, consider chopping ingredients uniformly; uneven sizes can make the salad feel lumpy or awkward to eat.
Timing-wise, these salads are a great candidate for batch prep. I usually make 3-4 jars at once on Sunday evening, which saves so much stress during the week. Just keep them upright in your fridge and don’t forget to shake before eating to mix flavors.
Lastly, if you want to add crunchy toppings like nuts or seeds, pack them separately or add just before eating, so they don’t go soft.
Variations & Adaptations
- Seasonal swaps: In fall, use roasted butternut squash, dried cranberries, and kale for a cozy vibe. Spring calls for fresh peas, radishes, and arugula.
- Dietary-friendly: For a vegan option, skip cheese and chicken; add tofu cubes or tempeh. Use tahini-based dressing instead of vinaigrette for a creamy touch.
- Flavor twists: Try Mediterranean style with olives, sun-dried tomatoes, cucumbers, and feta. Or go southwest with corn, black beans, avocado, and cilantro-lime dressing.
- Cooking method: Not just raw veggies—grill or roast some ingredients like bell peppers or zucchini before layering for smoky depth.
- Personal favorite: I once made a layered jar with roasted sweet potatoes, kale, quinoa, and tahini dressing—comforting but fresh and filling.
Serving & Storage Suggestions
Serve these salads straight from the jar for a no-fuss, portable lunch. If you prefer, pour into a bowl and toss lightly to coat everything evenly. They’re best enjoyed cold or at room temperature.
Pair with a slice of crusty bread or a side of hummus and pita for a more complete meal. A crisp iced tea or sparkling water with lemon complements the fresh flavors nicely.
Store sealed mason jars upright in the refrigerator for up to 4 days. The key to longevity is keeping the dressing separated and greens dry.
Reheating isn’t necessary since these are best fresh and cold, but if you’ve added roasted veggies or grains, those can be warmed separately before adding.
Over time, flavors meld and deepen nicely, especially with vinaigrette dressings, making leftovers surprisingly enjoyable the next day.
Nutritional Information & Benefits
Each mason jar salad is packed with fiber, vitamins A and C, and antioxidants from fresh vegetables and greens. The olive oil-based dressing provides healthy fats that support heart health, while proteins like chickpeas or grilled chicken add satisfying muscle fuel.
These salads are naturally gluten-free and low-carb, depending on your ingredient choices. They’re a great way to increase daily vegetable intake without sacrificing flavor or texture.
For those watching calories, the portion-controlled jar helps prevent overeating, making it easier to stick to nutrition goals without feeling deprived.
I’ve found these salads help me stay energized through busy afternoons, avoiding the sluggishness that often comes after heavier meals.
Conclusion
Fresh mason jar salads that stay crisp and vibrant aren’t just a trend—they’re a practical solution for anyone craving a fresh, fuss-free lunch that holds up all day. With simple ingredients, straightforward prep, and a little layering know-how, you can have colorful, tasty, and nourishing meals ready whenever life gets hectic.
Feel free to customize the ingredients and dressings to match your tastes and pantry. That’s the beauty of this recipe—it’s flexible and forgiving, yet always delicious.
For me, these salads became more than just food. They were a small act of care in a busy life, a lunch that made me pause, enjoy, and feel a little more nourished. I hope you find the same joy and ease in making and eating them.
Give it a try, and don’t hesitate to share your favorite versions or tweaks—you might just inspire someone else to rediscover what fresh, vibrant lunch can be.
Frequently Asked Questions
How long do mason jar salads stay fresh?
When layered properly, they can stay fresh and crisp for up to 4 days in the fridge. Just keep the jar sealed and upright.
Can I use any type of mason jar for this recipe?
Wide-mouth quart jars are ideal for easy layering and eating, but smaller jars can work for portion control. Avoid jars that don’t seal well.
What’s the best way to prevent soggy greens?
Keep dressing at the bottom and greens at the top, and make sure your greens are completely dry before layering.
Can I pack crunchy toppings like nuts or croutons in the jar?
It’s best to pack crunchy toppings separately or add them right before eating to keep them from getting soggy.
Are these salads suitable for meal prep?
Absolutely! They’re perfect for meal prepping since they stay fresh and make lunchtime hassle-free throughout the week.
Pin This Recipe!

Fresh Mason Jar Salads Easy Recipe for Crisp Vibrant Lunches
A quick and easy recipe for fresh mason jar salads that stay crisp and vibrant, perfect for on-the-go lunches and meal prep.
- Prep Time: 15 minutes
- Cook Time: 0 minutes
- Total Time: 15 minutes
- Yield: 1 mason jar salad (approx. 1 serving)
- Category: Main Course
- Cuisine: American
Ingredients
- Dressing (choose your favorite): Olive oil, balsamic vinegar, lemon juice, or a light vinaigrette (homemade or store-bought like Bragg’s or Newman’s Own)
- Hearty veggies: Cherry tomatoes (halved), cucumber (sliced or diced), bell peppers (thinly sliced), carrots (shredded or thin sticks), red onion (finely sliced, optional)
- Proteins and extras (optional): Cooked chickpeas or black beans, grilled chicken breast (diced), feta cheese or shredded cheddar, hard-boiled eggs (sliced), toasted nuts or seeds (pumpkin seeds or alm…
- Greens (top layer): Spinach leaves (baby or regular), mixed lettuce (romaine, butter lettuce, or spring mix), kale (massaged lightly with a pinch of salt)
- Fresh herbs (optional): Parsley, basil, or cilantro
Instructions
- Prepare the dressing: Whisk together 3 tablespoons (45 ml) olive oil, 1 tablespoon (15 ml) balsamic vinegar, 1 teaspoon (5 ml) lemon juice, a pinch of salt and pepper. Adjust to taste. (5 minutes)
- Chop and prep veggies: Slice cherry tomatoes, cucumbers, bell peppers, and shred carrots. Make sure everything is bite-sized. (10 minutes)
- Layer the jars starting with dressing: Pour about 2 tablespoons (30 ml) of dressing into the bottom of each mason jar. This keeps the greens from getting soggy. (2 minutes)
- Add hearty veggies: Spoon in a layer of chopped tomatoes, cucumbers, and bell peppers. These sturdy veggies sit well in the dressing without wilting. (3 minutes)
- Include proteins and extras: Add chickpeas, grilled chicken, or cheese on top of the veggies. This adds substance and flavor. (3 minutes)
- Top with greens: Add a generous handful of washed, dried spinach or mixed lettuce. Don’t pack too tight—leave a bit of air for freshness. (2 minutes)
- Seal and refrigerate: Screw on the lid tightly and store the jars upright in the fridge. They’re ready to grab-and-go for up to 4 days. (1 minute)
Notes
Keep dressing at the bottom and greens at the top to prevent sogginess. Dry greens thoroughly before layering. Pre-cook and cool proteins before adding. Pack crunchy toppings separately or add just before eating. Store jars upright in the fridge for up to 4 days. Shake before eating or pour into a bowl to mix.
Nutrition
- Serving Size: One mason jar salad
- Calories: 350
- Sugar: 8
- Sodium: 350
- Fat: 22
- Saturated Fat: 3
- Carbohydrates: 25
- Fiber: 7
- Protein: 12
Keywords: mason jar salad, fresh salad, meal prep, healthy lunch, portable salad, crisp salad, vibrant salad, easy salad recipe