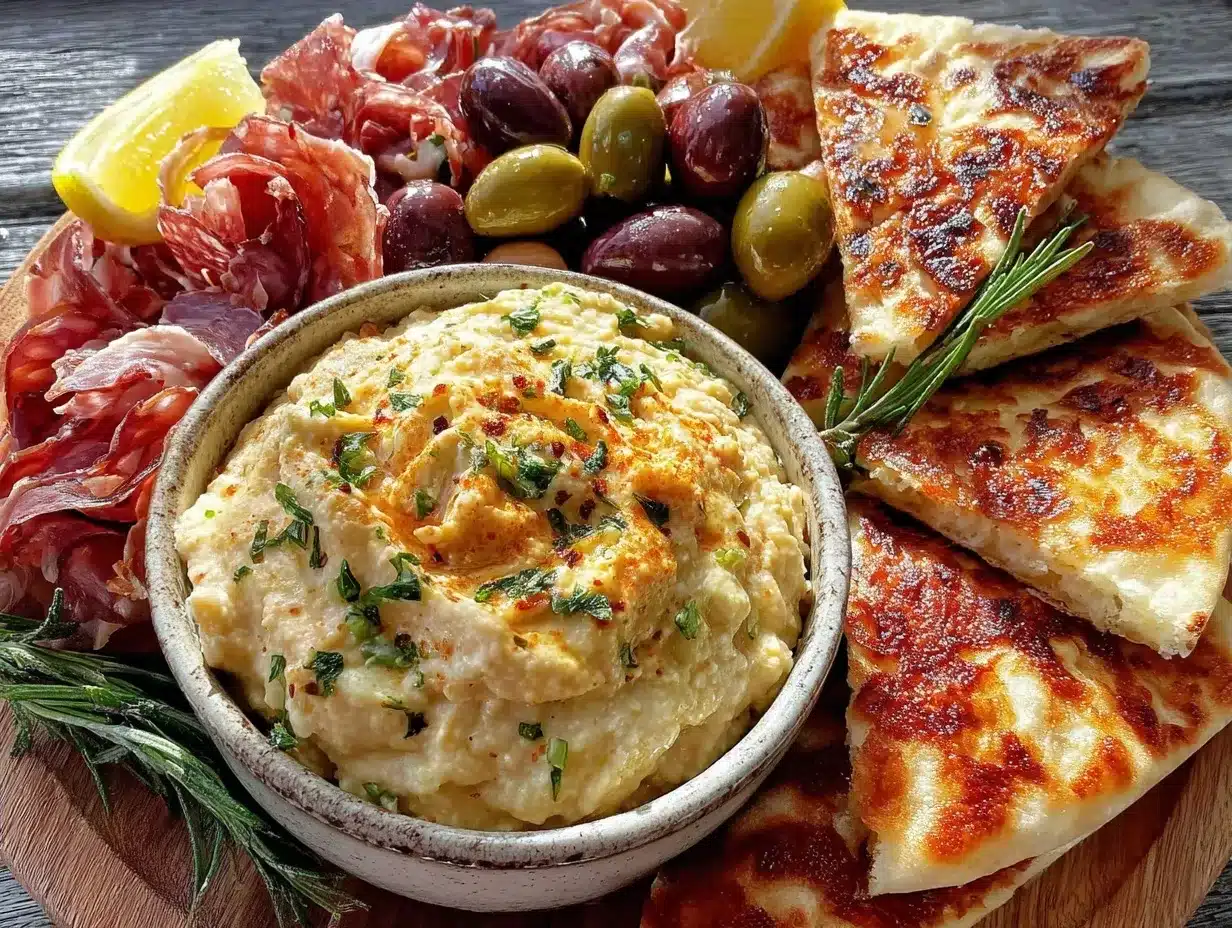
“Grab the olives, and don’t forget the hummus,” my friend called over as we scrambled to get everything ready before the sun dipped too low. That afternoon on the beach felt like a minor miracle—how a few simple ingredients tossed together could turn a chaotic day into a laid-back, flavor-packed moment. Honestly, I wasn’t expecting much when I first threw together this snack board with hummus, pita, olives, and charcuterie, but it quickly became my go-to for easy beach days and impromptu hangouts.
There’s something about the salty breeze mixing with the tangy hummus and the crunch of fresh pita that just clicks. I remember thinking, “Why haven’t I done this before?” It’s like a little picnic, but without the fuss—no hot dishes, no heavy clean-up, just pure, simple good stuff. And the best part? Everyone could pick and choose their favorites, from briny olives to rich slices of meat, making it feel special yet totally effortless.
What stuck with me was how this snack board somehow turned a hectic afternoon into a slow, tasty pause. It’s become my quiet little secret for easy entertaining, especially when I want to keep things casual but still impressive. No matter the occasion, this spread of hummus, pita, olives, and charcuterie feels like the perfect way to snack smart and enjoy the moment without any extra stress.
Why You’ll Love This Recipe
Making the perfect beach snack board with hummus, pita, olives, and charcuterie isn’t just about convenience—it’s about crafting something that feels thoughtful without being complicated. After trying and adjusting this recipe multiple times, here’s why it’s become a favorite:
- Quick & Easy: You can pull it together in under 15 minutes, which is perfect for those “I need snacks now” moments or last-minute beach trips.
- Simple Ingredients: No need for fancy or hard-to-find items—most are pantry staples or easy to grab at your local store.
- Perfect for Outdoor Occasions: Whether you’re beachside, picnicking, or just craving a relaxed snack board, this recipe fits the vibe.
- Crowd-Pleaser: It’s always a hit with both kids and adults—everyone loves the mix of salty, creamy, and crunchy.
- Unbelievably Delicious: The balance of creamy hummus, warm pita, tangy olives, and savory charcuterie is seriously comforting and satisfying.
- Unique Spin: What sets this apart is the way the hummus is seasoned—just a touch of smoked paprika and lemon zest gives it a subtle twist that you don’t usually get in store-bought versions.
This isn’t just another snack board; it’s got personality. I like to think of it as the kind of spread that makes you close your eyes and savor that perfect salty-smooth bite. It’s comfort food that’s light enough for summer but substantial enough to keep you going through a day of beach volleyball or a sunset walk.
What Ingredients You Will Need
This perfect beach snack board relies on fresh, straightforward ingredients that come together effortlessly. Most of these are pantry staples, and you can tweak them based on what you have or like.
- Hummus: 1 cup of store-bought or homemade hummus (I prefer Sabra for its creamy texture, but homemade with chickpeas, tahini, garlic, lemon juice, and olive oil works beautifully)
- Smoked Paprika: A pinch for sprinkling over the hummus (adds a smoky depth)
- Lemon Zest: From half a lemon, for brightness and zing
- Pita Bread: 4 large pita pockets, sliced into triangles (warm and fluffy; you can substitute with naan or lavash for variety)
- Olives: 1 cup mixed olives, pitted (Kalamata and green olives are my favorites; go for firm, not overly salty ones)
- Charcuterie: About 6 ounces total of assorted meats like prosciutto, salami, and chorizo (choose quality deli cuts—look for natural casing and minimal preservatives)
- Cheese: Optional but recommended—4 ounces of feta or manchego, cubed or sliced (adds creaminess and pairs well with olives)
- Fresh Veggies: Optional additions like cherry tomatoes, cucumber slices, or baby carrots for crunch and freshness
- Nuts: A handful of roasted almonds or walnuts for extra texture (optional)
- Olive Oil: For drizzling over the hummus or pita if desired (extra virgin is best)
If you want to keep things gluten-free, swapping the pita for gluten-free crackers or veggie sticks works great. For a dairy-free option, skip the cheese or use a plant-based alternative. The flexibility here really lets you tailor the board to your tastes or dietary needs.
Equipment Needed
One of the greatest things about this beach snack board is how little gear you actually need. Here’s the basic equipment that will make assembling it a breeze:
- Serving Board or Platter: A wooden cutting board or large platter works perfectly to arrange everything invitingly.
- Small Bowls: For the hummus, olives, and any dips or nuts—keeps things tidy and easy to access.
- Knife and Cutting Board: For slicing the pita, cheese, and charcuterie.
- Zester or Grater: To zest the lemon—if you don’t have one, just finely grate the peel with a sharp knife carefully.
- Serving Utensils: Small spoons or spreaders for the hummus and tongs or forks for picking up olives.
If you’re packing the board for a trip, consider reusable silicone containers for the dips and a sharp paring knife with a protective cover. I’ve found that a sturdy cutting board doubles as a serving tray, which saves on cleanup and packing space. For budget-friendly options, any simple wooden or bamboo board from your kitchen will do just fine!
Preparation Method
- Prepare the Hummus: If using store-bought, transfer 1 cup of hummus into a small bowl. Sprinkle with ¼ teaspoon smoked paprika and zest half a lemon over the top. Drizzle with a teaspoon of good-quality olive oil. Stir gently to combine the flavors but keep the topping visible for that inviting look. (Prep time: 5 minutes)
- Slice the Pita: Cut 4 pita pockets into small, manageable triangles about 2 inches wide. Warm them slightly in a dry skillet or oven for 3-5 minutes until soft and pliable but still firm enough to scoop hummus. (Prep time: 5 minutes)
- Arrange the Olives: Rinse and pit about 1 cup of mixed olives if needed. Place them in a small bowl or scatter some on the board. Kalamata and green olives offer a nice color contrast and flavor variety. (Prep time: 2 minutes)
- Prepare the Charcuterie: Lay out about 6 ounces of assorted sliced meats like prosciutto, salami, and chorizo in loose folds or rolls for easy grabbing. If you have cheese, slice or cube 4 ounces and arrange nearby. (Prep time: 5 minutes)
- Build the Board: On your serving platter or board, place the hummus bowl in the center. Surround it with pita triangles, the olive bowl, charcuterie folds, cheese cubes, and any optional veggies or nuts. Add a small bowl of olive oil for dipping if you like. (Assembly time: 5 minutes)
Pro tip: When warming pita, watch closely—it can go from perfectly soft to too crisp in seconds. Also, layering the meats loosely helps keep them from sticking together and makes the board look more inviting.
Cooking Tips & Techniques
Honestly, this snack board is about assembly more than cooking, but a few tips can make your experience smoother and the end result tastier.
- Choosing Your Hummus: If you’re making your own, blending chickpeas with good tahini, fresh lemon juice, garlic, and olive oil until silky smooth is key. Use ice-cold water to loosen the texture if it feels too dense.
- Warming Pita: Heat the pita just enough to soften but not crisp. Overheating makes it brittle and harder to scoop the hummus.
- Olives Prep: Rinse briny olives if they taste too salty, then dry them well. This balances flavor and prevents the board from getting soggy.
- Charcuterie Handling: Keep sliced meats cold until ready to serve. Room temperature meats show more flavor, but if it’s a hot day, a quick chill before serving helps prevent sweating.
- Presentation: Use contrasting colors and textures—fold your meats, mix olive varieties, and add fresh veggies or nuts for visual and flavor interest.
- Timing: Assemble your board just before serving to keep pita fresh and ingredients looking their best.
One lesson I learned the hard way: skipping the lemon zest on the hummus makes it feel flat. That tiny bit of citrus really wakes up the creaminess and adds a subtle pop of brightness. Also, don’t overcrowd your board—leave some breathing room so each element shines.
Variations & Adaptations
This snack board is a flexible canvas for whatever you enjoy or have on hand. Here are some ideas to tweak the recipe:
- Vegetarian Version: Skip the charcuterie and add marinated artichoke hearts, roasted red peppers, and extra nuts or seeds for protein and texture.
- Seasonal Twist: Swap olives for fresh grape tomatoes or pickled vegetables in summer, or add roasted nuts and dried figs for a fall vibe.
- Gluten-Free Option: Replace pita with gluten-free crackers, rice cakes, or crisp veggie sticks like celery and carrots.
- Spicy Kick: Mix some harissa or chili flakes into the hummus for a smoky heat that pairs beautifully with the creamy base.
- Cheese Swap: Instead of feta or manchego, try fresh mozzarella balls or a tangy goat cheese spread to mix things up.
Once, I added a dollop of tzatziki alongside the hummus for an extra creamy element that guests loved. It’s fun to mix dips and let everyone customize their bites. For a quick twist, you can even use flavored hummus varieties like roasted red pepper or garlic.
Serving & Storage Suggestions
This snack board is best served at room temperature to let all the flavors shine. If you’re outside by the beach, try to keep it shaded or in a cooler for freshness.
- Serving: Arrange the board attractively with small plates and napkins nearby. Pair with chilled white wine, sparkling water, or a crisp rosé for a perfect beach vibe.
- Storage: Leftovers keep well in airtight containers in the fridge for up to 2 days. Keep the hummus and pita separate to avoid sogginess.
- Reheating: Warm pita briefly in a toaster oven or skillet before serving leftovers. Avoid microwaving hummus, as it can change texture.
- Flavor Development: The hummus flavors deepen slightly after resting, so if you have time, prepare it a few hours in advance and refrigerate for a tastier board.
For inspiration on easy, crowd-pleasing meals that complement this snack board, you might enjoy the easy cheesy tater tot casserole or the one-pot taco spaghetti—both bring simple, hearty comfort to the table.
Nutritional Information & Benefits
This snack board offers a balanced mix of macronutrients—protein from the charcuterie and hummus, healthy fats from olive oil and nuts, and carbohydrates from pita. A typical serving provides approximately:
| Nutrient | Amount per Serving |
|---|---|
| Calories | 350-400 kcal |
| Protein | 15-20 grams |
| Fat | 20-25 grams (mostly healthy fats) |
| Carbohydrates | 25-30 grams |
| Fiber | 6-8 grams (from chickpeas and pita) |
Chickpeas in the hummus are a great source of plant protein and fiber, supporting digestion and satiety. Olives add antioxidants and heart-healthy fats, while the charcuterie provides iron and B vitamins. Keep in mind, this recipe contains gluten and nuts, so adjust accordingly if you have allergies. I appreciate how this board satisfies cravings without feeling heavy, making it a nourishing choice for a light meal or snack.
Conclusion
The perfect beach snack board with hummus, pita, olives, and charcuterie has quietly become my favorite way to snack well without fuss. It’s simple enough to throw together at a moment’s notice but thoughtful enough to impress friends and family. Whether you’re lounging by the water or just want a no-hassle, delicious spread, this recipe offers a comforting, flavorful pause in a busy day.
Feel free to tweak the ingredients to match your mood or pantry—this board welcomes creativity and personal touches. I keep coming back to this recipe because it captures that perfect balance of salty, creamy, and fresh, and it always brings people together around the table (or blanket) without any stress.
Let me know how your version turns out or if you’ve added a new twist. Sharing these kinds of simple joys really makes cooking feel like a conversation rather than a chore. Here’s to many more relaxed, tasty snack boards ahead!
FAQs
- Can I make this snack board ahead of time?
Yes, you can prepare the hummus and slice the pita a few hours in advance. Keep everything refrigerated and assemble the board just before serving for the best freshness. - What if I don’t eat meat—any good substitutions?
Absolutely! Swap charcuterie for marinated vegetables, roasted chickpeas, or extra cheese and nuts for protein and flavor. - How do I keep pita from getting soggy?
Warm the pita just before serving and avoid drizzling oil directly on it. Store pita separately from wet ingredients if packing for later. - Can I use flavored hummus?
Yes, flavored hummus like roasted red pepper or garlic works well. Just adjust the smoked paprika or lemon zest toppings accordingly. - What’s the best way to serve olives on a snack board?
Use a small bowl or ramekin to hold olives, and provide toothpicks or small forks for easy picking to keep the board neat.
Pin This Recipe!
Perfect Beach Snack Board Recipe 5 Easy Steps for Hummus Pita & Olives

A simple, flavorful snack board featuring hummus seasoned with smoked paprika and lemon zest, warm pita triangles, mixed olives, charcuterie, and optional cheese and veggies. Perfect for easy beach days and casual entertaining.
- Prep Time: 17 minutes
- Cook Time: 0 minutes
- Total Time: 17 minutes
- Yield: 4 servings 1x
- Category: Snack
- Cuisine: Mediterranean
Ingredients
- 1 cup hummus (store-bought or homemade)
- ¼ teaspoon smoked paprika
- Zest of half a lemon
- 1 teaspoon extra virgin olive oil
- 4 large pita pockets, sliced into triangles
- 1 cup mixed olives, pitted (Kalamata and green olives recommended)
- 6 ounces assorted charcuterie meats (prosciutto, salami, chorizo)
- 4 ounces feta or manchego cheese, cubed or sliced (optional)
- Optional fresh veggies: cherry tomatoes, cucumber slices, baby carrots
- Optional nuts: handful of roasted almonds or walnuts
- Olive oil for drizzling (optional)
Instructions
- Prepare the hummus: Transfer 1 cup of hummus into a small bowl. Sprinkle with ¼ teaspoon smoked paprika and zest half a lemon over the top. Drizzle with 1 teaspoon of olive oil. Stir gently to combine but keep the topping visible.
- Slice the pita: Cut 4 pita pockets into small triangles about 2 inches wide. Warm slightly in a dry skillet or oven for 3-5 minutes until soft and pliable but still firm enough to scoop hummus.
- Arrange the olives: Rinse and pit about 1 cup of mixed olives if needed. Place them in a small bowl or scatter some on the board.
- Prepare the charcuterie: Lay out about 6 ounces of assorted sliced meats in loose folds or rolls. If using cheese, slice or cube 4 ounces and arrange nearby.
- Build the board: On a serving platter or board, place the hummus bowl in the center. Surround with pita triangles, olive bowl, charcuterie folds, cheese cubes, and any optional veggies or nuts. Add a small bowl of olive oil for dipping if desired.
Notes
Warm pita just enough to soften but not crisp to avoid brittleness. Rinse olives if too salty and dry well to prevent sogginess. Keep sliced meats cold until serving and assemble board just before serving for freshness. Lemon zest on hummus is key for brightness. Leave space on the board to let each element shine.
Nutrition
- Serving Size: Approximately 1/4 of
- Calories: 350400
- Sugar: 24
- Sodium: 600800
- Fat: 2025
- Saturated Fat: 5
- Carbohydrates: 2530
- Fiber: 68
- Protein: 1520
Keywords: beach snack board, hummus, pita, olives, charcuterie, easy snack, Mediterranean snack, quick snack board, summer snack