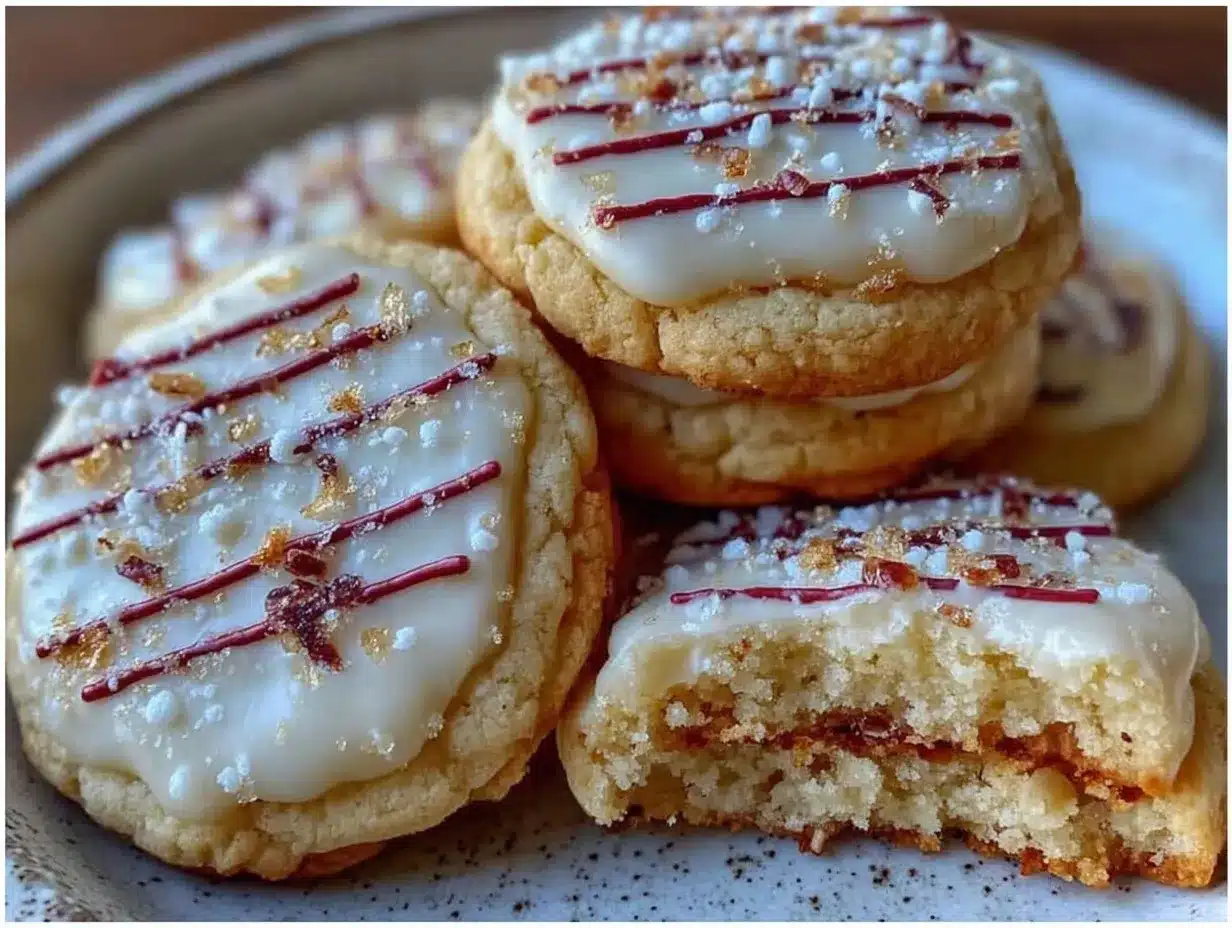
“You’re telling me these are homemade?” my friend asked, eyes wide as she reached for a cookie. Honestly, I wasn’t sure if my haphazard late-night baking experiment would turn out. I was juggling last-minute graduation party prep, a pile of invitations, and a very tired brain. Somehow, amid the chaos, I found myself rolling out sugar cookie dough at midnight, determined to make those quirky little diploma-shaped cookies I’d seen on Pinterest. The royal icing was a gamble—too runny last time, too stiff the time before—but this batch? Spot on.
That night, the kitchen was filled with the warm scent of vanilla and sugar, and the simple act of decorating those tiny diplomas felt oddly grounding. Not just because these cookies ended up perfect—crisp edges, soft centers, just the right bite—but because they somehow captured the whole bittersweet feeling of graduation: endings, beginnings, hope, and a pinch of nostalgia. I’ve made these cookies a few times since, each batch a little celebration in itself, and every time they bring back that quiet, satisfying moment of “I did it.”
There’s something about these Perfect Graduation Sugar Cookies with Royal Icing Diploma Designs that goes beyond just dessert. They’re conversation starters, memory makers, and yes, an easy way to impress without falling apart in the kitchen. If you’ve got a graduation coming up or just want to add a little sweet charm to your next party, these cookies might just become your new go-to. Let me walk you through what makes them special—and how you can nail them without breaking a sweat.
Why You’ll Love This Recipe
After testing this recipe more times than I can count—often under less-than-ideal circumstances—I can say for sure it’s a winner. Here’s why these graduation sugar cookies with royal icing diploma designs stand out:
- Quick & Easy: The dough comes together in under 15 minutes, and the cookies bake in just 10. Perfect for busy weeknights or last-minute party prep.
- Simple Ingredients: No weird or hard-to-find stuff here—just pantry staples you likely already have, which makes it stress-free.
- Perfect for Celebrations: Whether it’s a graduation party, a school send-off, or even a themed bake sale, these cookies fit the bill.
- Crowd-Pleaser: Kids and adults alike rave about these cookies. The soft, buttery base with that smooth royal icing finish is irresistible.
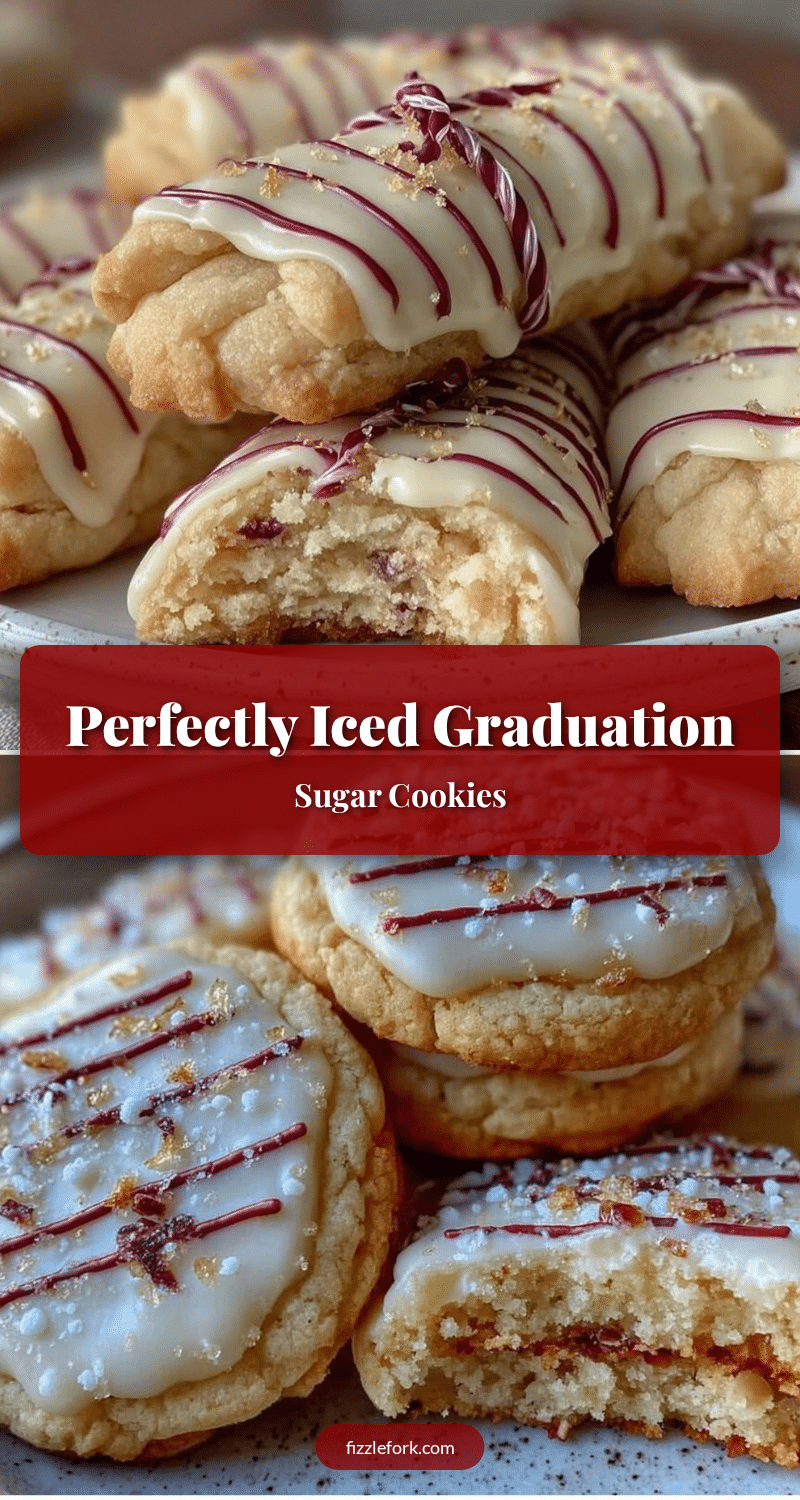
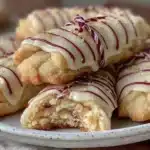
- Unbelievably Delicious: The cookie has just the right balance of crisp edges and tender centers, while the royal icing dries with a beautiful matte finish that’s firm but not crunchy.
What sets this recipe apart? The little diploma design isn’t just cute—it’s carefully crafted using a piping technique I’ve perfected after many late nights. The icing consistency is just right to pipe crisp lines and tiny bows that hold their shape. Plus, I’ve tweaked the sugar cookie dough to be less prone to spreading, so your shapes come out clean and sharp every time.
These cookies aren’t just sweets; they’re tokens of a milestone, and they have this way of making the moment feel a little more special—plus, they’re a neat way to show off your baking chops without needing a ton of advanced skills.
What Ingredients You Will Need
This recipe uses simple, wholesome ingredients to deliver bold flavor and satisfying texture without the fuss. You’ll find most of these in your pantry, and substitutions are easy if needed.
- For the Sugar Cookie Dough:
- 2 ¾ cups (345g) all-purpose flour, spooned & leveled (I recommend King Arthur brand for consistency)
- 1 teaspoon baking powder
- ½ teaspoon salt
- 1 cup (227g) unsalted butter, softened (room temperature is key for the right texture)
- 1 ½ cups (300g) granulated sugar
- 1 large egg, room temperature
- 1 ½ teaspoons pure vanilla extract
- 2 tablespoons whole milk (use any dairy-free milk for a vegan option)
- For the Royal Icing:
- 3 cups (360g) powdered sugar, sifted
- 2 tablespoons meringue powder
- 5-6 tablespoons water (adjust for desired consistency)
- Food coloring gel (black and gold recommended for diploma details)
- Optional Decoration Tools:
- Edible gold glitter or dust for a touch of sparkle
When selecting butter, unsalted is best to control salt levels, but salted works in a pinch. For the flour, I’ve found that using a spoon to scoop instead of scooping directly from the bag helps keep the dough from getting too dense. If you want to switch things up seasonally, swapping vanilla extract for almond extract creates a lovely twist.
Equipment Needed
- Mixing bowls (medium and large)
- Electric hand mixer or stand mixer with paddle attachment (makes creaming butter easier, but a sturdy whisk works too)
- Measuring cups and spoons (accurate measurement is key with baking)
- Rolling pin (a non-stick or lightly floured surface works best)
- Cookie cutters shaped like diplomas or rectangles (if not available, a sharp knife to cut shapes works fine)
- Baking sheets lined with parchment paper or silicone mats
- Piping bags and small round tips (size #1 or #2 for fine lines)
- Squeeze bottles can be a helpful alternative for filling in larger icing areas
- Toothpicks or scribe tools (for smoothing royal icing and fixing small mistakes)
I started piping these diplomas with just plastic sandwich bags with tiny snips at the corner—totally doable if you’re on a budget. But investing in reusable piping bags and a couple of tips made decorating feel much more enjoyable. I keep a small brush handy to gently clean up edges while the icing is still wet. Also, a baking stone helps cookies bake evenly if you want to get fancy.
Preparation Method
- Mix Dry Ingredients: In a medium bowl, whisk together 2 ¾ cups flour, 1 teaspoon baking powder, and ½ teaspoon salt. Set aside. (Takes about 3 minutes.)
- Cream Butter and Sugar: In a large bowl, beat 1 cup softened butter and 1 ½ cups granulated sugar on medium speed until light and fluffy—about 3-4 minutes. This step is crucial for tender, airy cookies.
- Add Egg and Vanilla: Beat in 1 large egg and 1 ½ teaspoons vanilla extract until combined. Scrape down the bowl as needed to mix evenly.
- Incorporate Dry Ingredients: Gradually add the dry flour mixture to the wet ingredients, alternating with 2 tablespoons milk. Mix on low speed just until combined. Don’t overmix—stop as soon as the dough forms.
- Chill the Dough: Divide dough into two disks, wrap in plastic, and chill for at least 1 hour or overnight. Chilling prevents spreading and makes rolling easier.
- Preheat Oven and Prepare Baking Sheets: Preheat your oven to 350°F (175°C). Line baking sheets with parchment or silicone mats.
- Roll Out Dough: On a lightly floured surface, roll dough to about ¼ inch (6 mm) thickness. Use diploma-shaped cookie cutters or cut rectangles about 3 x 1 ½ inches (7.5 x 4 cm).
- Cut and Transfer: Place cutouts 1 inch apart on the prepared baking sheets. If dough gets too soft while working, pop it back in the fridge for 10 minutes.
- Bake: Bake cookies for 8-10 minutes until edges are just golden. They’ll be soft but firm up as they cool.
- Cool Completely: Transfer cookies to wire racks and let cool fully before decorating.
- Prepare Royal Icing: In a mixing bowl, combine 3 cups powdered sugar and 2 tablespoons meringue powder. Add 5 tablespoons water and beat on high for about 7-10 minutes until stiff peaks form. Adjust water to thin for flooding icing or thicken for piping outlines.
- Color and Pipe: Divide icing into small bowls. Use black gel for the diploma “text” and gold for bows or accents. Outline each cookie with thicker icing, then flood the center with thinned icing. Use a toothpick to spread evenly.
- Decorate Diploma Details: Once the base layer dries a bit (about 15 minutes), pipe diploma lines, ribbons, and little text lines. Let cookies dry fully—overnight is best—to set the icing.
One trick I learned the hard way: don’t rush the drying. The royal icing sets best in a cool, dry spot (not the fridge). If you’re short on time, a fan on low helps, but keep an eye on the surface to avoid cracks.
Cooking Tips & Techniques
Getting sugar cookies and royal icing just right takes a bit of practice, but these tips make it less intimidating:
- Don’t Skip Chilling: The dough feels stiff when chilled, but trust me, it’s much easier to roll and cut clean shapes without warping.
- Use Room Temperature Eggs and Butter: Helps everything mix smoothly, creating a tender crumb.
- Flour Wisely: Flour your surface and rolling pin lightly to prevent sticking, but too much flour makes cookies tough.
- Test Icing Consistency: For outlining, the royal icing should hold a peak but still be pipeable. Flooding icing should flow slowly off a spoon without running.
- Keep Icing Covered: Royal icing dries fast when exposed. Cover bowls with damp towels when not in use to keep it workable.
- Practice Piping: If you’re new to royal icing, practice on parchment before decorating cookies. It builds confidence and steadies your hand.
- Clean Tips Often: Wipe piping tips frequently to avoid clogs and uneven lines.
- Don’t Overbake: Cookies should be just golden on edges but soft in center. Overbaking makes them hard once cooled.
I once tried skipping the meringue powder in the royal icing because I ran out—it was a disaster. The icing never set properly and turned sticky. Lesson learned: meringue powder is the secret to that perfect, firm finish.
Variations & Adaptations
These graduation sugar cookies are surprisingly versatile. Here are a few ways I’ve tweaked the recipe to fit different needs and tastes:
- Gluten-Free Version: Substitute all-purpose flour with a gluten-free blend (I recommend one with xanthan gum). The texture is slightly more delicate but still delicious.
- Flavor Twists: Add lemon zest or almond extract to the dough for a fresh flavor variation that pairs beautifully with the royal icing.
- Colorful Icing: Use school colors for the royal icing accents instead of classic black and gold. It’s a fun way to customize for any graduate’s alma mater.
- Vegan Option: Replace butter with vegan margarine and use aquafaba (chickpea water) in place of the egg in the dough. For royal icing, vegan meringue powder is available online.
- Shape Switch-Up: If diploma shapes aren’t handy, try these cookie dough cutouts with star or cap-shaped cutters for variety.
One personal favorite variation has been piping miniature “caps” on top of the diplomas with black icing, adding a tiny tassel with a contrasting color. It adds a bit of whimsy and always gets compliments.
Serving & Storage Suggestions
These cookies are best served at room temperature, allowing the royal icing to have its perfect matte finish without any stickiness. Arrange them on a platter with fresh flowers or alongside other graduation-themed treats for a festive look.
They pair wonderfully with a cup of coffee or a sparkling lemonade—both drinks that balance the sweetness nicely. If you want to turn your graduation party snack table into a mini dessert buffet, add some easy crowd-pleasers like fudgy small batch brownies or the savory counterpoint of creamy keto crack chicken with bacon.
Store cookies in an airtight container at room temperature for up to 5 days. If you want to keep them longer, freezing is your friend. Place cookies in a single layer on a tray, freeze until firm, then stack with parchment between layers in a sealed container. Thaw in the fridge overnight before serving.
When reheating, avoid microwaving to preserve the icing’s texture. Instead, bring them to room temperature naturally. Flavors often deepen after a day or two, making these cookies even better the next day.
Nutritional Information & Benefits
Each decorated sugar cookie (about 3 x 1 ½ inches) contains approximately:
| Calories | Fat | Carbohydrates | Protein |
|---|---|---|---|
| 150 kcal | 7 g | 22 g | 1.5 g |
While these cookies are an indulgence, they do provide some benefits. Butter offers fat-soluble vitamins, and the egg adds a touch of protein. Using real vanilla extract brings rich flavor without artificial additives.
For those watching gluten or dairy, the recipe easily adapts, making it accessible for various dietary needs. Just be mindful the royal icing contains powdered sugar and meringue powder, which may have allergens depending on the brand.
From my perspective, enjoying these cookies in moderation during life’s big moments is part of what makes them special—a little sweet reward alongside hard-earned achievements.
Conclusion
Perfect Graduation Sugar Cookies with Royal Icing Diploma Designs are more than just a treat—they’re a way to mark milestones with sweetness and style. Whether you’re a seasoned baker or giving cookie decorating a first try, this recipe is approachable and rewarding. The crisp edges, tender centers, and smooth, detailed icing come together to create a cookie that’s both beautiful and delicious.
Don’t hesitate to tweak colors, flavors, or shapes to make these cookies uniquely yours. That’s part of the fun and joy of baking for celebrations. I love how these cookies bring a smile and a little sparkle to any graduation gathering—and I’m excited for you to create that same magic.
Got questions or your own twists on this recipe? Drop a comment below—I’d love to hear how your cookies turned out or what fun designs you came up with!
Frequently Asked Questions
Can I make the dough ahead of time?
Yes! The dough can be wrapped tightly and refrigerated for up to 3 days or frozen for up to 3 months. Just thaw before rolling.
How do I store decorated cookies to keep the royal icing intact?
Keep them in an airtight container at room temperature, layered with parchment paper. Avoid stacking until the icing is fully dry.
What if I don’t have diploma-shaped cookie cutters?
You can use a knife to cut rectangles or try other shapes like stars or caps. The decorating technique works with any shape.
Can I use powdered sugar instead of granulated sugar in the dough?
Granulated sugar helps the dough hold structure and texture. Powdered sugar will make the dough softer and can change the cookie’s texture.
How do I fix royal icing that’s too runny or too thick?
If it’s too runny, add more powdered sugar a tablespoon at a time. If too thick, add water a teaspoon at a time until you reach the desired consistency for piping or flooding.
Pin This Recipe!
Perfect Graduation Sugar Cookies Recipe Easy Royal Icing Diploma Designs
These sugar cookies feature crisp edges and soft centers, decorated with perfectly piped royal icing diploma designs, ideal for graduation celebrations and easy to make with simple pantry ingredients.
- Prep Time: 15 minutes
- Cook Time: 10 minutes
- Total Time: 1 hour 25 minutes
- Yield: 24 cookies 1x
- Category: Dessert
- Cuisine: American
Ingredients
- 2 ¾ cups (345g) all-purpose flour, spooned & leveled
- 1 teaspoon baking powder
- ½ teaspoon salt
- 1 cup (227g) unsalted butter, softened (room temperature)
- 1 ½ cups (300g) granulated sugar
- 1 large egg, room temperature
- 1 ½ teaspoons pure vanilla extract
- 2 tablespoons whole milk (or any dairy-free milk for vegan option)
- 3 cups (360g) powdered sugar, sifted
- 2 tablespoons meringue powder
- 5–6 tablespoons water (adjust for desired consistency)
- Food coloring gel (black and gold recommended)
- Optional: edible gold glitter or dust for decoration
Instructions
- In a medium bowl, whisk together flour, baking powder, and salt. Set aside.
- In a large bowl, beat softened butter and granulated sugar on medium speed until light and fluffy, about 3-4 minutes.
- Beat in the egg and vanilla extract until combined, scraping down the bowl as needed.
- Gradually add the dry flour mixture to the wet ingredients, alternating with milk. Mix on low speed just until combined; do not overmix.
- Divide dough into two disks, wrap in plastic, and chill for at least 1 hour or overnight.
- Preheat oven to 350°F (175°C). Line baking sheets with parchment paper or silicone mats.
- Roll dough on a lightly floured surface to about ¼ inch (6 mm) thickness. Use diploma-shaped cookie cutters or cut rectangles about 3 x 1 ½ inches (7.5 x 4 cm).
- Place cutouts 1 inch apart on prepared baking sheets. If dough softens, chill for 10 minutes before baking.
- Bake cookies for 8-10 minutes until edges are just golden. Cookies will be soft but firm up as they cool.
- Transfer cookies to wire racks and cool completely before decorating.
- Prepare royal icing by combining powdered sugar and meringue powder in a bowl. Add 5 tablespoons water and beat on high for 7-10 minutes until stiff peaks form. Adjust water for desired consistency.
- Divide icing into small bowls and color with gel food coloring as desired.
- Outline each cookie with thicker icing, then flood the center with thinned icing. Use a toothpick to spread evenly.
- After base layer dries about 15 minutes, pipe diploma lines, ribbons, and text details. Let cookies dry fully overnight to set icing.
Notes
Chill dough for at least 1 hour to prevent spreading and make rolling easier. Use room temperature eggs and butter for best texture. Practice piping on parchment paper before decorating cookies. Let royal icing dry fully overnight in a cool, dry place for best results. Avoid overbaking to keep cookies soft in the center. Store decorated cookies in an airtight container at room temperature for up to 5 days or freeze for longer storage.
Nutrition
- Serving Size: 1 decorated cookie (
- Calories: 150
- Fat: 7
- Carbohydrates: 22
- Protein: 1.5
Keywords: graduation cookies, sugar cookies, royal icing, diploma cookies, easy sugar cookies, party cookies, celebration cookies