My brother-in-law Mark had avoided Halloween baking for his entire adult life. Fifteen years of store-bought candy, year after year. Then I showed up to his annual pumpkin carving party last October carrying a tray of these little orange Rice Krispie Treat Pumpkins, and I found him standing alone in the kitchen, halfway through his third one, trying to figure out how to make them himself.
“I don’t do baking,” he said, caught red-handed with orange frosting on his thumb. “But these are just… different.”
And honestly? He was right. They are different. Not because they’re complicated—they’re laughably simple. Not because they’re fancy—they look like something a five-year-old could make. But because they hit that perfect sweet spot between “I made something from scratch” and “I didn’t break a sweat doing it.”
Maybe you’ve been there. You want to bring something homemade to the Halloween party, but the thought of wrestling with pie crust or piping intricate spiderwebs makes you want to just grab a bag of fun-size candy bars instead. I get it. I’ve been that person. That’s exactly why these little pumpkins exist.
I made my first batch on a Tuesday night after work, completely on a whim. I had a box of Rice Krispies in the pantry and a bag of Halloween sprinkles I’d bought on clearance the year before. The power went out halfway through melting the marshmallows—which, let me tell you, creates a very specific kind of panic—but I finished by flashlight and they turned out ridiculous and wonderful. I’ve been making them every October since.
Why You’ll Love This Recipe
These Easy Halloween Rice Krispie Treat Pumpkins are the kind of recipe that makes you look like you put in way more effort than you actually did. Here’s why they keep showing up at my Halloween gatherings:
- Takes Under 30 Minutes : From start to finish, including cooling time, you can have a full tray of these ready before your favorite Halloween movie ends. No baking, no complicated steps.
- Five Simple Ingredients : You probably already have three of them in your kitchen right now. No special trips to the craft store for obscure candy melts or fondant.
- Perfect for Halloween Parties : They’re portable, kid-friendly, and don’t require plates or forks. Grab one and go—ideal for potlucks, classroom parties, or pumpkin carving nights.
- Zero Baking Skills Required : If you can melt butter and stir, you can make these. My brother-in-law is living proof.
- Customizable for Any Skill Level : Keep them simple with just orange frosting, or go wild with candy corn stems and sprinkles. There’s no wrong way to decorate.
What makes these different from every other Rice Krispie treat recipe out there? It’s the technique. Most recipes tell you to press the mixture into a pan and cut shapes. That works, but you end up with jagged edges and wasted scraps. I shape these entirely by hand—slightly damp fingers, a gentle touch—and the result is these perfectly round, soft little pumpkins that look like they came from a bakery. No waste, no fuss, and honestly, way more satisfying.
This is the recipe that makes you close your eyes after the first bite. The marshmallow-to-butter ratio is dialed in just right—chewy but not sticky, sweet but not cloying. It’s comfort food reimagined for the Halloween season, and it hits every single time.
What Ingredients You Will Need
This recipe uses simple, everyday ingredients to create something that looks and tastes special. Most of these are pantry staples, which means you can whip up a batch on impulse without a grocery run.
For the Treat Base
- 3 tablespoons unsalted butter (I use salted butter in a pinch and just skip the extra salt—works fine)
- 1 package (10 ounces) regular marshmallows (about 40 large marshmallows or 4 cups mini marshmallows—mini melt faster, so they’re my preference)
- 1/4 teaspoon vanilla extract (pure vanilla if you have it, imitation works too—just adds that classic Rice Krispie treat flavor)
- 6 cups Rice Krispies cereal (or any crispy rice cereal—store brands work perfectly, I’ve tested them)
- Pinch of salt (optional but recommended—balances the sweetness beautifully)
For Decorating
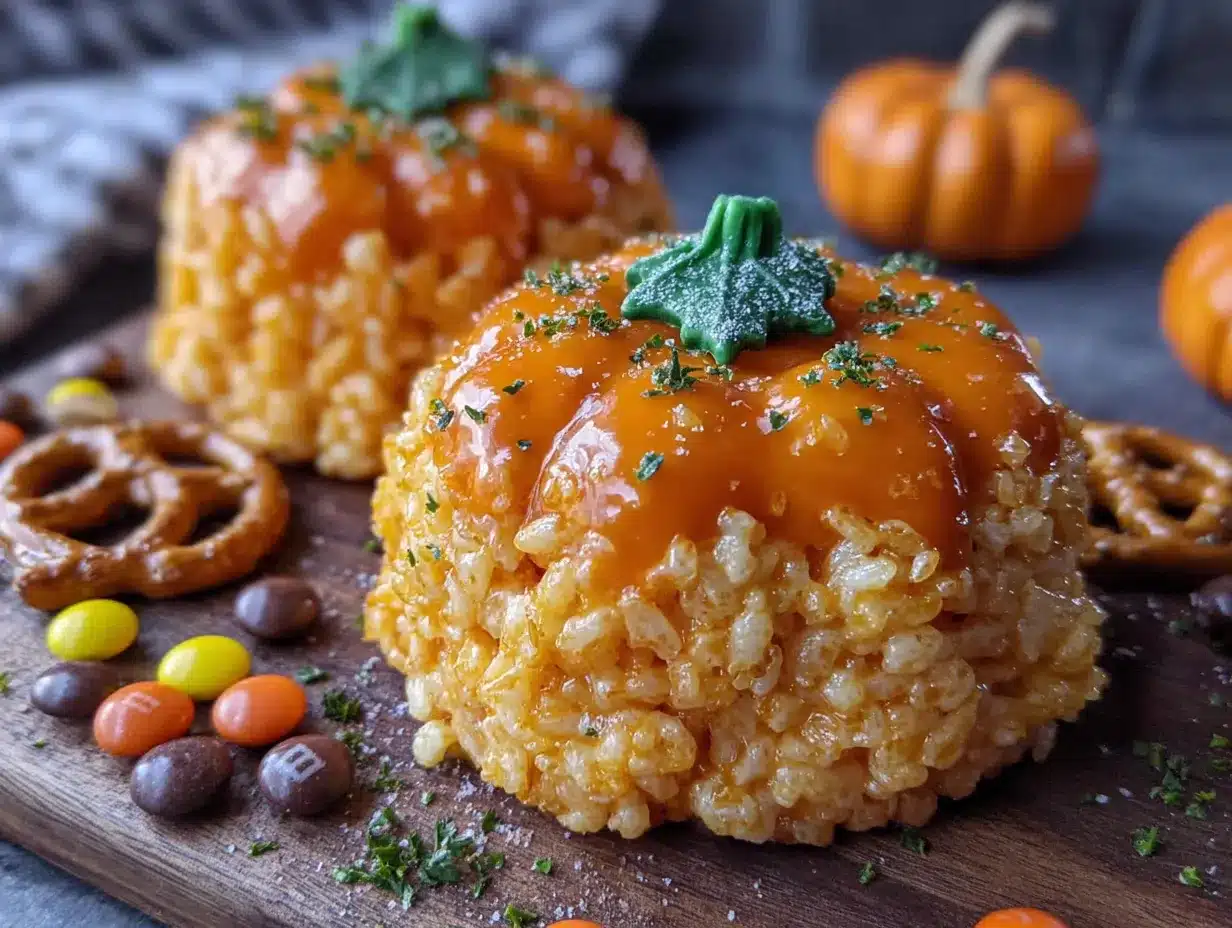
- 1 can (16 ounces) orange frosting (store-bought is totally fine—I like Duncan Hines or Pillsbury for consistent color and texture)
- Green candy melts or green frosting (for the stems—I use Wilton green candy melts, but green frosting tubes work too)
- Pretzel sticks or small pretzel twists (broken into 1-inch pieces for stems—gives a nice salty crunch)
- Halloween sprinkles (orange jimmies, black nonpareils, or little candy eyes—whatever you have on hand)
- Green licorice strings or green fruit leather (for pumpkin vines—optional but adorable)
Ingredient Deep Dive: The butter is non-negotiable here. Margarine or plant-based butter alternatives work, but they change the texture slightly—the treats won’t be quite as tender. For a dairy-free version, I’ve had success with Miyoko’s vegan butter; it melts similarly and the flavor is nearly identical.
The marshmallows are the heart of this recipe. Fresh marshmallows are crucial—if your bag has been sitting in the pantry for six months, the treats will turn out dense and hard. Give the bag a squeeze; if the marshmallows are stiff, buy a new bag. Jet-Puffed is my go-to brand because they melt evenly without leaving weird grainy bits.
For the orange frosting, I’ve tested homemade buttercream too, and honestly? The canned stuff works better here. It’s thicker and holds its shape when you pipe it onto the treats. If you want to make your own, use a stiffer buttercream recipe with extra powdered sugar.
Equipment Needed
You don’t need much for these Easy Halloween Rice Krispie Treat Pumpkins. Here’s what I use:
- Large pot or Dutch oven (at least 5-quart—gives you room to stir without flinging cereal everywhere)
- Large mixing bowl (for the cereal—I use my biggest stainless steel bowl)
- Rubber spatula or wooden spoon (silicone spatulas work best for scraping every bit of marshmallow off the sides)
- 9×13-inch baking pan (for the initial press—you can skip this and shape directly on parchment)
- Parchment paper or wax paper (absolute lifesaver for preventing sticking)
- Small offset spatula or butter knife (for spreading frosting)
- Piping bags or small zip-top bags (for the frosting—snip a tiny corner off a zip-top bag if you don’t have piping bags)
- Measuring cups and spoons
If you don’t have a piping bag, don’t stress. I’ve used a sandwich bag with the corner snipped off more times than I can count. For shaping the pumpkins, your hands are the best tool you own—just keep them slightly damp with water to prevent sticking. I learned that trick after my first batch turned into a sticky nightmare that stuck to everything including my cat, who was very unimpressed.
Preparation Method
Let me walk you through this step by step. I’ve made these pumpkins at least two dozen times, so I’ve figured out all the little tricks that make the process smooth and stress-free.
- Prep your workspace. Line your 9×13-inch pan with parchment paper, leaving some overhang on the sides. Lightly grease the parchment with butter or non-stick spray. Set aside a second sheet of parchment for shaping.
- Melt the butter. Place your large pot over medium-low heat and add the 3 tablespoons of butter. Let it melt slowly—don’t rush this. You want it fully melted but not bubbling or browning. Swirl the pot occasionally to help it melt evenly. This takes about 2-3 minutes.
- Add the marshmallows. Pour in the entire bag of marshmallows and stir constantly with your spatula. Keep the heat on medium-low. The marshmallows will start to soften and puff up—this is normal. Keep stirring until about 80% of them are melted and you have a few lumps remaining. Remove the pot from the heat immediately. The residual heat will finish melting the lumps. If you keep cooking until everything is perfectly smooth, you’ll end up with hard, dense treats.
- Add vanilla and salt. Stir in the vanilla extract and pinch of salt. The mixture will smell incredible at this point—like a warm hug.
- Fold in the cereal. Add the 6 cups of Rice Krispies to the pot. Fold gently with your spatula, starting from the bottom and bringing the mixture up and over. Don’t stir vigorously—you’ll crush the cereal and end up with dense treats. Fold until all the cereal is coated, about 1-2 minutes. If you see dry spots, keep folding gently.
- Press into the pan. Transfer the mixture to your prepared pan. Here’s the trick: lightly grease your hands with butter or non-stick spray, then press the mixture into an even layer. Don’t press too hard—you want them tender, not compressed into hockey pucks. Let cool for 10 minutes at room temperature, then refrigerate for 20 minutes to set up firm.
- Shape the pumpkins. Once the treats are firm, lift them out using the parchment overhang. Cut into 12 equal rectangles. Take one rectangle and roll it gently between your palms to form a ball. You want it round but slightly flattened on top and bottom—pumpkin shaped, not perfectly spherical. If the mixture sticks to your hands, dampen them slightly with water. Repeat with all pieces.
- Add the frosting. Spoon the orange frosting into a piping bag or zip-top bag and snip off a tiny corner. Pipe a small amount onto the top of each pumpkin, then spread it slightly with your offset spatula or finger. You want a thin, even coating—not a thick layer. Let the frosting set for 5 minutes.
- Attach the stems. Break pretzel sticks into 1-inch pieces. Press one gently into the center of each pumpkin, leaving about half an inch exposed. If you’re using green candy melts, melt a small amount in the microwave (15-second intervals, stirring between) and dip the pretzel piece in before inserting—it gives a nice green stem look.
- Decorate! Add sprinkles, candy eyes, or tiny green vines made from licorice strings. Work quickly while the frosting is still tacky so everything sticks. Let the finished pumpkins sit at room temperature for 15 minutes to set completely.
Cooking Tips & Techniques
I’ve made every mistake in the book with these treats, so you don’t have to. Here’s what I’ve learned:
The Marshmallow Mistake: My first batch turned out like hockey pucks because I cooked the marshmallows too long. I was so focused on getting them perfectly smooth that I kept stirring over the heat. Big mistake. Marshmallows are done when about 80% of them have melted and you still see a few lumps. Take the pot off the heat and let the residual warmth finish the job. Your treats will be soft and pillowy instead of dense and hard.
The Sticky Hands Solution: Shaping these by hand is the best way to get round, cute pumpkins, but the mixture will stick to everything. Keep a small bowl of water nearby and dip your fingers in it before handling each piece. The water creates a barrier between the sticky marshmallow and your skin. Works like magic. Just don’t use too much water or you’ll end up with sog spots on your treats.
The Timing Trick: These treats are easiest to shape when they’re cold but not frozen. After pressing them into the pan, let them cool at room temperature for 10 minutes, then pop them in the fridge for exactly 20 minutes. Set a timer. If you leave them too long, they’ll be too hard to roll into balls. If you don’t chill them long enough, they’ll be too sticky to handle.
The Frosting Hack: Store-bought orange frosting straight from the can is thick and perfect for piping. If you want a deeper orange color, add a drop of red food coloring to the orange frosting and mix well. If you want a lighter, pastel pumpkin, use white frosting and add yellow and red food coloring drop by drop until you get the shade you want.
Multitasking Strategy: While the treats are chilling in the fridge, prep your decorating station. Set out your sprinkles, break the pretzel sticks, and fill your piping bags. This way, when the treats come out of the fridge, you can decorate them all in one smooth flow without stopping to hunt for supplies.
Variations & Adaptations
One of the best things about this recipe is how easy it is to make it your own. Here are some variations I’ve tried and loved:
Peanut Butter Pumpkin Treats: Add 1/4 cup of creamy peanut butter to the marshmallow mixture right after you remove it from the heat. Stir until fully incorporated before adding the cereal. The peanut butter adds richness and a subtle savory note that balances the sweetness. My husband declared these “the best thing I’ve ever made” and he’s not easily impressed.
Chocolate-Dipped Pumpkins: After shaping the treats into balls, dip the bottom half in melted dark or milk chocolate. Let the excess drip off, then place on parchment to set. The chocolate adds a nice crunch and makes them look extra fancy for Halloween parties. I did this for a neighborhood gathering and people thought I bought them from a bakery.
Gluten-Free Version: Rice Krispies are naturally gluten-free, but check the label—some store brands use malt flavoring that contains gluten. I use the name brand or a certified gluten-free alternative like Nature’s Path. Everything else in the recipe is already gluten-free, so this is an easy swap.
Vegan Pumpkin Treats: Use vegan marshmallows (Dandies is my favorite brand—they melt beautifully) and plant-based butter. Miyoko’s or Earth Balance work well. The texture will be slightly different—a bit chewier—but the flavor is spot-on. I made these for a vegan friend’s Halloween party and they disappeared before the non-vegan versions.
Mini Pumpkins for Kids: Instead of cutting the treats into 12 pieces, cut them into 24 smaller pieces and shape into tiny pumpkins. Kids love the bite-sized version, and they’re perfect for classroom parties or Halloween lunchboxes. I use pretzel sticks broken into half-inch pieces for the stems on these little guys.
Spiced Pumpkin Treats: Add 1/2 teaspoon of pumpkin pie spice to the marshmallow mixture along with the vanilla. It gives the treats a subtle autumn warmth without being overpowering. I tried this on a whim last year and it’s now my go-to version for Thanksgiving gatherings.
Serving & Storage Suggestions
These Easy Halloween Rice Krispie Treat Pumpkins are best served at room temperature. The texture is perfectly chewy and the frosting stays soft but not sticky. I usually arrange them on a platter with a few extra pretzel sticks scattered around for a rustic look.
How to Store: Place the treats in an airtight container, layering them between sheets of parchment paper. They’ll stay fresh at room temperature for up to 3 days. Don’t refrigerate them—the cold air makes the treats hard and the frosting can get weepy. If you need to keep them longer, freeze them (see below).
Freezing Instructions: These freeze beautifully. Arrange the undecorated treats (no frosting or stems) in a single layer on a baking sheet and freeze for 1 hour. Transfer to a freezer-safe bag or container, separating layers with parchment. They’ll keep for up to 3 months. When you’re ready to serve, thaw at room temperature for 30 minutes, then decorate as usual. I often make a double batch in early October and freeze half for Halloween week.
How Flavors Develop: These treats actually taste better the next day. The marshmallow and cereal have time to meld together, creating a more cohesive texture. The frosting sets up slightly, which makes them easier to handle. I always make mine a day ahead of any party.
What to Serve Alongside: These pumpkins pair beautifully with warm apple cider, hot chocolate, or a pumpkin spice latte. For a Halloween dessert spread, arrange them next to chocolate cupcakes with spiderweb frosting or a bowl of candy corn. They’re also fantastic alongside a cheese board—the sweet-salty combo with sharp cheddar is surprisingly good.
Nutritional Information & Benefits
Let’s be real—these are a treat, not a health food. But here’s the breakdown so you know what you’re working with:
Per Serving (1 pumpkin): Approximately 220 calories, 8g fat, 36g carbohydrates, 2g protein, 18g sugar. These numbers will vary based on your frosting and decorating choices.
Health Highlights: Rice Krispies are fortified with iron and B vitamins, so there’s that. The butter adds a small amount of vitamin A. And honestly? Sometimes the mental health benefit of making something cute and delicious with your own hands is worth more than any nutritional metric. I’m a big believer in balance—eat your vegetables, but also enjoy your Halloween treats without guilt.
Dietary Considerations: As written, this recipe contains gluten (check your cereal), dairy (butter), and may contain traces of nuts depending on your decorating ingredients. For gluten-free, use certified gluten-free cereal. For dairy-free, use vegan butter. For nut-free, check all labels carefully. The recipe is egg-free and can be made vegan with the substitutions listed above.
Allergen Note: If you’re serving these at a school or party, label them clearly with ingredients. I always include a little card that says “Contains: dairy, gluten” so everyone can make informed choices.
Conclusion
These Easy Halloween Rice Krispie Treat Pumpkins are the kind of recipe that makes you feel like a kitchen wizard without actually having to do any wizardry. They’re simple enough for a Tuesday night, cute enough for a Halloween party, and delicious enough that people will ask for the recipe every single time.
I love that I can make these with my niece and nephew without either of us getting frustrated. I love that they look impressive on a platter but take less than 30 minutes from start to finish. And I really love that my brother-in-law, who swore off Halloween baking for fifteen years, now makes these every year without fail.
Try them as written, or make them your own with the variations I’ve shared. Add sprinkles, skip the stems, double the frosting—there’s no wrong way to do this. Just make sure you save a few for yourself before the party starts, because trust me, they disappear fast.
I’d love to see your pumpkin creations! Drop a comment below and tell me how yours turned out, or share your own twist on the recipe. And if you’re looking for more Halloween baking ideas that won’t stress you out, check out my spiderweb cupcakes or these no-bake Halloween cookie bars.
Happy Halloween, and happy snacking!
Frequently Asked Questions
Can I use homemade frosting instead of canned?
Absolutely! Just make sure your homemade buttercream is on the stiffer side so it holds its shape when piped. Add extra powdered sugar until it’s thick enough to pipe without running. I’ve used both, and honestly, canned frosting is easier and works just as well for this recipe.
Why are my Rice Krispie treats hard instead of soft?
This usually happens when the marshmallows are cooked too long or over too high heat. Keep the heat on medium-low and remove the pot from the stove when about 80% of the marshmallows are melted. The residual heat will finish the job. Also, don’t press the mixture too firmly into the pan—gentle pressure keeps them tender.
Can I make these ahead of time for a party?
Yes! Make the treats (without frosting) up to 3 days ahead and store in an airtight container at room temperature. Frost and decorate the day of your party for the freshest look. Or freeze the undecorated treats for up to 3 months and decorate after thawing.
How do I get the orange frosting to be a darker pumpkin color?
Add a tiny drop of red food coloring to the orange frosting and mix well. You can also use a drop of brown food coloring for a more muted, earthy pumpkin shade. Go slowly—a little goes a long way, and you can always add more.
Can I use a different cereal instead of Rice Krispies?
Sure! Cocoa Krispies would make chocolate pumpkins, Fruity Pebbles would give you colorful treats, or even crushed cornflakes for a different texture. Just keep the cereal-to-marshmallow ratio the same. I’ve tried Cocoa Krispies and they’re fantastic for a chocolate twist on the classic.
Pin This Recipe!
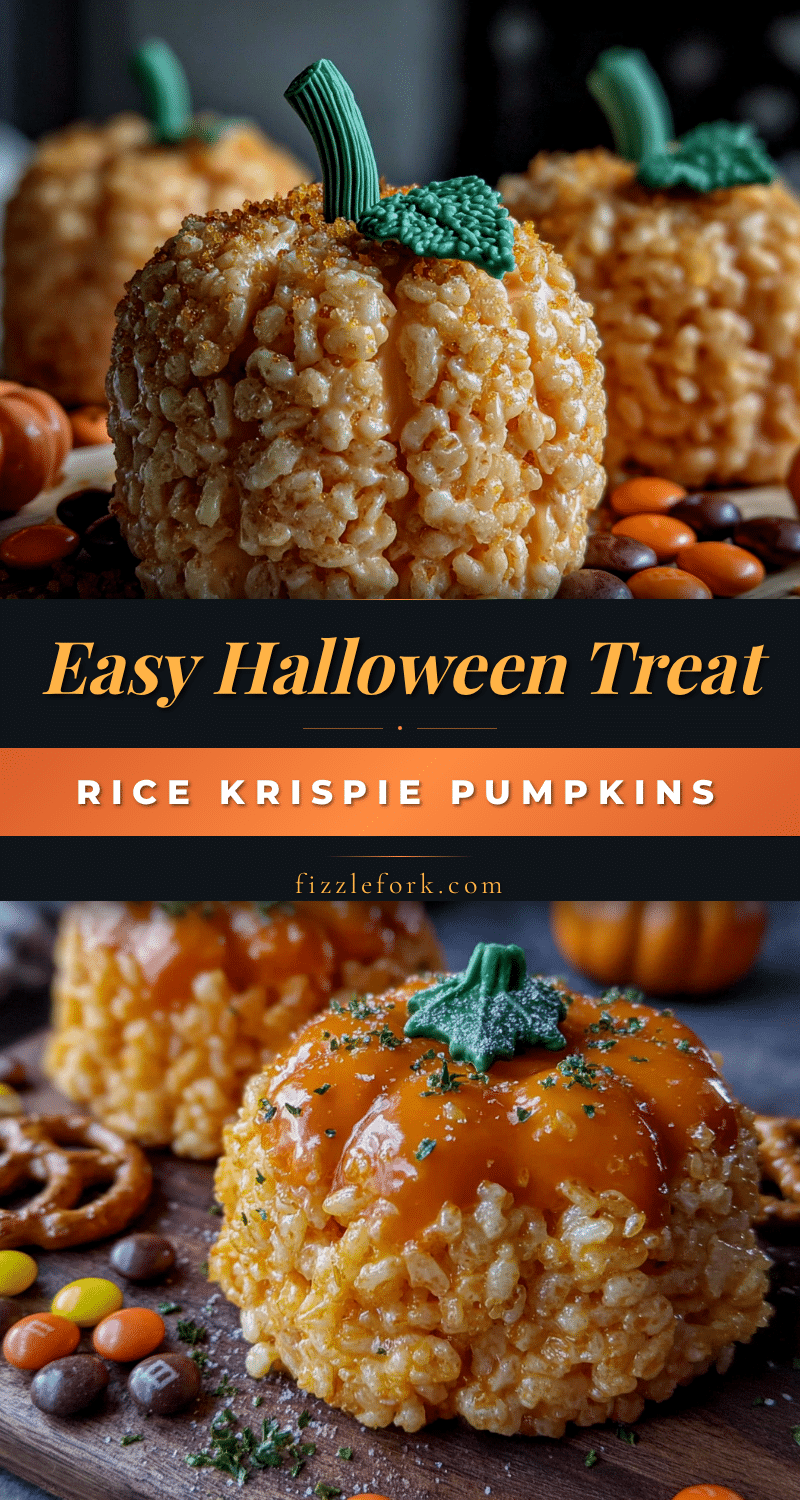
Easy Halloween Rice Krispie Treat Pumpkins
These adorable pumpkin-shaped Rice Krispie treats are laughably simple to make, require zero baking skills, and come together in under 30 minutes. Perfect for Halloween parties, they’re portable, kid-friendly, and customizable with your favorite decorations.
- Prep Time: 15 minutes
- Cook Time: 10 minutes
- Total Time: 25 minutes
- Yield: 12 servings 1x
- Category: Dessert
- Cuisine: American
Ingredients
- 3 tablespoons unsalted butter
- 1 package (10 ounces) regular marshmallows (about 40 large or 4 cups mini)
- 1/4 teaspoon vanilla extract
- 6 cups Rice Krispies cereal
- Pinch of salt (optional)
- 1 can (16 ounces) orange frosting
- Green candy melts or green frosting (for stems)
- Pretzel sticks or small pretzel twists (broken into 1-inch pieces)
- Halloween sprinkles (optional)
- Green licorice strings or green fruit leather (optional, for vines)
Instructions
- Prep your workspace: Line a 9×13-inch pan with parchment paper, leaving overhang. Lightly grease the parchment with butter or non-stick spray. Set aside a second sheet of parchment for shaping.
- Melt the butter: Place a large pot over medium-low heat and add 3 tablespoons of butter. Let it melt slowly, about 2-3 minutes, without browning.
- Add the marshmallows: Pour in the entire bag of marshmallows and stir constantly. Keep heat on medium-low until about 80% of marshmallows are melted with a few lumps remaining. Remove from heat immediately; residual heat will finish melting.
- Add vanilla and salt: Stir in vanilla extract and a pinch of salt.
- Fold in the cereal: Add 6 cups of Rice Krispies and fold gently with a spatula until all cereal is coated, about 1-2 minutes.
- Press into the pan: Lightly grease your hands with butter or non-stick spray, then press the mixture into an even layer in the prepared pan. Don’t press too hard. Let cool for 10 minutes at room temperature, then refrigerate for 20 minutes to set.
- Shape the pumpkins: Lift the treats out using parchment overhang. Cut into 12 equal rectangles. Roll each rectangle gently between your palms to form a ball, slightly flattened on top and bottom. Dampen hands with water if sticky.
- Add the frosting: Spoon orange frosting into a piping bag or zip-top bag and snip off a tiny corner. Pipe a small amount onto the top of each pumpkin and spread slightly. Let set for 5 minutes.
- Attach the stems: Break pretzel sticks into 1-inch pieces. Press one gently into the center of each pumpkin, leaving about half an inch exposed. Optionally, dip pretzel in melted green candy melts first.
- Decorate: Add sprinkles, candy eyes, or green licorice vines while frosting is still tacky. Let finished pumpkins sit at room temperature for 15 minutes to set completely.
Notes
For best texture, don’t overcook the marshmallows—remove from heat when about 80% melted. Keep hands slightly damp when shaping to prevent sticking. These taste even better the next day. Store in an airtight container at room temperature for up to 3 days. Freeze undecorated treats for up to 3 months.
Nutrition
- Serving Size: 1 pumpkin
- Calories: 220
- Sugar: 18
- Sodium: 180
- Fat: 8
- Saturated Fat: 4
- Carbohydrates: 36
- Protein: 2
Keywords: Halloween Rice Krispie treats, pumpkin treats, no-bake Halloween dessert, easy Halloween recipe, Rice Krispie pumpkins