The school Halloween party was in six hours and I’d completely forgotten. My son reminded me at breakfast, mid-bite of his cereal, milk dribbling down his chin. “Mom, the treat sign-up sheet? You took the last slot.” Panic isn’t a strong enough word for what I felt. Every other parent would be bringing elaborate cupcakes with fondant ghosts, themed cookies with royal icing, or those creepy crawly gelatin desserts that take three days to set. I had a bag of string cheese, a can of pizza sauce, and some whole wheat tortillas that were about to expire. Honestly, I wanted to crawl under the table.
But here’s the thing about panic—it makes you creative. Or maybe just desperate. I stared at that string cheese and thought, well, at least it’s white. Like a mummy’s wrappings. And then it hit me: mummy pizza bites. Little cheese-stuffed roll-ups with sauce for dipping. They could be cute. They could be fast. And if I used lighter ingredients, I wouldn’t feel guilty about my kid eating three of them before the party even started. Maybe you’ve been there—staring at your pantry, willing it to become something party-worthy.
I threw them together in twenty minutes flat. No measuring, no fuss, just assembly and a quick bake. When I walked into that gymnasium with my tray of slightly lopsided mummy bites, I felt like a fraud next to the Pinterest-worthy spread. But you know what happened? The kids devoured them first. The parents asked for the recipe. And my son—he told everyone his mom made the “coolest monster snacks.” So I kept making them. For every Halloween since, for movie nights, for days when we want something fun without the junk. They’re the little recipe that won by accident, and honestly, that’s my favorite kind.
Why You’ll Love This Recipe
Let me tell you why these lighter mummy pizza bites with string cheese have become my most-requested Halloween recipe. I’ve tested this about a dozen times now—trying different tortillas, different cheeses, different baking times—and this version is the one that works every single time. No fuss, no stress, just pure snack magic.
- Ready in 20 Minutes: From fridge to table in the time it takes to watch one episode of a cartoon. Perfect for last-minute party panic or after-school cravings.
- Simple Ingredients: String cheese, tortillas, pizza sauce, and a few spices. That’s it. No specialty stores, no weird finds.
- Perfect for Halloween Parties: These little guys look like mummies but taste like pizza. Kids go wild for them, and adults sneak them too.
- Actually Lighter: We’re using whole wheat tortillas, part-skim mozzarella string cheese, and just a brush of olive oil. No heavy dough, no greasy pepperoni, no guilt.
- Crowd-Pleaser: I’ve brought these to three different Halloween events now, and they disappear faster than anything else on the table. Even the kids who “don’t like healthy food” grab seconds.
What makes these different from every other mummy snack out there? It’s the texture. The tortilla gets crispy on the outside while the string cheese melts into gooey perfection inside. Plus, the lighter approach means you can feel good about your kids having three or four of them. They’re not just cute—they’re actually satisfying. The kind of snack that makes you close your eyes after the first bite and think, okay, this works. Comfort food reimagined for real life.
What Ingredients You Will Need
This recipe uses simple, wholesome ingredients to deliver that pizza flavor we all crave without the heavy feeling afterward. Most of these are pantry staples or easy to find at any grocery store.
- String cheese sticks (6 sticks, part-skim mozzarella) — These are the mummies themselves. I prefer part-skim for the lighter factor. Look for sticks that are firm and fresh. (String cheese is the whole point here—don’t substitute shredded cheese or you’ll lose the mummy look.)
- Whole wheat tortillas (6 small, 6-inch tortillas) — These wrap around the cheese to form the mummy bandages. I like the 100% whole wheat ones from the refrigerated section. They’re softer and roll better without cracking.
- Pizza sauce (1/3 cup, plus more for dipping) — Use your favorite jarred brand or make a quick one from tomato paste and Italian seasoning. I’m partial to Rao’s for the clean ingredient list.
- Olive oil (1 tablespoon) — Just enough to brush on top for golden, crispy results. You could also use avocado oil spray for even less fat.
- Garlic powder (1/2 teaspoon) — Adds that savory depth that makes these taste like real pizza.
- Italian seasoning (1/2 teaspoon) — A little oregano, basil, and thyme goes a long way.
- Black olives (6 slices, or 6 small olive pieces) — These become the mummy eyes. You can also use peppercorns or tiny dots of black sesame seeds.
Optional but nice:
- Red pepper flakes (for a tiny kick, if your audience can handle it)
- Fresh basil leaves (for garnish, makes them look fancy)
- Marinara sauce (for extra dipping, because you can never have too much sauce)
Ingredient note: If you’re dairy-free, you can find plant-based string cheese alternatives now. They melt differently—less stretchy—but they still work for the mummy look. Just watch the baking time closely so they don’t dry out.
Substitution tip: No whole wheat tortillas? Use regular flour tortillas, corn tortillas (smaller, crispier), or even wonton wrappers for bite-sized versions. Just adjust the bake time down by a few minutes for smaller wraps.
Equipment Needed
Nothing fancy here—you probably have all of this in your kitchen already. That’s the beauty of this recipe.
- Baking sheet (standard half-sheet pan works great) — I use an old one that’s seen better days. It’s fine. Imperfect pans still make perfect mummies.
- Parchment paper or silicone baking mat — Prevents sticking and makes cleanup a breeze. I’ve forgotten this before and regretted it. Trust me on this one.
- Pastry brush (or just your fingers) — For brushing olive oil onto the tortillas. A silicone brush is nice, but I’ve used a paper towel in a pinch.
- Sharp knife or pizza cutter — For cutting the tortillas into strips. A pizza cutter is faster and gives cleaner edges.
- Small bowl — For the pizza sauce dip. Or just use the jar lid. No judgment here.
- Toothpicks (optional) — If you want to secure the wraps, especially for younger kids who might try to unroll them.
Budget-friendly tip: If you don’t have a pastry brush, just drizzle the olive oil over the tortilla strips and spread it with your fingers. It’s less precise but works exactly the same. I’ve done it both ways, and honestly, my fingers method gets better coverage.
Preparation Method

Let’s make these mummy pizza bites. Take your time with the wrapping—it’s the only slightly fiddly part, and it goes fast once you get the rhythm.
- Preheat your oven to 375°F (190°C). Line your baking sheet with parchment paper. This gives you time to prep while the oven heats.
- Prepare the tortilla strips. Lay a tortilla flat on your cutting board. Using a sharp knife or pizza cutter, cut it into 4-5 strips, each about 1 inch wide. They don’t need to be perfect—mummies aren’t known for tidy bandages. Repeat with all 6 tortillas. You should have about 24-30 strips total.
- Season the olive oil. In your small bowl, mix the olive oil with the garlic powder and Italian seasoning. Stir it with a fork until combined. Set this near your work station.
- Wrap the string cheese. Take one string cheese stick and place it at the end of a tortilla strip. Roll the strip around the cheese, slightly overlapping as you go, leaving a small gap at the top for the “face.” The cheese should peek out about 1/2 inch at one end—that’s where the eyes will go. If the strip isn’t long enough to cover the whole stick, add another strip, pressing the ends together slightly. Don’t worry if it looks messy. Mummies are supposed to look a little unraveled.
- Place on the baking sheet. Set each wrapped mummy on the parchment paper, seam side down. This helps the wraps stay closed during baking. Leave about 1 inch between each one for even browning.
- Brush with seasoned oil. Using your pastry brush (or fingers), lightly brush each mummy with the garlic-herb oil mixture. Don’t soak them—just a light coating. This is what gives them that golden, crispy exterior.
- Bake for 10-12 minutes. Place the sheet in the preheated oven. Bake until the tortilla strips are golden brown and the cheese is melted and slightly puffed. At 10 minutes, check them. You’re looking for light golden edges. If they need more time, give them 2 more minutes. Watch closely—they go from perfect to burnt fast.
- Add the eyes immediately. As soon as the mummies come out of the oven, press two small olive pieces (or peppercorns) into the exposed cheese at the top to create eyes. The cheese will be hot and soft, so the olives sink right in. Work quickly before the cheese sets.
- Let them rest for 2 minutes. This is important. The cheese inside is molten hot and will burn little tongues. Let them cool just enough to handle. The tortilla will also crisp up more as it rests.
- Serve with warm pizza sauce. Pour the remaining pizza sauce into a small bowl for dipping. Arrange the mummies on a platter with the sauce in the center. Watch them disappear.
Sensory cue: When they’re done, the kitchen smells like a pizzeria crossed with a fall festival. The tortilla strips will be visibly crisp at the edges, and the cheese might bubble through a gap here and there—that’s actually perfect. It looks more mummy-like.
Troubleshooting note: If your tortilla strips are unraveling during baking, you wrapped them too loosely. Next time, press the end of the strip against the seam before placing them seam-side down. Or use a toothpick to secure the end. I’ve done the toothpick trick for kids’ parties, and it works like a charm.
Cooking Tips & Techniques
I’ve made these mummy pizza bites at least twenty times now, and let me tell you—I’ve learned some things the hard way. Here’s what I wish someone had told me the first time.
Don’t overbake them. I know I said 10-12 minutes, but I once got distracted by a phone call and left them in for 15. The cheese exploded out of the tortilla, and I had little cheese puddles instead of mummies. They still tasted good, but the presentation was a disaster. Set a timer. Actually set two timers.
Warm the tortillas first. If your tortillas are cold from the fridge, they’ll crack when you try to wrap them. Microwave them for 10 seconds between damp paper towels. They’ll become pliable and cooperative. This is a game-changer, especially with whole wheat tortillas which tend to be drier.
Use room temperature string cheese. Same logic. Cold cheese takes longer to melt, which means the tortilla might burn before the center is gooey. Let the cheese sit on the counter for 10 minutes before wrapping. I keep mine out while I prep everything else.
Cut the tortilla strips slightly wider than you think. I started with thin strips—like 1/2 inch—and they were too flimsy. They tore easily and didn’t hold the cheese well. One-inch strips are the sweet spot. They wrap cleanly and stay put.
Brush, don’t drizzle. I made the mistake of drizzling the oil directly onto the mummies once. It pooled underneath and made the bottoms soggy. A light brush is all you need. You’re going for a sheen, not a soak.
Make extra dipping sauce. I cannot stress this enough. The ratio of mummy to sauce is critical. One-third cup of pizza sauce for six mummies is barely enough. Double the sauce. Your guests will thank you.
My biggest failure? The time I forgot to add the eyes before serving. I brought a tray of eyeless mummies to a party, and my nephew asked if they were “ghost burritos.” We laughed, but I learned my lesson. The eyes are what make them mummies. Don’t skip that step.
Variations & Adaptations
This recipe is flexible—I’ve tried several variations, and most of them turned out great. Here are some ways to make these mummy pizza bites your own.
Gluten-Free Version: Use gluten-free tortillas or corn tortillas. Corn tortillas are smaller, so you might need to cut them into thinner strips and use one strip per cheese stick. They get extra crispy, which I actually prefer. Just watch the bake time—corn tortillas brown faster.
Spicy Mummies: Add a pinch of red pepper flakes to the olive oil mixture, or use pepper jack string cheese instead of mozzarella. I did this for a grown-up Halloween party, and they were a hit. The heat cuts through the richness of the cheese nicely.
Vegan Version: Use plant-based string cheese (I’ve tried the brand Follow Your Heart) and brush with vegan butter instead of olive oil. The texture is different—less stretchy, more creamy—but the flavor is still solid. Bake for 12-14 minutes since vegan cheese takes longer to soften.
Breakfast Mummies: Swap the pizza sauce for a drizzle of honey or maple syrup, and use a cinnamon-sugar sprinkle instead of garlic and Italian seasoning. My kids love these for a fun weekend breakfast. They’re sweeter, obviously, but still lighter than danishes or donuts.
Pepperoni Mummies: For a more traditional pizza flavor, wrap a small piece of turkey pepperoni around the cheese before adding the tortilla strips. It adds a salty, smoky kick. I do this when I want something heartier for dinner alongside a salad.
Air Fryer Method: I tried this last week, and it works beautifully. Preheat the air fryer to 350°F (175°C). Arrange the mummies in a single layer (don’t overcrowd) and cook for 6-8 minutes, flipping halfway through. They come out extra crispy with less oil. Perfect for small batches.
My personal favorite variation? The everything bagel version. I brush the tortilla strips with a little beaten egg white, then sprinkle everything bagel seasoning over them before baking. The sesame, poppy, garlic, and onion flavors pair surprisingly well with melted cheese. It’s weird but wonderful.
Serving & Storage Suggestions
These mummy pizza bites are best served warm, right when the cheese is still stretchy and the tortilla is crispy. Here’s how to make the most of them.
Serving temperature: Serve them within 10 minutes of coming out of the oven. That’s when the magic happens—the cheese pulls apart in long strings, and the tortilla shatters slightly when you bite into it. If they sit too long, the tortilla softens from the steam. Still tasty, but not as dramatic.
Presentation idea: Arrange them on a black or dark orange platter for Halloween vibes. Place the dipping sauce in a small pumpkin-shaped bowl if you have one. I like to scatter a few olive “eyes” around the platter for extra creepiness. Kids love that touch.
What to serve with them: These are great on their own, but they pair well with a simple side salad (for balance) or carrot sticks with ranch dip (for color). For a Halloween party spread, I serve them alongside spooky Halloween punch and easy ghost bananas for a full themed menu.
Storage: If you have leftovers (unlikely, but possible), let them cool completely, then store them in an airtight container in the refrigerator for up to 3 days. The tortilla will soften, but the flavor stays good.
Reheating: The air fryer is your best friend here. Reheat at 350°F (175°C) for 3-4 minutes until the tortilla crisps back up. The microwave works in a pinch (30 seconds), but the tortilla will be chewy, not crispy. I’ve also reheated them in a toaster oven with good results.
Freezer instructions: You can freeze these before baking. Assemble the mummies, place them on a baking sheet, and freeze until solid (about 2 hours). Transfer to a freezer bag. When you’re ready, bake from frozen at 375°F (190°C) for 14-16 minutes. Add the eyes after baking. This is my secret weapon for last-minute Halloween gatherings.
Flavor development note: These don’t really improve with age—they’re best fresh. But the sauce? Make that a day ahead. The flavors meld together, and it tastes more robust. I always make my pizza sauce the night before when I’m planning a party.
Nutritional Information & Benefits
One of my favorite things about these mummy pizza bites is that they feel indulgent without actually being heavy. Here’s the breakdown per serving (3 mummy bites, with sauce):
- Calories: Approximately 280-320
- Protein: 18-20 grams (thanks to the string cheese)
- Carbohydrates: 28-32 grams (from the tortillas)
- Fat: 12-14 grams (mostly from the cheese and olive oil)
- Fiber: 4-6 grams (whole wheat tortillas bring the fiber)
- Sugar: 3-5 grams (naturally occurring from the sauce)
Health benefits: String cheese is a great source of calcium and protein, which helps keep kids (and adults) full and satisfied. The whole wheat tortillas add fiber, which supports digestion and steady energy. Olive oil provides healthy monounsaturated fats. Plus, by using lighter ingredients and controlling portions, you’re getting all the fun of pizza without the grease bomb.
Dietary considerations: This recipe is vegetarian. For gluten-free, use corn tortillas. For dairy-free, use plant-based cheese alternatives. It’s naturally nut-free and egg-free (unless you add the everything bagel variation).
Potential allergens: Dairy (cheese), gluten (tortillas). Check your specific brands if you have sensitivities.
My personal wellness perspective: I love that these let my kids participate in Halloween food traditions without the sugar crash and processed junk. They get excited about the mummy shape, and I feel good about what they’re eating. It’s a win-win that I didn’t expect when I first threw them together in panic.
Conclusion
These lighter mummy pizza bites with string cheese are proof that you don’t need hours of prep or a dozen specialty ingredients to make something memorable. They came together in a moment of panic, and they’ve become a tradition we genuinely look forward to every October. The crispy tortilla, the gooey cheese, the little olive eyes staring up at you—it’s Halloween fun without the Halloween junk.
I hope you try them, and I hope you make them your own. Add pepperoni. Go gluten-free. Double the garlic. Whatever feels right to you. That’s the beauty of a simple recipe—it leaves room for your personality to shine through. And if you forget the eyes like I did that one time? Just call them ghost burritos. Nobody will care once they taste them.
I’d love to hear how yours turn out! Drop a comment below and tell me about your Halloween party, your kids’ reactions, or your own kitchen mishaps. Share this recipe with a friend who always forgets the class party sign-up sheet—they’ll thank you later. And if you come up with a wild variation I haven’t tried, let me know. I’m always up for a new mummy experiment.
Happy Halloween, friends. May your cheese be stretchy and your tortillas stay crispy.
Frequently Asked Questions
Can I make these mummy pizza bites ahead of time?
Yes! You can assemble them up to 24 hours in advance and keep them covered in the refrigerator. Bake them just before serving for the best texture. If you’re bringing them to a party, bake them at home and reheat in the oven or air fryer for 3-4 minutes once you arrive.
Can I use low-fat string cheese?
You can, but I don’t recommend it. Low-fat string cheese has less moisture and doesn’t melt as smoothly. Part-skim mozzarella string cheese is the sweet spot—lighter than full-fat but still melts into that perfect stretchy texture. I’ve tested both, and part-skim wins every time.
How do I keep the tortilla strips from unraveling?
Make sure you place the mummies seam-side down on the baking sheet. The weight of the cheese and the heat of the oven will seal the seam. If you’re still having trouble, secure the end of the strip with a toothpick before baking. Just remember to remove the toothpicks before serving!
Can I use something other than olives for the eyes?
Absolutely. Black peppercorns work great (they’re actually more mummy-like), or you can use tiny dots of black sesame seeds, small pieces of sun-dried tomato, or even a dab of black food coloring gel. For a less scary version, use small pieces of red bell pepper or carrot rounds.
Are these mummy pizza bites kid-friendly to make?
Very! Kids can help cut the tortilla strips with a pizza cutter (with supervision), wrap the cheese, and place the olive eyes. It’s a great Halloween activity that doubles as snack time. Just handle the hot baking sheet yourself—the cheese gets extremely hot inside.
Pin This Recipe!
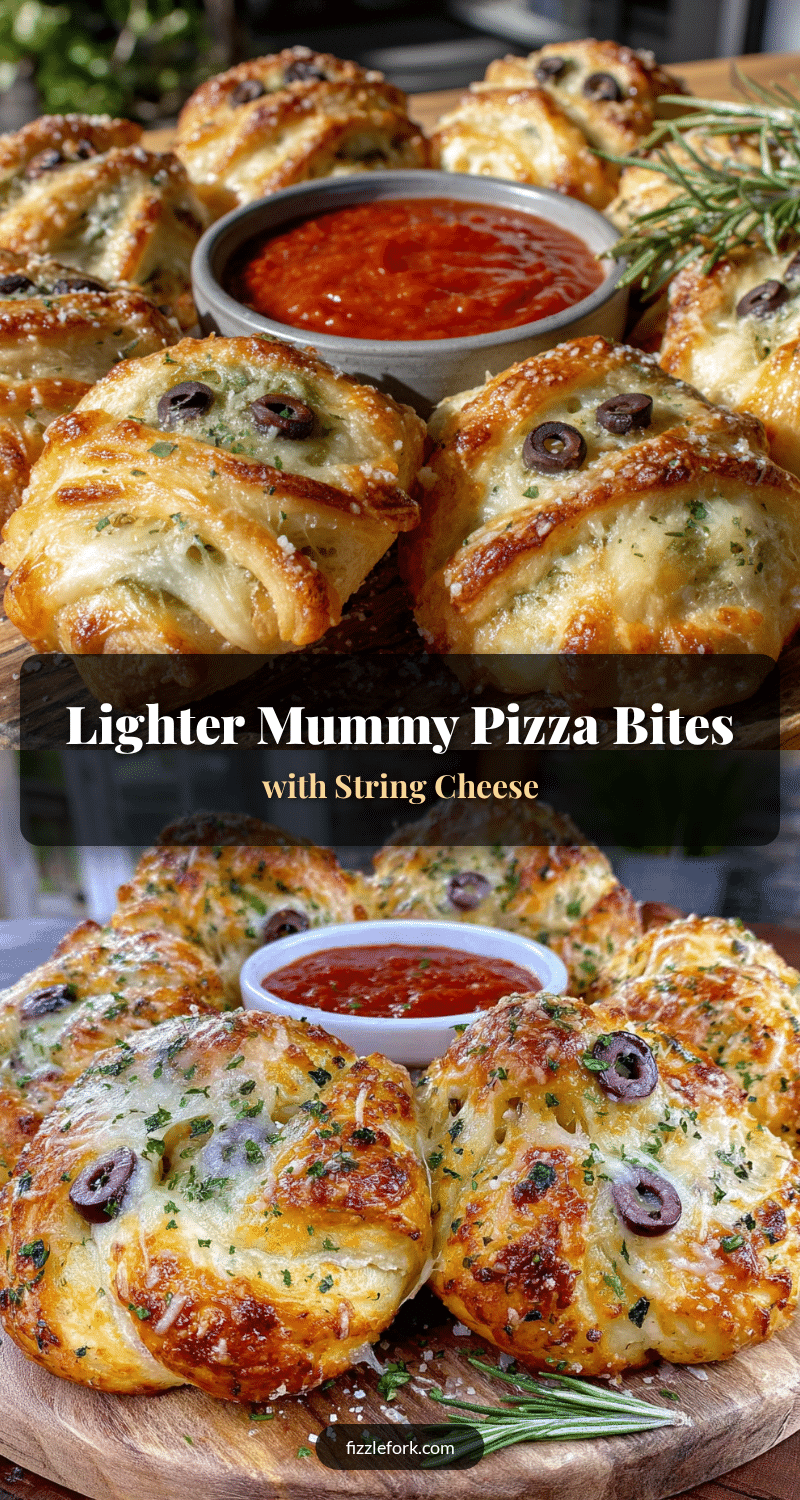
Lighter Mummy Pizza Bites with String Cheese (Easy Halloween Recipe)

These lighter mummy pizza bites with string cheese are ready in 20 minutes and use simple ingredients like whole wheat tortillas and part-skim mozzarella. They’re a fun, healthier Halloween snack that kids and adults love.
- Prep Time: 10 minutes
- Cook Time: 12 minutes
- Total Time: 22 minutes
- Yield: 6 servings (3 mummy bites per serving) 1x
- Category: Appetizer
- Cuisine: American
Ingredients
- 6 string cheese sticks (part-skim mozzarella)
- 6 small whole wheat tortillas (6-inch)
- 1/3 cup pizza sauce (plus more for dipping)
- 1 tablespoon olive oil
- 1/2 teaspoon garlic powder
- 1/2 teaspoon Italian seasoning
- 6 slices black olives (or 6 small olive pieces for eyes)
- Red pepper flakes (optional, for a kick)
- Fresh basil leaves (optional, for garnish)
- Marinara sauce (optional, for extra dipping)
Instructions
- Preheat your oven to 375°F (190°C). Line a baking sheet with parchment paper.
- Lay a tortilla flat on a cutting board. Using a sharp knife or pizza cutter, cut it into 4-5 strips, each about 1 inch wide. Repeat with all 6 tortillas (about 24-30 strips total).
- In a small bowl, mix the olive oil with the garlic powder and Italian seasoning. Stir until combined.
- Take one string cheese stick and place it at the end of a tortilla strip. Roll the strip around the cheese, slightly overlapping, leaving a small gap at the top for the ‘face’ (about 1/2 inch of cheese exposed). If the strip isn’t long enough, add another strip, pressing the ends together.
- Place each wrapped mummy on the parchment paper, seam side down. Leave about 1 inch between each one.
- Using a pastry brush (or your fingers), lightly brush each mummy with the seasoned oil mixture.
- Bake for 10-12 minutes, until the tortilla strips are golden brown and the cheese is melted and slightly puffed.
- Immediately after removing from the oven, press two small olive pieces into the exposed cheese at the top to create eyes.
- Let the mummies rest for 2 minutes before serving.
- Serve with warm pizza sauce for dipping.
Notes
Don’t overbake—cheese may explode. Warm tortillas for 10 seconds in microwave if they crack. Use room temperature string cheese for even melting. Cut tortilla strips 1 inch wide. Brush oil lightly to avoid sogginess. Double the dipping sauce. Add eyes immediately after baking for best presentation.
Nutrition
- Serving Size: 3 mummy bites with s
- Calories: 300
- Sugar: 4
- Sodium: 480
- Fat: 13
- Saturated Fat: 5
- Carbohydrates: 30
- Fiber: 5
- Protein: 19
Keywords: Halloween, mummy pizza bites, string cheese, easy recipe, kid-friendly, healthy snack, party food


