I was elbow-deep in pumpkin guts on a rainy Tuesday afternoon, not exactly where I expected to find my new favorite snack. The year before, I’d made the classic salty roasted pumpkin seeds, and they were fine—fine, you know? But I wanted something different. Something that made you close your eyes after the first bite. That’s when my neighbor, an eighty-year-old retired baker named Marge, shuffled over to borrow my kitchen scale. She saw the mess on my counter, laughed, and said, “You’re doing it wrong, honey. The real magic is in the sweet stuff.”
Honestly, I thought she was just being a nosy neighbor. But Marge knows her way around a kitchen—she used to run a bakery out of her garage for thirty years. She told me about tossing pumpkin seeds with cinnamon, sugar, and a little butter before roasting them until they’re light and crispy. Not the dense, chewy kind you usually get, but seeds that shatter when you bite them. I was skeptical, but I had nothing to lose. I mean, the seeds were already sitting there, staring at me from a bowl.
So I tried it. I tossed them in melted butter, a generous sprinkle of cinnamon, and just enough sugar to make them glisten. Then I spread them on a baking sheet and waited. The smell that filled my kitchen was ridiculous—like a pumpkin patch married a cinnamon roll. When I pulled them out, they were golden, crackly, and absolutely irresistible. I ate half the batch before they even cooled down. Maybe you’ve been there, standing over the counter, telling yourself you’ll stop after one more handful. Yeah, me too.
That rainy Tuesday turned into a tradition. Now, every time I carve a pumpkin or even open a can of pumpkin puree, I save the seeds for this recipe. It’s the kind of snack that feels special but takes almost no effort. And honestly, it’s the reason I look forward to pumpkin season all year.
Why You’ll Love This Recipe
This isn’t your average pumpkin seed recipe. I’ve tested this method at least a dozen times, tweaking the temperature and the sugar ratio until it was just right. What I ended up with is a snack that’s light, crispy, and coated in a cinnamon-sugar crust that stays put—no sad, naked seeds here.
- Quick & Easy: From start to finish, these seeds take about 25 minutes. That’s faster than a trip to the store for a bag of chips.
- Simple Ingredients: You probably already have everything in your pantry. Butter, sugar, cinnamon, salt—that’s it. No fancy trips required.
- Perfect for Fall: Great for Halloween parties, Thanksgiving snacking, or just cozying up with a movie on a crisp autumn evening.
- Crowd-Pleaser: I’ve brought these to potlucks and watched grown adults argue over the last handful. Kids love them too—they’re basically nature’s candy.
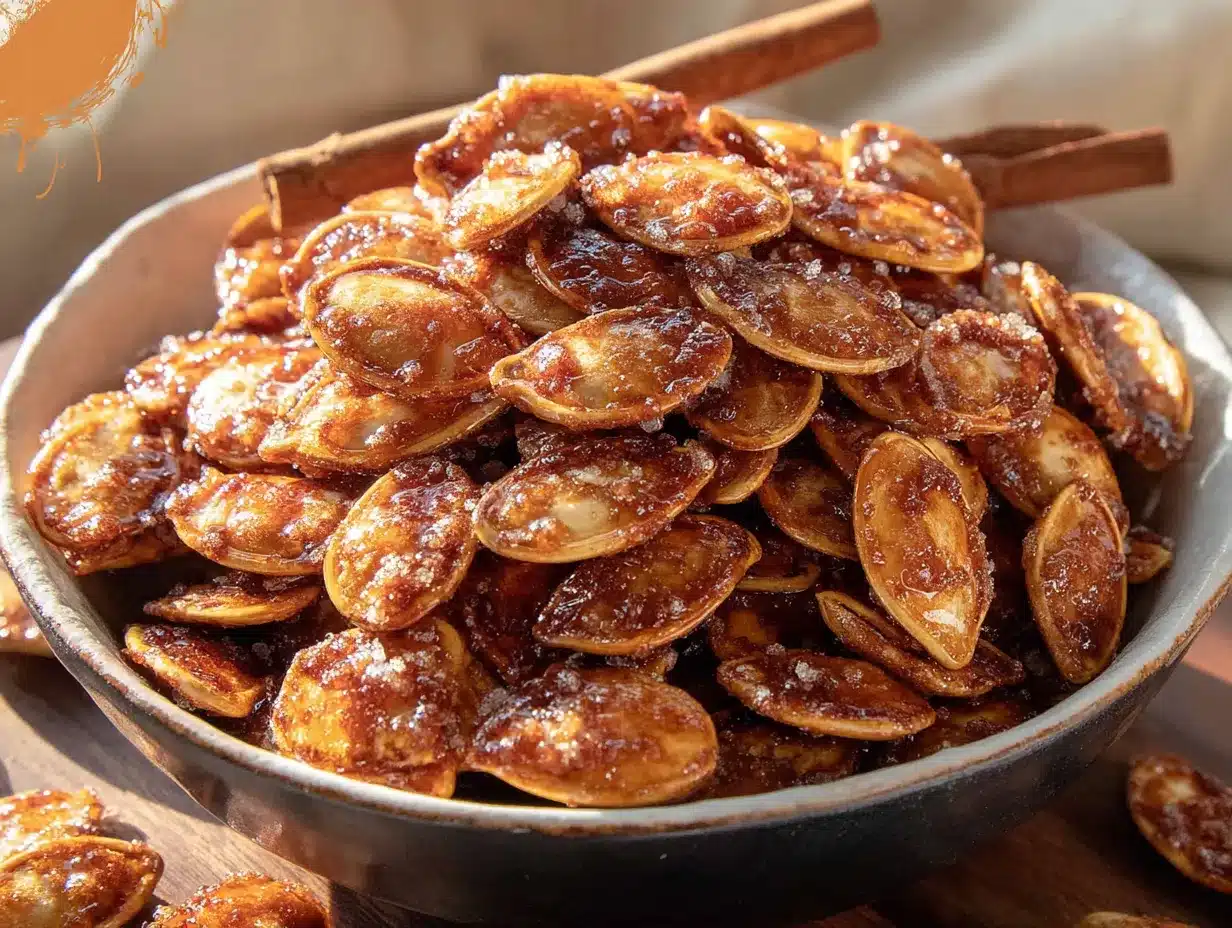
- Unbelievably Delicious: The texture is what gets you. Light and crispy with a sweet, spiced coating that melts on your tongue. It’s next-level comfort food in a bowl.
What makes this recipe different from all the others? It’s the boiling step. I know, I know—boiling seeds sounds weird. But trust me, it’s the secret to getting that light, airy crunch instead of the tough, chewy texture most roasted seeds have. Plus, the cinnamon-sugar mixture sticks perfectly because of the butter and the slight tackiness from boiling. This isn’t just another version of roasted pumpkin seeds. It’s the best version.
This recipe is the kind that makes you close your eyes after the first bite. It’s comfort food reimagined—healthier than a candy bar, faster than baking cookies, but with the same soul-soothing satisfaction. Perfect for impressing guests without stress, or turning a simple Tuesday night into something memorable.
What Ingredients You Will Need
This recipe uses simple, wholesome ingredients to deliver bold flavor and a satisfying crunch without any fuss. Most of these are pantry staples, so you can whip up a batch anytime the craving hits.
- Fresh pumpkin seeds – 1 cup (about 120g), rinsed and patted dry. You can use seeds from any pumpkin variety, but sugar pumpkins tend to have the best flavor. If you’re using seeds from a carving pumpkin, they’ll still work great—just make sure to remove all the stringy pulp.
- Unsalted butter – 2 tablespoons (28g), melted. I prefer unsalted so I can control the salt level. Salted butter works too, just reduce the added salt slightly. For a dairy-free option, use coconut oil or vegan butter.
- Granulated sugar – 2 tablespoons (25g). This gives the seeds their sweet coating. You can swap in coconut sugar for a less refined option, though the color will be darker.
- Ground cinnamon – 1 teaspoon. Use a good quality cinnamon like Saigon or Ceylon for the best flavor. I’ve tried both, and Saigon is bolder and warmer—perfect for this recipe.
- Salt – 1/4 teaspoon. Just a pinch to balance the sweetness and bring out the nutty flavor of the seeds. I use fine sea salt.
- Water – 2 cups (480ml) for boiling. This is the magic ingredient that makes the seeds light and crispy instead of dense.
Ingredient Selection Tips: Look for pumpkin seeds that are plump and feel slightly heavy for their size. Avoid seeds that look shriveled or have dark spots. If you’re buying pre-packaged seeds, make sure they’re raw and unsalted. I personally recommend using seeds from a fresh pumpkin—the flavor is noticeably better than store-bought raw seeds.
Substitution Guidance: For a vegan version, swap the butter with melted coconut oil. For a lower-sugar option, use monk fruit sweetener or a stevia blend. Just note that the texture might be slightly different. If you’re out of cinnamon, try pumpkin pie spice for a more complex flavor profile.
Equipment Needed
You don’t need a fancy kitchen to make these seeds. Most of these tools you probably already own, and I’ve included alternatives for anything specialized.
- Medium saucepan – For boiling the seeds. Any pot will do, but a heavy-bottomed one distributes heat more evenly.
- Colander or fine-mesh strainer – To drain the seeds after boiling. A regular colander works fine, but a fine-mesh strainer catches smaller seeds.
- Mixing bowl – For tossing the seeds with butter and sugar. A medium glass or stainless steel bowl works best.
- Baking sheet – A rimmed baking sheet prevents seeds from rolling off. I use a half-sheet pan (18×13 inches).
- Parchment paper or silicone baking mat – Not strictly necessary, but it makes cleanup a breeze. I’ve forgotten it before and the seeds still came out fine—just a little more scrubbing.
- Spatula or wooden spoon – For stirring the seeds during roasting. A silicone spatula is gentle on non-stick pans.
- Kitchen towel or paper towels – For patting the seeds dry after rinsing. A clean dish towel works best to absorb extra moisture.
Budget-Friendly Options: If you don’t have a fine-mesh strainer, use a regular colander lined with cheesecloth. No silicone baking mat? Parchment paper is cheap and works just as well. I’ve even used aluminum foil in a pinch—just spray it lightly with cooking spray.
Maintenance Tip: After roasting, let your baking sheet cool completely before washing. Plunging a hot pan into cold water can warp it over time.
Preparation Method
- Preheat your oven to 350°F (175°C). This gives it time to come to temperature while you prep the seeds. Line a baking sheet with parchment paper or a silicone mat and set it aside.
- Rinse the pumpkin seeds thoroughly under cold running water in a colander. Use your fingers to gently rub off any remaining pumpkin strings or pulp. This step is important—leftover pulp can make the seeds clump together and burn. Pat them dry with a clean kitchen towel or paper towels.
- Bring 2 cups of water to a boil in a medium saucepan. Once it’s bubbling, add the cleaned pumpkin seeds. Boil them for exactly 10 minutes. I set a timer because I’ve forgotten before and ended up with mushy seeds—not great. The boiling step softens the outer shell and helps the seeds puff up during roasting, giving you that light, crispy texture.
- Drain the seeds in a colander and rinse them briefly with cold water to stop the cooking process. Shake off as much water as possible. Then spread them out on a clean kitchen towel and pat them dry. They don’t need to be bone-dry, but they shouldn’t be dripping wet either.
- In a medium mixing bowl, combine the melted butter, granulated sugar, ground cinnamon, and salt. Stir until the sugar and cinnamon are fully incorporated into the butter. The mixture should look like a thick paste. If it’s too runny, your butter might be too hot—let it cool for a minute.
- Add the boiled and dried pumpkin seeds to the bowl. Toss them with a spatula or spoon until every seed is evenly coated. Make sure to scrape the bottom of the bowl—the good stuff settles there. The seeds should look glossy and speckled with cinnamon.
- Spread the coated seeds in a single layer on the prepared baking sheet. Try not to overlap them too much, or they’ll steam instead of roast. I use my spatula to spread them out evenly, then give the pan a little shake.
- Roast for 12-15 minutes, stirring halfway through. At the 7-minute mark, pull the pan out and give the seeds a good stir with a spatula. This ensures even cooking and prevents burning. The seeds are done when they’re golden brown and smell incredibly fragrant—like a cinnamon toast version of autumn.
- Let the seeds cool completely on the baking sheet. They’ll continue to crisp up as they cool. I know it’s tempting, but don’t eat them right away—they’re softer when hot. Give them at least 15 minutes. Once cooled, they should be light, crispy, and shatter when you bite into them.
Troubleshooting Tip: If your seeds are chewy instead of crispy, they likely needed more time in the oven or weren’t boiled long enough. Next time, boil for the full 10 minutes and roast until they’re deep golden brown. If they’re burning on the edges but still soft in the middle, your oven might run hot—try reducing the temperature to 325°F next time.
Cooking Tips & Techniques
I’ve made this recipe more times than I can count, and I’ve learned a few things the hard way. Let me save you the trouble.
Don’t skip the boiling step. I know it adds an extra 10 minutes, but it’s non-negotiable. Boiling softens the seed’s outer shell, allowing steam to escape during roasting. This is what gives you that light, airy crunch instead of a dense, chewy texture. The first time I made these, I skipped the boil and ended up with seeds that felt like pebbles.
Dry the seeds well after boiling. Excess moisture will make the butter and sugar mixture slide off instead of sticking. I pat them dry with a towel, then let them sit for a few minutes to air dry. If they’re still too wet, the sugar can dissolve and create a sticky mess on the pan.
Stir halfway through roasting. This is a small step that makes a big difference. The seeds on the edges of the pan cook faster than the ones in the middle. Stirring ensures even browning and prevents burning. I’ve forgotten to stir before and ended up with half the batch too dark and the other half undercooked.
Watch your oven temperature. Ovens vary wildly. My friend’s oven runs 25 degrees hot, so she has to reduce the temperature to 325°F. If your seeds are browning too quickly, lower the temp and extend the cooking time. If they’re not browning at all, increase it slightly.
Let them cool completely. I know I said this before, but it’s worth repeating. Hot seeds are soft and bendy. As they cool, the sugar hardens and the seeds become crispy. If you eat them warm, you’ll think they’re a failure. Wait the full 15 minutes, and you’ll be rewarded with the perfect crunch.
Variations & Adaptations
Once you’ve mastered the basic recipe, feel free to experiment. Here are a few variations I’ve tried and loved.
Spicy Cinnamon Sugar: Add 1/4 teaspoon of cayenne pepper or chili powder to the sugar mixture. The heat sneaks up on you and pairs beautifully with the sweet cinnamon. I made this for a game night and it was gone in ten minutes.
Maple Cinnamon: Replace the granulated sugar with 2 tablespoons of pure maple syrup. Reduce the butter to 1 tablespoon since the syrup adds moisture. The flavor is deeper and more complex—perfect for fall. Just note that the seeds will be slightly stickier than the original version.
Vegan Option: Use melted coconut oil instead of butter. Coconut oil has a subtle tropical flavor that works surprisingly well with cinnamon. I’ve also used vegan butter sticks with great results.
Extra Crunchy: After tossing the seeds with the butter mixture, add 1 tablespoon of cornstarch. This creates an even crispier coating that stays crunchy for days. I discovered this trick when I accidentally added cornstarch instead of sugar—happy accident!
Chocolate Drizzle: Once the seeds have cooled, drizzle them with melted dark chocolate. Let the chocolate set before serving. It turns a healthy snack into a decadent treat that feels like dessert.
Serving & Storage Suggestions
These seeds are best served at room temperature, straight from the baking sheet or a bowl. They make a fantastic snack on their own, but they’re also great as a topping for yogurt, oatmeal, or even a fall salad. I’ve sprinkled them over butternut squash soup for a sweet and crunchy garnish—highly recommend.
Storage Instructions: Store the cooled seeds in an airtight container at room temperature. They’ll stay fresh and crispy for up to 5 days. If you live in a humid climate, add a silica gel packet to the container to absorb excess moisture. I keep mine in a glass jar with a tight lid.
Freezer Instructions: These seeds freeze beautifully. Place them in a freezer-safe bag or container and freeze for up to 3 months. To refresh, spread them on a baking sheet and warm them in a 300°F oven for 5 minutes. They’ll crisp right back up.
Reheating Tip: If your seeds lose their crunch after a few days, don’t throw them out! Spread them on a baking sheet and roast at 300°F for 3-4 minutes. Let them cool completely, and they’ll be as good as new.
How Flavors Develop: Interestingly, the cinnamon flavor becomes more pronounced after a day or two. The sugar and spice meld together, creating a deeper, more rounded taste. So don’t be discouraged if they taste a little simple on day one—they get better with time.
Nutritional Information & Benefits
Pumpkin seeds are a nutritional powerhouse, and this recipe keeps them relatively healthy despite the sweet coating. Here’s the estimated breakdown per serving (about 1/4 cup or 30g):
| Nutrient | Amount |
|---|---|
| Calories | 120 |
| Total Fat | 8g |
| Saturated Fat | 3g |
| Carbohydrates | 10g |
| Sugar | 6g |
| Fiber | 2g |
| Protein | 4g |
| Iron | 6% DV |
| Magnesium | 12% DV |
Health Benefits: Pumpkin seeds are rich in magnesium, which supports muscle function and sleep quality. They also contain zinc, which is great for immune health and skin. The fiber helps keep you full between meals, making this a satisfying snack that won’t spike your blood sugar.
Dietary Considerations: This recipe is naturally gluten-free and can be made vegan with a simple butter swap. It’s also low-carb friendly if you use a sugar substitute like monk fruit. Potential allergens include dairy (butter) and tree nuts (if using coconut oil, though coconut is technically a fruit).
Personal Wellness Perspective: I love that this snack feels indulgent but is actually pretty good for you. It satisfies my sweet tooth without the crash I get from processed candy. Plus, making them from scratch means I know exactly what’s in them—no weird additives or preservatives.
Conclusion
This Light & Crispy Cinnamon Sugar Pumpkin Seeds recipe is the snack you didn’t know you needed. It’s quick, easy, and uses ingredients you probably already have. The boiling trick transforms ordinary seeds into something extraordinary—light, crunchy, and coated in a sweet cinnamon crust that’s impossible to resist.
I love this recipe because it turns a kitchen byproduct into the star of the show. Every time I make it, I think of Marge and her nosy wisdom. It’s a reminder that the best recipes often come from unexpected places—and that a little cinnamon and sugar can make anything better.
Now it’s your turn. Give this recipe a try and let me know how it turns out. Did you add your own twist? Did you eat the whole batch before your family got any? Share your experience in the comments below—I’d love to hear from you. And if you loved this recipe, don’t forget to pin it for later or share it with a friend who needs a new fall snack obsession.
Happy roasting, and may your kitchen always smell like cinnamon!
Frequently Asked Questions
Can I use store-bought raw pumpkin seeds instead of fresh ones?
Absolutely. Store-bought raw pumpkin seeds (also called pepitas) work perfectly. Just skip the step where you rinse and clean them, but still boil them for 10 minutes to get that light, crispy texture.
Why are my pumpkin seeds chewy instead of crispy?
Chewy seeds usually mean they weren’t boiled long enough or roasted long enough. Make sure you boil for the full 10 minutes and roast until they’re golden brown. Also, let them cool completely on the baking sheet before eating—they crisp up as they cool.
Can I make this recipe without butter?
Yes! Use melted coconut oil or vegan butter as a substitute. Coconut oil adds a subtle tropical flavor that pairs nicely with cinnamon. Just use the same amount called for in the recipe.
How long do these cinnamon sugar pumpkin seeds last?
Stored in an airtight container at room temperature, they’ll stay fresh and crispy for up to 5 days. You can also freeze them for up to 3 months. If they lose their crunch, reheat them in a 300°F oven for 3-4 minutes.
Can I use other spices besides cinnamon?
Definitely. Pumpkin pie spice, nutmeg, ginger, or even a pinch of cardamom work beautifully. Start with 1 teaspoon of your chosen spice and adjust to taste. For a savory-sweet twist, try adding a pinch of cayenne pepper.
Pin This Recipe!
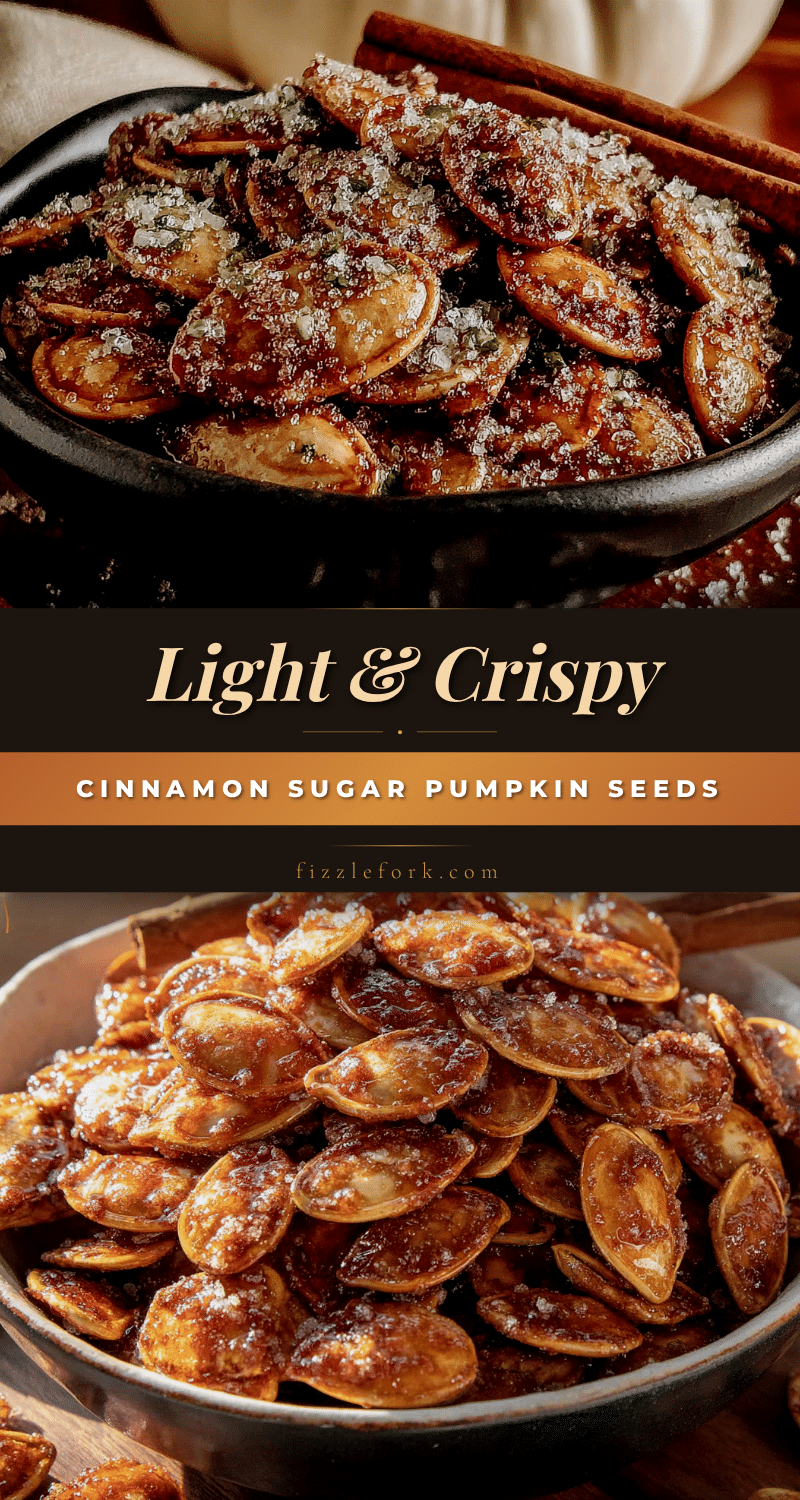
Best Easy Homemade Cinnamon Sugar Pumpkin Seeds Recipe

Light, crispy pumpkin seeds coated in a sweet cinnamon-sugar crust. This quick and easy recipe transforms ordinary seeds into an irresistible fall snack.
- Prep Time: 15 minutes
- Cook Time: 15 minutes
- Total Time: 30 minutes
- Yield: 4 servings 1x
- Category: Snack
- Cuisine: American
Ingredients
- 1 cup fresh pumpkin seeds (about 120g), rinsed and patted dry
- 2 tablespoons unsalted butter (28g), melted
- 2 tablespoons granulated sugar (25g)
- 1 teaspoon ground cinnamon
- 1/4 teaspoon salt
- 2 cups water (480ml) for boiling
Instructions
- Preheat your oven to 350°F (175°C). Line a baking sheet with parchment paper or a silicone mat and set aside.
- Rinse the pumpkin seeds thoroughly under cold running water in a colander. Use your fingers to gently rub off any remaining pumpkin strings or pulp. Pat them dry with a clean kitchen towel or paper towels.
- Bring 2 cups of water to a boil in a medium saucepan. Once bubbling, add the cleaned pumpkin seeds. Boil for exactly 10 minutes.
- Drain the seeds in a colander and rinse briefly with cold water to stop the cooking process. Shake off as much water as possible, then spread them out on a clean kitchen towel and pat dry.
- In a medium mixing bowl, combine the melted butter, granulated sugar, ground cinnamon, and salt. Stir until the sugar and cinnamon are fully incorporated into the butter, forming a thick paste.
- Add the boiled and dried pumpkin seeds to the bowl. Toss with a spatula or spoon until every seed is evenly coated.
- Spread the coated seeds in a single layer on the prepared baking sheet. Try not to overlap them too much.
- Roast for 12-15 minutes, stirring halfway through at the 7-minute mark. The seeds are done when golden brown and fragrant.
- Let the seeds cool completely on the baking sheet (at least 15 minutes). They will continue to crisp up as they cool.
Notes
Don’t skip the boiling step—it’s the secret to light, crispy seeds. Dry the seeds well after boiling to help the coating stick. Stir halfway through roasting for even browning. Let seeds cool completely before eating; they become crispy as they cool. For a vegan version, substitute melted coconut oil for butter. For a lower-sugar option, use monk fruit sweetener or stevia blend.
Nutrition
- Serving Size: 1/4 cup (30g)
- Calories: 120
- Sugar: 6
- Sodium: 75
- Fat: 8
- Saturated Fat: 3
- Carbohydrates: 10
- Fiber: 2
- Protein: 4
Keywords: cinnamon sugar pumpkin seeds, roasted pumpkin seeds, easy pumpkin seeds, fall snack, Halloween snack, Thanksgiving snack