My neighbor, Mrs. Gable, watched me haul a grocery bag of canned pumpkin out of my car and didn’t say anything at first. Then she just shook her head with this knowing little smile. “You’re overcomplicating it,” she said, wiping her hands on her apron. “Come here.”
She pulled me into her kitchen, which smelled like cinnamon and something warm I couldn’t quite place. Without a word, she opened her pantry and pulled out a box of yellow cake mix, a can of pumpkin puree, and a stick of butter. I thought she was joking at first. I mean, I had three different recipes bookmarked on my phone, each with a dozen steps and a grocery list a mile long. But Mrs. Gable just started layering things in a pan, and honestly, I stood there with my mouth slightly open.
“Friendsgiving is about being together, not being stressed,” she said, sliding the pan into the oven. “And kids don’t care about fancy. They care about this.”
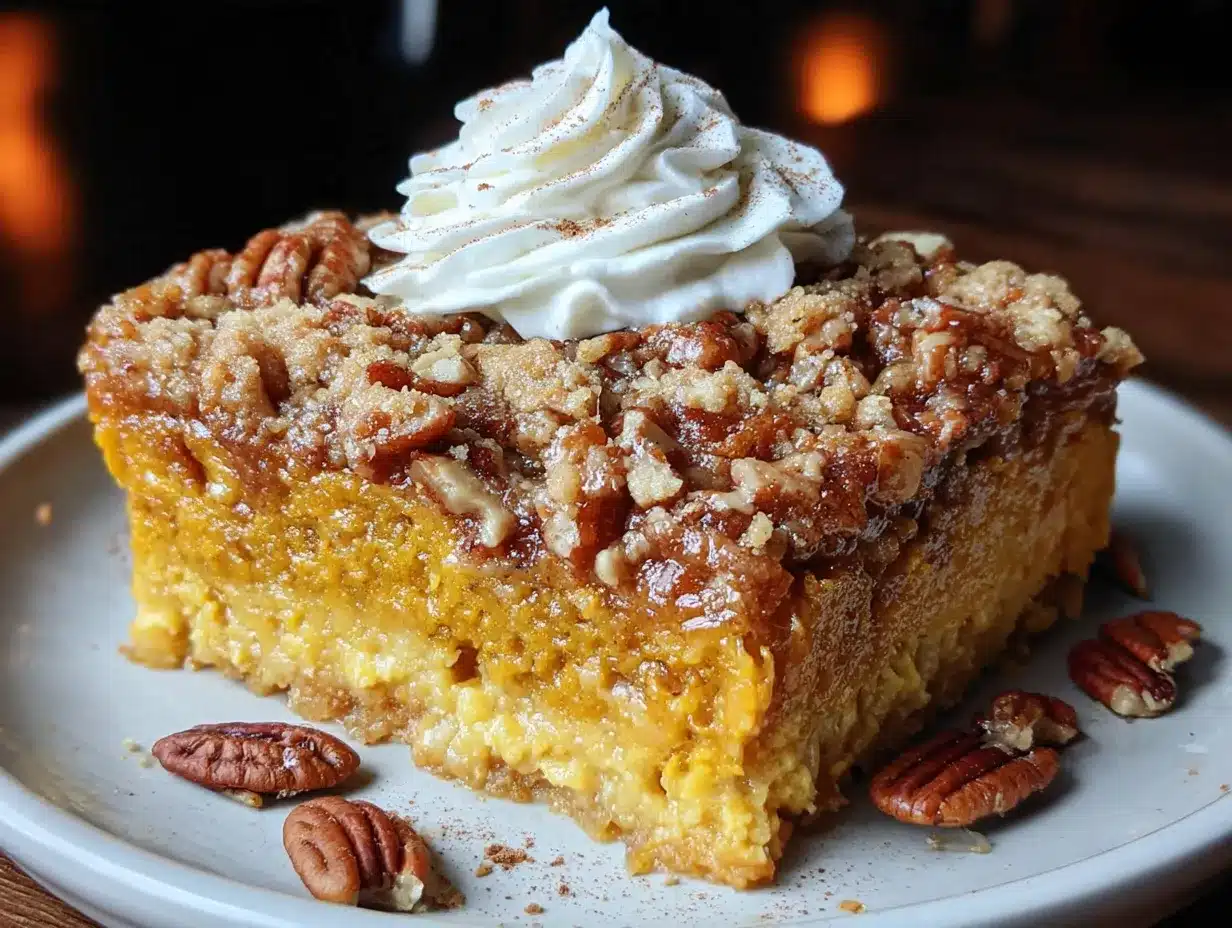
That first bite was a revelation. The pumpkin layer was creamy and spiced just right, and the top had this incredible buttery, crumbly texture that tasted like a warm hug. The kids at the table went quiet for a solid minute, which is basically a miracle if you’ve ever tried to feed a group of excited children. One of them even asked for seconds before touching her vegetables. I knew right then this recipe was something special.
Maybe you’ve been there too—staring down a holiday menu, wondering how to please everyone without spending your whole paycheck. This is that recipe. The one that makes you look like a hero with almost zero effort. It’s the dessert that lets you actually enjoy your own party.
Why You’ll Love This Recipe
Let me tell you why this Kid-Approved Friendsgiving Pumpkin Pie Dump Cake has earned a permanent spot in my rotation. I’ve tested it at three different Friendsgiving gatherings, two family dinners, and one very chaotic preschool bake sale. It passed every single test with flying colors.
- Quick & Easy: You need about 10 minutes of active prep time. That’s it. The oven does the rest of the work while you focus on your guests or maybe just take a breather.
- Simple Ingredients: Canned pumpkin, boxed cake mix, butter, eggs, and a few pantry spices. No hunting for obscure ingredients or spending forty dollars at the store.
- Perfect for Friendsgiving: This dessert feeds a crowd without requiring fancy plating or last-minute assembly. It’s forgiving, transportable, and always a hit.
- Crowd-Pleaser: Kids devour it. Adults ask for the recipe. Even picky eaters who “don’t like pumpkin” somehow end up with a second slice.
- Unbelievably Delicious: The contrast between the silky pumpkin custard and the crisp, buttery topping is pure comfort food magic. It tastes like fall in a pan.
What makes this version different from all the other pumpkin dump cakes out there? I’ve dialed in the spice blend so it’s warm but not overpowering. The ratio of pumpkin filling to cake topping is perfectly balanced so every bite has both textures. And I added a small trick—a sprinkle of cinnamon sugar on top before baking—that creates a delicate, crackly crust that makes this dessert feel just a little bit special.
This is the kind of dessert that makes people close their eyes after the first bite. It’s nostalgia and comfort and celebration all baked into one pan. And honestly, isn’t that what Friendsgiving is all about?
What Ingredients You Will Need
This recipe uses simple, honest ingredients that work together to create something truly greater than the sum of its parts. Most of these are pantry staples, which is exactly what you want when you’re feeding a crowd on a budget.
For the Pumpkin Layer
- 1 can (15 oz) pumpkin puree — not pumpkin pie filling. Look for 100% pure pumpkin. Libby’s is my go-to for consistent texture.
- 1 can (12 oz) evaporated milk — this adds richness without needing heavy cream. Great for keeping costs down.
- 3 large eggs, room temperature — they blend more smoothly into the filling.
- 3/4 cup granulated sugar — just enough sweetness to balance the earthy pumpkin.
- 1 teaspoon vanilla extract — pure vanilla if you have it, but imitation works fine here too.
- 2 teaspoons pumpkin pie spice — or make your own blend (see my tip below).
- 1/2 teaspoon ground cinnamon — because you can never have too much cinnamon in a fall dessert.
- 1/4 teaspoon salt — this brightens all the other flavors.
For the Topping
- 1 box (15.25 oz) yellow cake mix — Duncan Hines or Betty Crocker both work beautifully. Do not use a mix that requires pudding in the box.
- 3/4 cup unsalted butter, melted — salted butter works too, just reduce the added salt slightly.
- 1 tablespoon cinnamon sugar — for that crackly top crust. Mix 1 tablespoon sugar with 1/2 teaspoon cinnamon.
Ingredient Notes & Substitutions
If you want to make your own pumpkin pie spice, combine 1 teaspoon cinnamon, 1/2 teaspoon ginger, 1/4 teaspoon nutmeg, 1/4 teaspoon allspice, and a pinch of cloves. This homemade blend actually tastes fresher and more vibrant than most store-bought versions.
For a dairy-free version, use full-fat coconut milk instead of evaporated milk and plant-based butter. The texture will be slightly different but still delicious. Gluten-free cake mix works perfectly here—just make sure it’s a yellow or vanilla flavor.
One thing I learned the hard way: don’t use pumpkin pie filling. It already has sugar and spices added, which throws off the balance completely. Trust me, I made that mistake once and ended up with something that tasted like syrup.
Equipment Needed
You don’t need a fancy kitchen to make this recipe work. Here’s what you’ll actually use:
- 9×13-inch baking pan — glass or metal both work. Glass lets you see the bottom layer, which is helpful for checking doneness.
- Large mixing bowl — for whisking the pumpkin filling.
- Whisk — a fork works in a pinch, but a whisk makes the filling smoother.
- Measuring cups and spoons — for accuracy, especially with the spices.
- Spatula — for spreading the cake mix evenly.
- Cooling rack — optional but helpful for even cooling.
I’ve made this in a disposable aluminum pan for potlucks, and it works just as well. The bake time might be slightly shorter, so start checking at 40 minutes. If you don’t have a whisk, just use a fork and be prepared to whisk a little longer to break up any lumps.
One tip: spray your pan generously with non-stick spray, especially if you’re using glass. The pumpkin layer can stick if you’re not careful. I learned this after spending fifteen minutes scrubbing a pan that I definitely should have greased better.
Preparation Method
Preheat your oven to 350°F (175°C). Grease your 9×13-inch baking pan thoroughly with butter or non-stick spray. This step matters—don’t skip it unless you enjoy scrubbing baked-on pumpkin later.
- Make the pumpkin filling: In your large mixing bowl, combine the pumpkin puree, evaporated milk, eggs, sugar, vanilla extract, pumpkin pie spice, cinnamon, and salt. Whisk until everything is smooth and well combined. The mixture should be a uniform orange color with no streaks of egg white. This takes about 2 minutes of steady whisking.
- Pour the filling into the prepared pan: Use your spatula to scrape every last bit out of the bowl. Gently shake the pan to level the filling. It should be an even layer across the entire bottom of the pan.
- Add the cake mix topping: Sprinkle the dry cake mix evenly over the pumpkin filling. Don’t stir it in—just let it sit on top. Try to cover the entire surface as evenly as possible. Some bits of cake mix will sink into the filling, and that’s totally fine. The key is to avoid big clumps of dry mix.
- Drizzle with melted butter: Pour the melted butter slowly and evenly over the cake mix layer. Try to get butter on as much of the surface as possible. Some spots will stay dry, and that’s okay—they’ll still bake up fine. Just do your best to distribute it evenly.
- Sprinkle with cinnamon sugar: Dust the top with your cinnamon sugar mixture. This is the secret to that crackly, slightly crisp top that makes this dessert feel special.
- Bake: Place the pan in the preheated oven and bake for 45-50 minutes. The top should be golden brown and the edges should be bubbly. You’ll know it’s done when the center is set and doesn’t jiggle when you gently shake the pan. A knife inserted in the center should come out mostly clean.
- Cool: Let the dump cake cool on a wire rack for at least 20 minutes before serving. This allows the filling to set properly. If you cut into it too soon, it will be runny. I know because I’ve done it, and it’s still delicious but definitely messier.
One thing I always tell first-timers: don’t overmix the pumpkin filling. A few tiny lumps are fine. Overmixing can incorporate too much air, which might cause the filling to puff up and then sink unevenly. Just whisk until combined and call it done.
Cooking Tips & Techniques
After making this recipe more times than I can count, I’ve picked up a few tricks that make a real difference. Let me share them so you can skip the learning curve.
The butter drizzle matters more than you think. I used to just pour the melted butter in the center and hope it spread. Now I drizzle it in a zigzag pattern across the entire surface, then gently tilt the pan to help it distribute. This ensures the cake mix gets evenly moistened, which means no dry patches in your finished dessert.
Room temperature eggs are worth the wait. Cold eggs can make the pumpkin filling slightly lumpy and take longer to whisk smooth. If you forgot to take them out of the fridge, place them in a bowl of warm water for 5 minutes before cracking them. It’s a small step that makes a noticeable difference in texture.
Watch your oven like a hawk for the last 10 minutes. Every oven runs a little differently. My first attempt came out slightly burnt on the edges because I trusted the timer blindly. Start checking at 40 minutes, and if the top is browning too quickly, tent the pan loosely with foil for the remaining time.
Don’t skip the cooling time. I know it’s tempting to dig in right away, especially when your kitchen smells like a bakery. But the filling needs time to set. I once served it after only 10 minutes of cooling, and it was more like pumpkin soup with a cake topping. Still tasty, but not the texture you want.
Make it ahead for better flavor. This is one of those desserts that actually tastes better the next day. The flavors meld together overnight, and the texture becomes even more cohesive. If you’re planning a Friendsgiving, make this the day before and just reheat it gently before serving.
Variations & Adaptations
This recipe is incredibly forgiving, which makes it perfect for experimenting. Here are some variations I’ve tried and loved:
Gluten-Free Version: Use a gluten-free yellow cake mix. I’ve tested this with both Bob’s Red Mill and King Arthur Flour gluten-free mixes, and both worked beautifully. The texture is slightly more crumbly but still delicious. No other adjustments needed.
Dairy-Free Version: Substitute the evaporated milk with full-fat coconut milk and use plant-based butter. I recommend Miyoko’s or Earth Balance for the butter. The coconut flavor is subtle and actually complements the pumpkin nicely. Just make sure your cake mix doesn’t contain milk solids.
Spice It Up: Add 1/4 teaspoon of cayenne pepper or chipotle powder to the pumpkin filling for a subtle warmth that adults love. The kids won’t even notice the heat—it just adds depth. I tried this at a Friendsgiving where someone brought a spicy chili, and the contrast was perfect.
Add Mix-Ins: Sprinkle 1/2 cup of chopped pecans or walnuts over the cake mix before adding the butter. The nuts toast as the cake bakes, adding crunch and richness. Chocolate chips work too, especially if you have kids who need extra convincing to try pumpkin desserts.
Pumpkin Chocolate Swirl: Melt 1/2 cup of semi-sweet chocolate chips and drizzle it over the cake mix before baking. Use a knife to gently swirl it into the pumpkin layer. The chocolate and pumpkin combination is surprisingly wonderful—think pumpkin chocolate chip cookies, but easier.
My personal favorite variation is the pecan version. I made it for a Friendsgiving where I knew there would be several gluten-free guests, and it disappeared faster than the regular version. The nuts add this wonderful texture that makes every bite interesting.
Serving & Storage Suggestions
This dump cake is best served warm, but it’s also delicious at room temperature. I usually let it cool for about 20 minutes, then cut it into squares and serve straight from the pan. No fancy plating required—this is a casual dessert for casual gatherings.
For the ultimate experience, top each serving with a scoop of vanilla ice cream or a dollop of whipped cream. The cold, creamy topping against the warm, spiced cake is pure magic. If you want to get fancy, add a drizzle of caramel sauce and a sprinkle of cinnamon on top.
This dessert pairs beautifully with hot apple cider, coffee, or even a glass of cold milk. The kids at my Friendsgiving always go for the milk, while the adults reach for the coffee. It’s a versatile dessert that fits any beverage.
Storage: Cover the pan tightly with foil or plastic wrap and store in the refrigerator for up to 5 days. The flavors actually improve after a day or two as the pumpkin filling sets and the spices meld together.
Reheating: For individual servings, microwave for 20-30 seconds until warm. For the whole pan, reheat in a 300°F oven for 10-15 minutes. The topping stays crispier when reheated in the oven versus the microwave.
Freezing: This dump cake freezes beautifully. Let it cool completely, then wrap the pan tightly in plastic wrap and foil. Freeze for up to 3 months. Thaw overnight in the refrigerator and reheat before serving. I’ve done this for two different Friendsgivings when I needed to prep ahead, and no one ever guessed it wasn’t freshly baked.
One thing I love about this recipe is how the texture changes over time. The first day, the topping is crisp and the filling is soft. By day three, everything has settled into a more uniform, almost pudding-like consistency that’s equally delicious. It’s like getting two different desserts from one pan.
Nutritional Information & Benefits
Let’s be real: this is a dessert, not a health food. But it does have some redeeming qualities worth mentioning.
| Nutrient | Per Serving (1/12 of recipe) |
|---|---|
| Calories | 320 |
| Total Fat | 14g |
| Saturated Fat | 8g |
| Cholesterol | 65mg |
| Sodium | 380mg |
| Total Carbohydrates | 45g |
| Dietary Fiber | 2g |
| Sugars | 28g |
| Protein | 5g |
| Vitamin A | 180% DV |
Pumpkin is packed with vitamin A, which supports eye health and immune function. Each serving provides nearly twice your daily recommended intake. It’s also a good source of fiber, which helps with digestion and keeps you feeling satisfied.
The eggs add protein and healthy fats, while the evaporated milk provides calcium and vitamin D. Is it a superfood? No. But it’s a dessert that happens to have some nutritional perks, which is more than you can say for most holiday treats.
If you’re watching your sugar intake, you can reduce the sugar in the filling to 1/2 cup without sacrificing too much sweetness. The cake mix already contains sugar, so the dessert will still be plenty sweet. I’ve tested this version and it works well, especially if you’re serving it with whipped cream or ice cream.
This recipe contains gluten, dairy, and eggs. For allergen-friendly options, check the variations section above.
Conclusion
This Kid-Approved Friendsgiving Pumpkin Pie Dump Cake is everything I want in a holiday dessert: easy, affordable, and genuinely loved by everyone who tries it. It’s the recipe that lets me actually enjoy my own party instead of stressing over complicated layers or fussy decorations.
I love how this recipe brings people together. There’s something about a warm, spiced dessert that makes conversations flow and laughter come easier. Maybe it’s the nostalgia of pumpkin pie without the work. Maybe it’s the fact that kids and adults can agree on something. Or maybe it’s just that good food shared with good people is always a recipe for happiness.
Don’t be afraid to make this your own. Add your favorite mix-ins, adjust the spices to your taste, or try one of the variations I mentioned. The beauty of a dump cake is that it’s forgiving and flexible. You really can’t mess it up.
I’d love to hear how yours turns out! Leave a comment below and let me know if you tried any fun variations. Did your kids love it? Did you add chocolate chips or pecans? Share your Friendsgiving story—I read every single comment and I always love hearing how this recipe shows up at your table.
Now go preheat that oven. Your Friendsgiving dessert is waiting.
Frequently Asked Questions
Can I use pumpkin pie filling instead of pumpkin puree?
No, I don’t recommend it. Pumpkin pie filling already has sugar and spices added, which will make your dump cake overly sweet and throw off the spice balance. Stick with 100% pure pumpkin puree for the best results.
Can I make this in a different size pan?
Yes, but you’ll need to adjust the baking time. An 8×8-inch pan will give you a thicker dessert that needs about 55-60 minutes. A 9×9-inch pan works well with the same bake time as the 9×13. Just keep an eye on it and check for doneness with a knife.
Why is my dump cake runny in the middle?
This usually means it needs more time in the oven. The center should be set and not jiggle when you shake the pan. If the top is browning too quickly, cover it with foil and continue baking until the center is firm. Also, make sure you let it cool for at least 20 minutes before cutting.
Can I use a different flavor of cake mix?
Absolutely! Spice cake mix is a popular choice that adds even more warm flavor. White cake mix works too, though the flavor is more neutral. I’ve even seen people use butter pecan or caramel cake mix for a fun twist. Just avoid chocolate cake mix—it doesn’t pair well with pumpkin.
How do I prevent the cake mix from clumping?
Make sure you sprinkle the dry cake mix evenly across the entire surface. If you dump it all in one spot, it will form clumps. Use your fingers or a spoon to break up any large clumps before adding the butter. Drizzling the butter evenly also helps the cake mix absorb it properly.
Pin This Recipe!
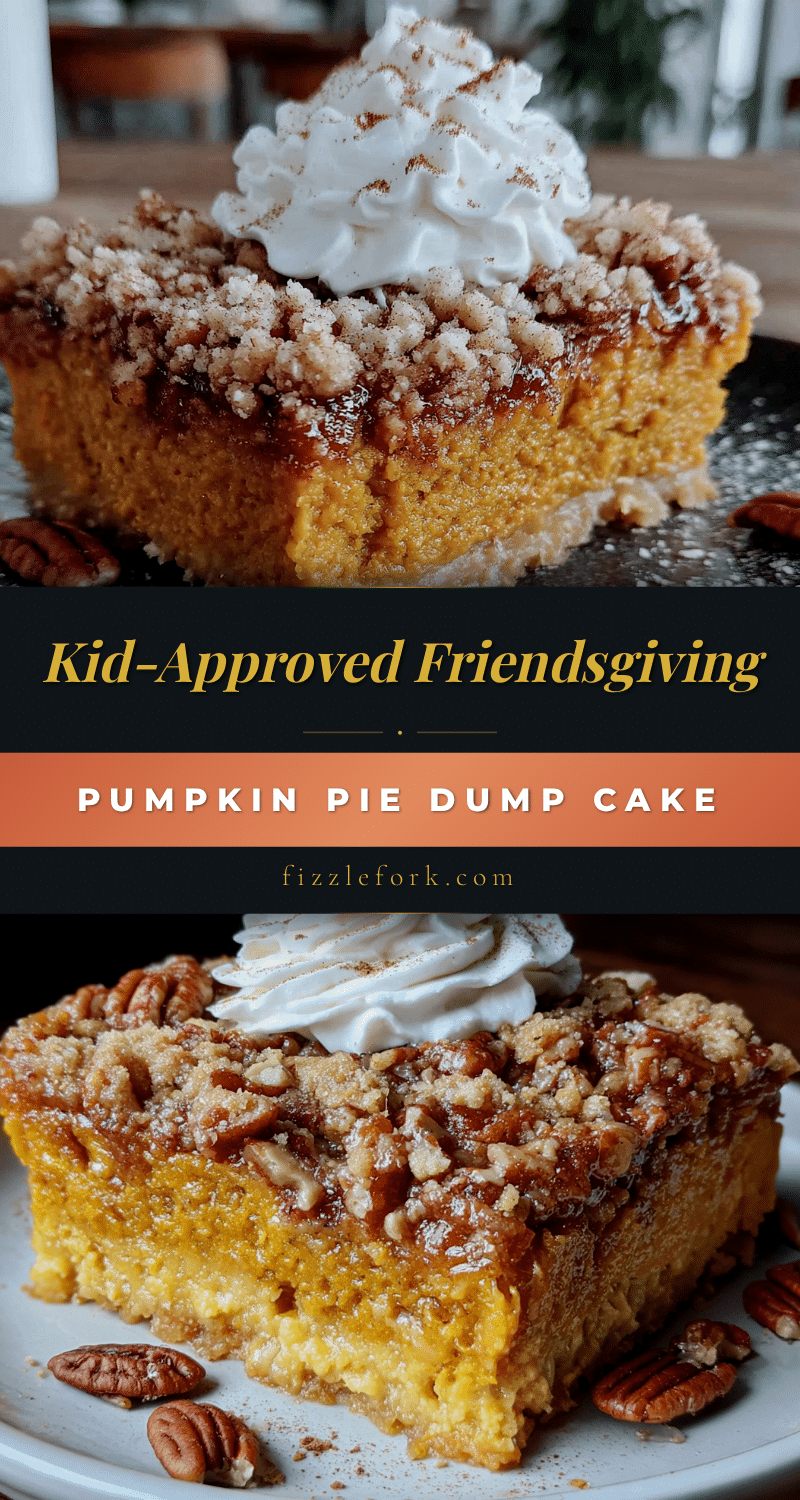
Best Kid-Approved Friendsgiving Pumpkin Pie Dump Cake
This easy pumpkin dump cake features a creamy, spiced pumpkin layer topped with a buttery, crumbly cake mix crust. It’s a crowd-pleasing dessert perfect for Friendsgiving, with minimal prep and maximum flavor.
- Prep Time: 10 minutes
- Cook Time: 45 minutes
- Total Time: 55 minutes
- Yield: 12 servings 1x
- Category: Dessert
- Cuisine: American
Ingredients
- 1 can (15 oz) pumpkin puree
- 1 can (12 oz) evaporated milk
- 3 large eggs, room temperature
- 3/4 cup granulated sugar
- 1 teaspoon vanilla extract
- 2 teaspoons pumpkin pie spice
- 1/2 teaspoon ground cinnamon
- 1/4 teaspoon salt
- 1 box (15.25 oz) yellow cake mix
- 3/4 cup unsalted butter, melted
- 1 tablespoon cinnamon sugar (1 tablespoon sugar + 1/2 teaspoon cinnamon)
Instructions
- Preheat oven to 350°F (175°C). Grease a 9×13-inch baking pan thoroughly with butter or non-stick spray.
- In a large mixing bowl, combine pumpkin puree, evaporated milk, eggs, sugar, vanilla extract, pumpkin pie spice, cinnamon, and salt. Whisk until smooth and well combined, about 2 minutes.
- Pour the pumpkin filling into the prepared pan and gently shake to level it into an even layer.
- Sprinkle the dry cake mix evenly over the pumpkin filling. Do not stir.
- Drizzle the melted butter slowly and evenly over the cake mix layer.
- Sprinkle the cinnamon sugar mixture over the top.
- Bake for 45-50 minutes, until the top is golden brown, edges are bubbly, and the center is set (does not jiggle when shaken). A knife inserted in the center should come out mostly clean.
- Let cool on a wire rack for at least 20 minutes before serving.
Notes
For best results, use 100% pure pumpkin puree (not pumpkin pie filling). Room temperature eggs blend more smoothly. Let the cake cool for at least 20 minutes before cutting to allow the filling to set. The flavor improves after a day. For a dairy-free version, use full-fat coconut milk and plant-based butter. For gluten-free, use a gluten-free yellow cake mix.
Nutrition
- Serving Size: 1/12 of recipe
- Calories: 320
- Sugar: 28
- Sodium: 380
- Fat: 14
- Saturated Fat: 8
- Carbohydrates: 45
- Fiber: 2
- Protein: 5
Keywords: pumpkin dump cake, Friendsgiving dessert, easy pumpkin dessert, kid-friendly, fall dessert, dump cake