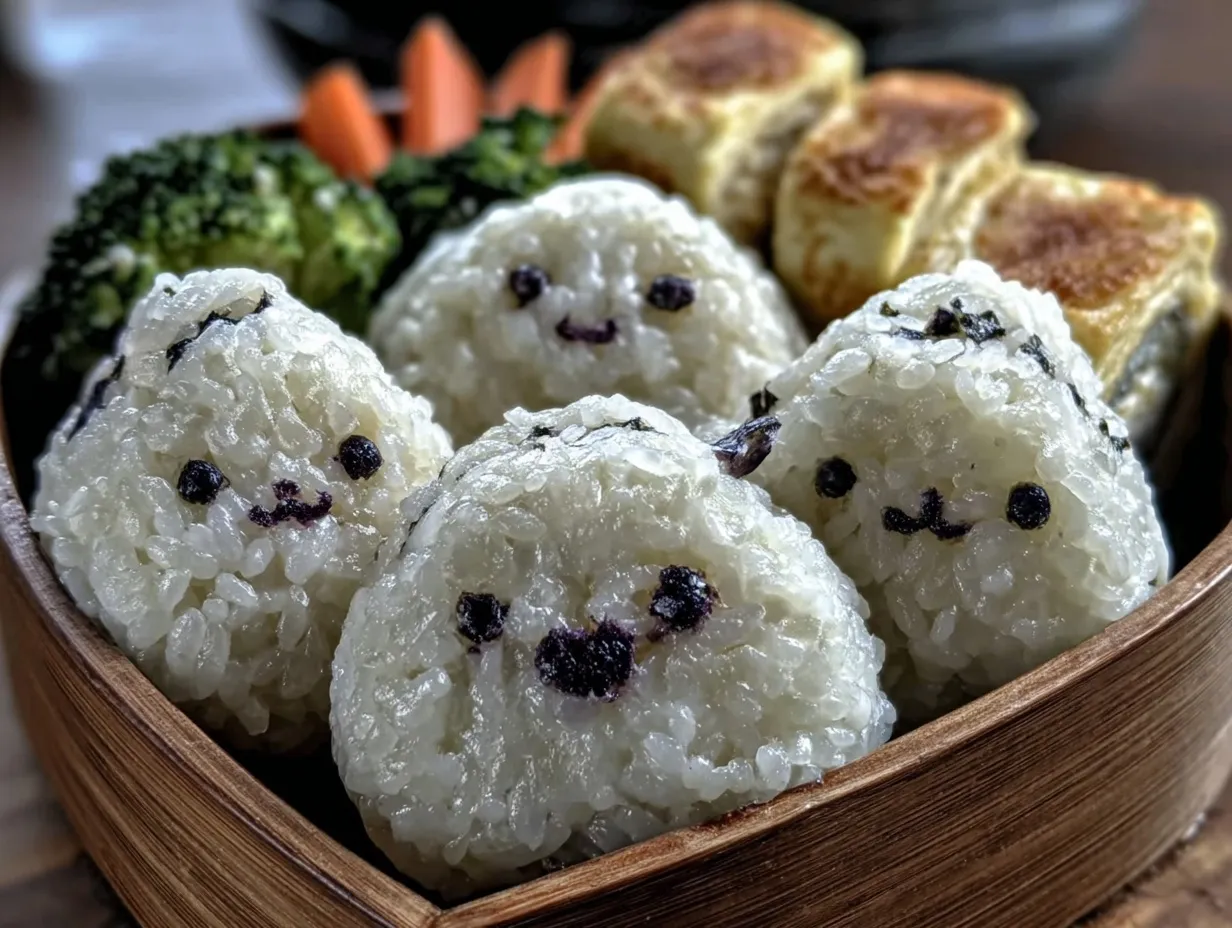
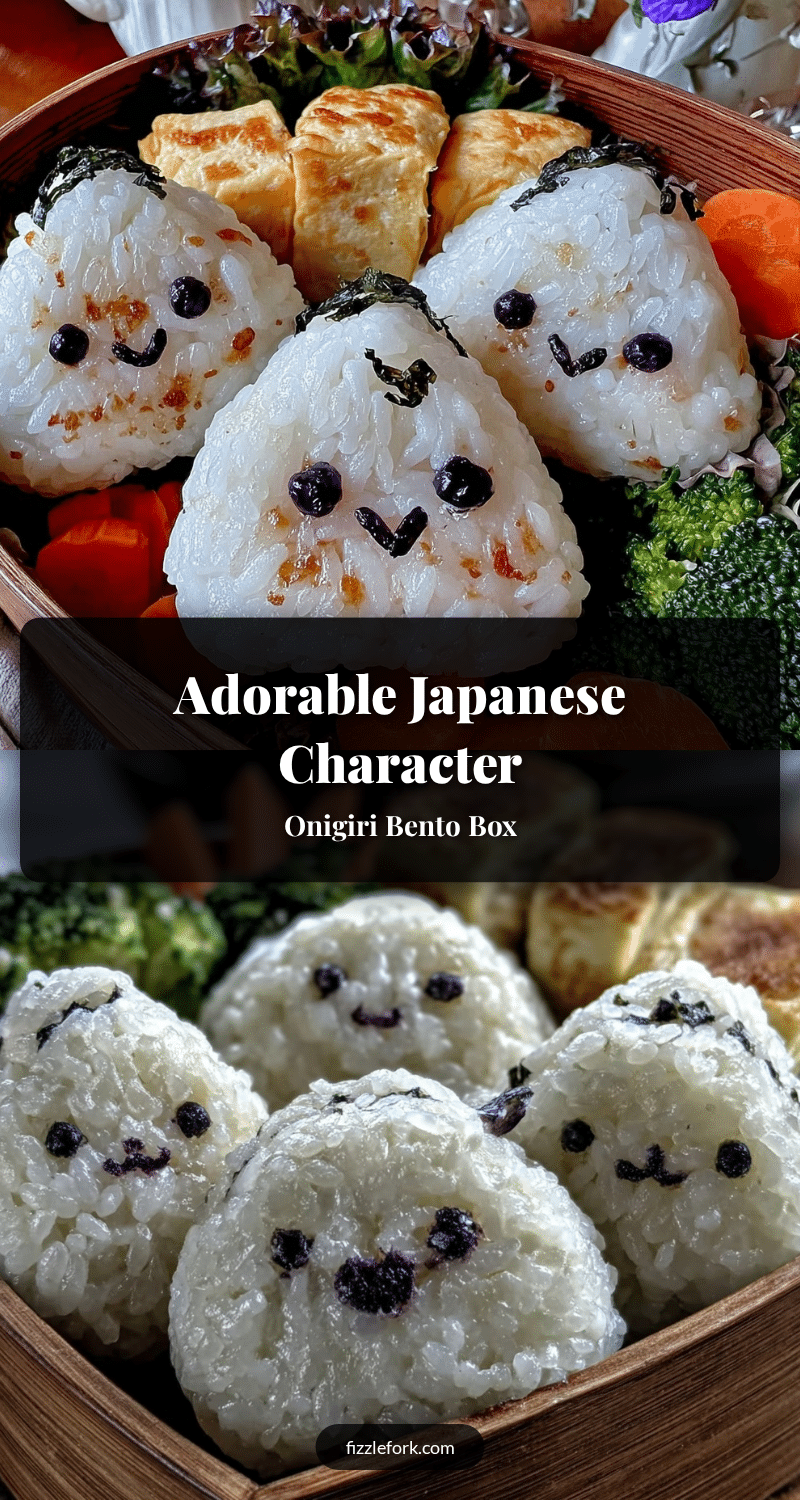
“Hey, can you make me a cute lunch today?” That text popped up out of nowhere on a hectic Wednesday morning. I was juggling a mountain of emails and the usual chaos, and honestly, the last thing I expected was a request for a Japanese character bento box. But, you know, sometimes those little unexpected asks turn into something fun. So I rummaged through the fridge, grabbed some rice, nori, and a few simple fillings, and got to work on these adorable onigiri rice balls shaped like tiny animals and characters.
At first, I was skeptical — how complicated could these be, really? But as I shaped the rice, wrapped the seaweed, and added faces with sesame seeds and tiny carrot slices, something clicked. It wasn’t just lunch anymore; it was a tiny edible art project that made the whole morning feel lighter. The best part? Everyone loved it, and I found myself making these cute bento boxes several times that week, each one a bit different but just as charming.
There’s something honestly comforting about crafting food that looks this cute. It’s a quiet joy, really — a little break from the daily whirlwind, a chance to slow down and create, even if just for ten minutes. And those little onigiri rice balls? They turned out to be the perfect base, soft and sticky enough to mold but forgiving enough for a beginner. This recipe stuck around because it’s not just about the food; it’s about the smiles it brings.
Why You’ll Love This Recipe
After making this adorable Japanese character bento box with onigiri rice balls more times than I can count, I can safely say it’s a keeper for all kinds of occasions. Here’s why it stands out:
- Quick & Easy: You can whip up these onigiri rice balls in under 30 minutes — perfect for last-minute lunches or a fun weekend project.
- Simple Ingredients: No obscure items here. Just rice, seaweed, and a few fillings you probably already have in your kitchen.
- Perfect for Kids’ Lunches & Parties: Whether it’s a school lunchbox or a themed party, these bento boxes make mealtime fun and inviting.
- Crowd-Pleaser: Both kids and adults tend to ask for seconds once they see these cute characters.
- Unbelievably Delicious: The savory fillings combined with tender rice and crisp nori create a satisfying flavor and texture combo.
Unlike other bento recipes that can feel intimidating or time-consuming, this one uses a straightforward technique for shaping onigiri rice balls that anyone can master. I like to blend a little rice vinegar and salt into the rice to get that authentic Japanese flavor without fuss. Plus, the little details — like using tiny cutouts of cheese or carrot for eyes and mouths — really bring the characters to life.
This recipe isn’t just a meal; it’s a way to bring a bit of whimsy to your day or to the lunchbox of someone you care about. It’s proof that food can be both fun and nourishing without requiring a lot of time or fancy tools.
What Ingredients You Will Need
This recipe uses simple, wholesome ingredients to deliver bold flavor and satisfying texture without the fuss. Most items are pantry staples, and substitutions are easy if you want to tweak things.
- For the Onigiri Rice Balls:
- Short-grain Japanese rice (1 ½ cups / 300g) – the stickier, the better for shaping
- Rice vinegar (2 tablespoons) – adds a subtle tang and helps with texture
- Salt (1 teaspoon) – for seasoning the rice
- Water (as needed for cooking rice)
- For Filling Options:
- Cooked salmon flakes (about ½ cup / 75g) – lightly salted
- Pickled plum (umeboshi), finely chopped (optional) – traditional and tangy
- Cooked tuna mixed with mayo (about ½ cup / 75g) – creamy and kid-friendly
- Cooked vegetables like chopped spinach or carrots (½ cup / 75g)
- For Decoration:
- Nori sheets (seaweed), cut into tiny shapes for eyes and mouths – I prefer Yamamotoyama brand for crispness
- Sesame seeds (black and white) – for eyes or texture
- Carrot slices, thin and cut into shapes – adds color and sweetness
- Cheese slices (optional), cut into small shapes
- Optional Extras:
- Soy sauce, for dipping or seasoning
- Plastic wrap or onigiri molds to help shape the rice
If you want a gluten-free option, just stick to gluten-free soy sauce or omit it. For a dairy-free version, skip the cheese decorations or swap for thinly sliced avocado. In summer, swapping cooked fillings for fresh cucumber or edamame can add a refreshing twist.
Equipment Needed
- Rice cooker or heavy-bottom pot with a lid – for perfectly cooked Japanese rice every time
- Bowl for mixing rice vinegar and salt mixture
- Onigiri molds (optional) – these little plastic molds help shape the rice balls quickly and neatly, but you can also shape by hand with wet hands
- Sharp kitchen scissors or small cookie cutters – to cut nori seaweed and cheese into character shapes
- Plastic wrap – makes shaping easier and keeps rice balls sticky without mess
- Small knife or tweezers – handy for placing tiny nori eyes and decorations
Honestly, I’ve shaped onigiri both with molds and freehand, and while molds speed things up, shaping by hand feels more personal (and fun). For budget-friendly options, simple sushi molds or even clean hands with a touch of water work just fine. Just make sure your scissors are sharp enough to cut seaweed cleanly without tearing.
Preparation Method
- Cook the rice: Rinse 1 ½ cups (300g) of short-grain Japanese rice under cold water until the water runs clear. This removes excess starch and prevents gumminess. Cook the rice in a rice cooker or on the stovetop with 1 ¾ cups (415ml) of water. Cooking time is about 20 minutes, plus 10 minutes resting off the heat.
- Prepare the vinegar seasoning: While the rice cooks, mix 2 tablespoons rice vinegar with 1 teaspoon salt in a small bowl until dissolved. This seasoning is key to that authentic onigiri flavor.
- Season the rice: When the rice is done, transfer it to a large bowl and gently fold in the vinegar mixture while the rice is still warm. Use a cutting motion with a rice paddle to avoid crushing grains. Let the rice cool slightly until it’s warm but not hot — easier to handle for shaping.
- Prepare fillings: If using salmon flakes, tuna mayo, or other fillings, have them ready in small bowls. Remember, less is more—too much filling can break the rice ball.
- Shape the onigiri: Wet your hands with water and sprinkle a pinch of salt on them (this helps the rice not stick and adds seasoning). Take about ⅓ cup (60g) of rice and flatten it slightly in your palm. Place about 1 tablespoon of filling in the center, then gently mold the rice around it to form a triangle or ball shape. Use molds if preferred for consistent shapes.
- Decorate the rice balls: Cut nori into small shapes for eyes, mouths, and other features using scissors or small cutters. Use sesame seeds for eyes, thin carrot slices for cheeks or noses, and cheese slices for extra details. Use tweezers or your fingers to carefully place them on the rice balls. Wrap in plastic wrap if packing for later.
- Assemble the bento box: Place your onigiri rice balls in a bento box with colorful sides like steamed broccoli, cherry tomatoes, tamagoyaki (Japanese rolled omelette), or pickled vegetables. The balance of colors and textures makes the entire box visually appealing and tasty.
One thing I learned the hard way: don’t over-pack the rice balls or they’ll fall apart. Also, handling the rice when it’s too hot leads to smashed balls, so patience pays off. If your seaweed decorations get soggy, try adding them just before serving for maximum crispness.
Cooking Tips & Techniques
Making adorable Japanese character bento boxes with onigiri rice balls is surprisingly approachable when you follow a few insider tips:
- Rice choice matters: Short-grain Japanese rice is sticky due to its high amylopectin content — that’s what makes shaping possible without crumbling. Avoid long-grain rice for this recipe.
- Season the rice properly: Lightly seasoning with rice vinegar and salt adds that authentic tang and helps keep the rice from clumping too much.
- Wet hands prevent sticking: Keep a bowl of water nearby to wet your hands before shaping. Adding a pinch of salt on your hands seasons the rice and keeps it from sticking.
- Use plastic wrap for shaping: If you’re nervous about rice sticking to your hands, use plastic wrap to help mold the rice balls.
- Cut nori carefully: Use sharp scissors or tiny cookie cutters for crisp shapes. Sometimes the nori can tear, so handle gently.
- Timing for decoration: Add nori decorations just before serving or packing to keep them crisp and attractive.
I once tried shaping onigiri with cold rice straight from the fridge — big mistake. The rice was hard and crumbly, so warm rice is your friend here. Also, don’t rush the shaping step; it’s worth taking a couple extra minutes to get the shape right and prevent the filling from leaking out.
If you’re curious about other easy but delicious meals, I recently shared my crispy homemade crunch wrap supreme recipe which has a totally different vibe but is just as fun to make and share.
Variations & Adaptations
This adorable Japanese character bento box recipe is flexible and invites creativity. Here are a few ways to mix things up:
- Vegetarian/Vegan: Skip fish or dairy fillings and try mashed avocado, grilled shiitake mushrooms, or roasted sweet potato cubes with a dash of soy sauce.
- Different Shapes: Go beyond triangles — make rice balls shaped like bears, cats, or even hearts using molds or freehand pinch techniques.
- Seasonal Fillings: Use fresh summer ingredients like cucumber and edamame or switch to cooked root vegetables and pickles in cooler months.
- Alternative Rice: For a low-carb twist, swap rice with cauliflower rice, but shaping will be trickier, so use molds and press firmly.
- Spicy Kick: Mix a little spicy mayo inside the filling or sprinkle shichimi togarashi (Japanese seven-spice) on top for extra flavor.
I tried a version once with shredded chicken mixed with teriyaki sauce as filling — the kids went nuts for it. You can even pair your bento with crispy loaded potato skins for a fusion snack that’s unexpected but totally tasty.
Serving & Storage Suggestions
Serve these adorable bento boxes at room temperature or slightly chilled. They’re perfect for lunch at school, work, or even a picnic. Presentation is everything here — arrange onigiri with colorful veggies, tamagoyaki, and perhaps some fruit for balance.
To store, wrap each rice ball tightly in plastic wrap and keep in an airtight container in the refrigerator for up to 24 hours. Avoid longer storage as rice texture suffers. For best results, prepare the rice balls and decorate just before serving.
When reheating, gently warm in the microwave for 15-20 seconds to soften the rice without drying it out. Avoid reheating if you have nori decorations already on, as the seaweed will get chewy.
Interestingly, flavors meld beautifully if you pack these the night before — the rice absorbs more vinegar and fillings taste even richer, but nori should be added fresh to keep that crisp charm.
Nutritional Information & Benefits
A typical serving of onigiri rice balls (2 medium-sized balls) provides approximately:
| Calories | 250-300 kcal |
|---|---|
| Carbohydrates | 55g |
| Protein | 6-8g (depending on filling) |
| Fat | 2-5g |
| Fiber | 1-3g (from veggies and nori) |
Rice provides a great source of energy through complex carbohydrates, while fillings like salmon add heart-healthy omega-3 fats and protein. Nori seaweed is rich in iodine and minerals. This recipe is naturally gluten-free and can be adapted for dairy-free or vegan diets. For those watching carbs, portion control or cauliflower rice can help.
I love this recipe because it balances comfort and nutrition effortlessly — it’s a tasty way to sneak in some veggies and wholesome ingredients without feeling like a chore.
Conclusion
Making an adorable Japanese character bento box with onigiri rice balls is one of those simple joys that combines creativity, flavor, and a touch of whimsy. Whether you’re packing lunch for a loved one or just want a break from the usual, this recipe offers something special without a ton of fuss.
Feel free to customize the fillings, shapes, and decorations to fit your mood or pantry. I’ve loved seeing how many variations friends and readers have brought to life after trying this recipe. It’s proof that a little care and imagination turn everyday food into something memorable.
Give it a go, and when you do, drop a comment sharing your favorite character or filling combo — I’m always eager to hear how you make it your own. Wishing you many happy, adorable lunches ahead!
FAQs about Adorable Japanese Character Bento Box with Onigiri Rice Balls
How do I prevent the rice from sticking to my hands when shaping onigiri?
Keep a small bowl of water nearby and wet your hands before handling the rice. Adding a pinch of salt to your wet hands also helps prevent sticking and seasons the rice.
Can I use brown rice instead of white rice for onigiri?
Brown rice is less sticky and harder to shape, so it’s not ideal for traditional onigiri. You can try using short-grain brown rice, but expect a different texture and more difficulty shaping.
What are some easy fillings for beginners?
Simple cooked salmon flakes, tuna mixed with mayo, or pickled plum (umeboshi) are great beginner-friendly fillings that add flavor without complexity.
How long can I store onigiri rice balls in the fridge?
Store wrapped tightly in plastic wrap inside an airtight container for up to 24 hours. They’re best eaten fresh or within a day to maintain texture and flavor.
Can I freeze onigiri rice balls?
Yes, you can freeze onigiri. Wrap them individually in plastic wrap and place in a freezer-safe bag. Thaw in the fridge before reheating gently in the microwave.
Pin This Recipe!
Adorable Japanese Character Bento Box Recipe with Easy Onigiri Rice Balls Ideas
Create cute and delicious Japanese character bento boxes featuring easy-to-make onigiri rice balls shaped like tiny animals and characters. Perfect for kids’ lunches, parties, or a fun culinary project.
- Prep Time: 10 minutes
- Cook Time: 30 minutes
- Total Time: 40 minutes
- Yield: 4 servings 1x
- Category: Main Course
- Cuisine: Japanese
Ingredients
- 1 ½ cups (300g) short-grain Japanese rice
- 2 tablespoons rice vinegar
- 1 teaspoon salt
- Water (as needed for cooking rice)
- ½ cup (75g) cooked salmon flakes, lightly salted
- Optional: finely chopped pickled plum (umeboshi)
- ½ cup (75g) cooked tuna mixed with mayo
- ½ cup (75g) cooked vegetables like chopped spinach or carrots
- Nori sheets (seaweed), cut into tiny shapes for eyes and mouths
- Black and white sesame seeds
- Thin carrot slices cut into shapes
- Optional: cheese slices cut into small shapes
- Optional extras: soy sauce for dipping or seasoning
- Optional: plastic wrap or onigiri molds to help shape the rice
Instructions
- Rinse 1 ½ cups (300g) of short-grain Japanese rice under cold water until the water runs clear.
- Cook the rice in a rice cooker or on the stovetop with 1 ¾ cups (415ml) of water for about 20 minutes, then let it rest off the heat for 10 minutes.
- While the rice cooks, mix 2 tablespoons rice vinegar with 1 teaspoon salt in a small bowl until dissolved.
- Transfer the cooked rice to a large bowl and gently fold in the vinegar mixture while the rice is still warm using a cutting motion to avoid crushing grains.
- Let the rice cool slightly until warm but not hot.
- Prepare fillings such as salmon flakes, tuna mayo, or cooked vegetables in small bowls.
- Wet your hands with water and sprinkle a pinch of salt on them to prevent sticking and add seasoning.
- Take about ⅓ cup (60g) of rice, flatten it slightly in your palm, place about 1 tablespoon of filling in the center, then gently mold the rice around it to form a triangle or ball shape. Use molds if preferred.
- Cut nori into small shapes for eyes, mouths, and other features using scissors or small cutters.
- Decorate the rice balls with nori shapes, sesame seeds, carrot slices, and cheese slices using tweezers or fingers.
- Wrap rice balls in plastic wrap if packing for later.
- Assemble the bento box by placing onigiri rice balls with colorful sides like steamed broccoli, cherry tomatoes, tamagoyaki, or pickled vegetables.
Notes
Use short-grain Japanese rice for best stickiness and shaping. Wet hands with salted water to prevent rice sticking. Add nori decorations just before serving to keep them crisp. Store wrapped tightly in plastic wrap in an airtight container for up to 24 hours. Reheat gently in microwave for 15-20 seconds without nori decorations. For gluten-free, use gluten-free soy sauce or omit. For dairy-free, skip cheese or substitute with avocado slices.
Nutrition
- Serving Size: 2 medium-sized onigi
- Calories: 275
- Sugar: 1
- Sodium: 400
- Fat: 3.5
- Saturated Fat: 0.5
- Carbohydrates: 55
- Fiber: 2
- Protein: 7
Keywords: onigiri, bento box, Japanese rice balls, cute lunch, kids lunch, character bento, easy onigiri, rice balls recipe


