My brother Mark asked why I couldn’t just cook the rice right in the same pan as the beef. I started to explain why that wouldn’t work—something about absorption rates and the way rice needs to simmer undisturbed. Then I stopped. Honestly, I had no good reason except that I’d never done it that way before. It was a Tuesday night, and I was already tired from work, trying to teach him how to make something quick for his college apartment. I let out a sigh and said, “Fine, let’s try it your way.”
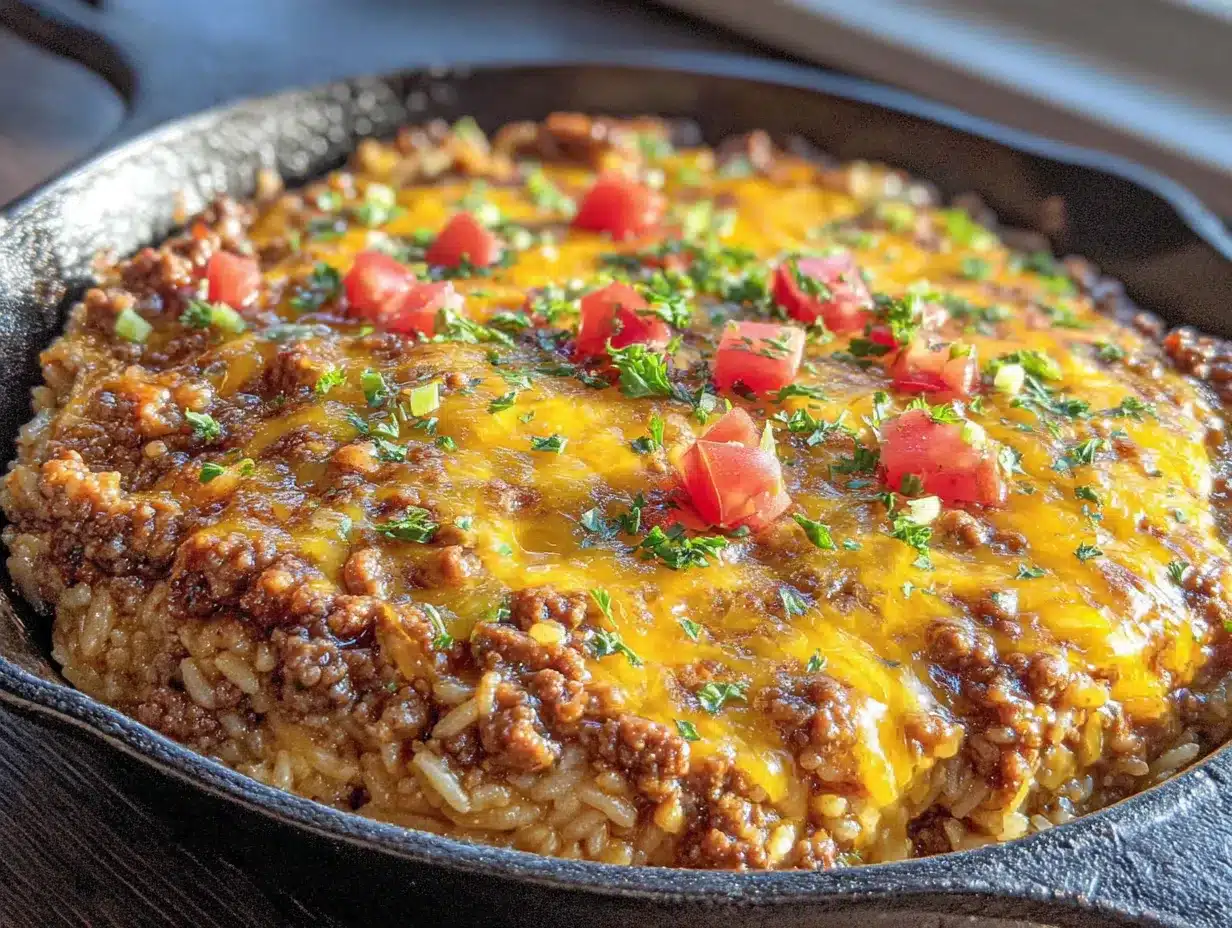
The rice came out perfect. Fluffy, infused with all that beefy goodness, and somehow even more flavorful than when I cooked it separately. I stood there over the stove with my wooden spoon in hand, genuinely stunned. Mark just shrugged and went back to texting his girlfriend. That moment of being wrong—completely, delightfully wrong—is exactly why this cheesy ground beef and rice skillet became my go-to for every potluck and dinner party since. You know that feeling when a recipe just clicks? When every ingredient works together like they were meant to be? That’s this dish.
I’ve made it for Super Bowl parties, casual family dinners, and even a neighborhood cookout where someone showed up with a bag of groceries instead of a dish. The skillet disappeared in fifteen minutes. There’s something about that melted cheese on top, the savory beef, and the tender rice that makes people go quiet for a second after their first bite. Then they ask for the recipe. And I get to tell them about the night my little brother taught me something I should have known all along.
Why You’ll Love This Recipe
Let me tell you why this cheesy ground beef and rice skillet has earned a permanent spot in my hosting rotation. I’ve tested this recipe at least a dozen times—for picky eaters, for friends who claim they don’t like rice, and for my neighbor Carol who judges everything by how well it reheats. It passed every single test with flying colors.
- One-Pan Wonder: Everything cooks in a single skillet. Less cleanup means more time with your guests.
- Budget-Friendly: Ground beef, rice, and cheese are pantry staples that won’t break the bank.
- Perfect for Crowds: This recipe scales beautifully. Double it for a big gathering without any fuss.
- Make-Ahead Magic: You can prep this entirely before guests arrive and just reheat when ready.
- Kid-Approved: Even the pickiest eaters at my table went back for seconds.
- Customizable: Swap in ground turkey, add vegetables, or change up the cheese blend.
What makes this recipe different from every other ground beef and rice dish out there? It’s the technique. Cooking the rice directly in the seasoned beef broth means every grain absorbs that deep, savory flavor. No bland rice hiding under your toppings. Plus, that layer of melted cheese on top creates a golden, bubbly crust that my guests fight over. I mean that literally—my friend Jen once scraped the edges of the pan with a spoon after everyone else had finished.
This is the kind of meal that makes you close your eyes after the first bite. It’s comfort food reimagined—hearty enough for a winter dinner party but light enough for a spring potluck. When you’re hosting, you want dishes that let you relax and enjoy your own party. This skillet does exactly that. Prep it, pop it on the table, and watch your guests help themselves.
What Ingredients You Will Need
This recipe relies on simple, everyday ingredients that come together to create something truly special. Most of these are probably already sitting in your pantry and fridge right now. Here’s what you’ll need and why each one matters.
For the Base
- 1 pound ground beef (80/20 blend works best for flavor; drain excess fat if needed)
- 1 medium yellow onion, diced (adds sweetness and depth)
- 3 cloves garlic, minced (fresh is non-negotiable here—don’t use the jarred stuff)
- 1 cup long-grain white rice (uncooked; basmati or jasmine work beautifully too)
- 2 cups beef broth (low-sodium so you can control the salt; I prefer Swanson brand)
- 1 can (14.5 oz) diced tomatoes, drained (fire-roasted adds a nice smoky note)
- 1 teaspoon smoked paprika (regular paprika works, but smoked is worth the extra trip)
- 1 teaspoon dried oregano (Mexican oregano if you can find it—it’s earthier)
- ½ teaspoon salt (adjust to taste, especially if using regular broth)
- ½ teaspoon black pepper (freshly ground makes a difference)
For the Cheesy Topping
- 2 cups shredded sharp cheddar cheese (shred it yourself—pre-shredded has anti-caking agents that don’t melt as smoothly)
- ½ cup shredded Monterey Jack cheese (adds creaminess; use all cheddar if that’s what you have)
- ¼ cup grated Parmesan cheese (the real stuff, not the green can—trust me on this)
Optional Garnishes
- Fresh parsley or cilantro, chopped (adds color and freshness)
- Green onions, sliced (for a mild onion kick and visual appeal)
- Hot sauce (for those who want extra heat at the table)
Ingredient selection tip: Look for ground beef that’s bright red and hasn’t been sitting in the store display too long. If you’re feeding a crowd, buy an extra pound—this recipe has a way of disappearing faster than you expect. For the cheese, I’ve found that Tillamook or Cabot cheddar melts like a dream. And please, please don’t skip the smoked paprika. It’s not the star of the show, but it’s the background singer that makes everything better.
Substitution guidance: Use ground turkey or chicken for a leaner option—just add a tablespoon of olive oil to keep it from drying out. For a gluten-free version, double-check your broth label. Brown rice works but needs about 10-15 minutes more cooking time and an extra half cup of liquid. Dairy-free? Omit the cheese and stir in a dollop of nutritional yeast at the end for that savory flavor.
Equipment Needed
You don’t need a fancy kitchen to pull off this cheesy ground beef and rice skillet. Here’s what I use every time I make it.
- Large skillet or Dutch oven (12-inch with a tight-fitting lid; cast iron or stainless steel both work great)
- Wooden spoon or spatula (for breaking up the beef and stirring without scratching your pan)
- Cheese grater (box grater or microplane—skip the pre-shredded bags)
- Cutting board and sharp knife (for dicing onion and mincing garlic)
- Measuring cups and spoons (accuracy matters here, especially for the rice-to-liquid ratio)
- Can opener (unless you buy the pull-tab cans like I do when I’m lazy)
- Lid or foil (to cover the skillet while the rice cooks)
If you don’t have a lid that fits your skillet, a sheet of aluminum foil works perfectly. I’ve used foil more times than I care to admit. For a budget-friendly option, a basic non-stick skillet from any grocery store will do the job. Just be gentle with the metal utensils if you want it to last. I learned that lesson the hard way after ruining a perfectly good pan my first year cooking on my own.
Preparation Method
Let me walk you through this step by step. I’ve made this so many times I could do it in my sleep, but I’ll share all the little tricks I’ve picked up along the way.
- Prep your ingredients first. Dice the onion, mince the garlic, shred the cheese, and drain the tomatoes. Having everything ready makes the cooking process smooth and stress-free. Trust me, you don’t want to be mincing garlic while your beef is burning.
- Heat your skillet over medium-high heat. Add the ground beef and cook for 5-7 minutes, breaking it up with your wooden spoon as it browns. You want nice brown bits forming on the bottom of the pan—that’s flavor waiting to happen. Don’t stir it constantly; let it sit for a minute between stirs to get that proper sear.
- Add the diced onion once the beef is mostly browned. Cook for 3-4 minutes until the onion turns translucent and starts to soften. The smell at this point is already incredible. Throw in the minced garlic and cook for another 30 seconds—just until fragrant. Garlic burns fast, so keep it moving.
- Drain excess fat if there’s more than a tablespoon or two. I usually tilt the pan and spoon it out, leaving just enough to coat the vegetables. If you’re using lean ground beef, you might not need to drain at all.
- Stir in the smoked paprika, dried oregano, salt, and pepper. Let the spices toast for about 30 seconds. This wakes up their flavors and makes the whole dish more aromatic. You’ll notice the kitchen starting to smell like a restaurant kitchen at this point.
- Add the uncooked rice and stir it around for a minute. Let it get slightly toasted in the beef fat—this step keeps the grains separate and adds a subtle nuttiness. I learned this trick from a chef friend who insisted it made a difference. She was right.
- Pour in the beef broth and drained diced tomatoes. Stir everything together, scraping up any browned bits from the bottom of the pan. Those bits are pure gold—don’t leave them behind.
- Bring the mixture to a boil, then reduce the heat to low. Cover the skillet with your lid or foil and let it simmer for 18-20 minutes. Don’t peek! Every time you lift that lid, steam escapes and your rice takes longer to cook. I know it’s tempting, but resist.
- After 18 minutes, check the rice. It should be tender and most of the liquid should be absorbed. If it’s still a bit crunchy, add 2-3 tablespoons of water, re-cover, and cook for another 3-5 minutes. Every stovetop runs a little differently, so trust your eyes more than the timer.
- Remove the skillet from heat. Sprinkle the shredded cheddar and Monterey Jack evenly over the top, then finish with the Parmesan. Cover again and let it sit for 3-5 minutes. The residual heat will melt the cheese into a glorious, gooey blanket.
- Garnish with fresh parsley or cilantro and sliced green onions if you’re feeling fancy. Serve straight from the skillet—it’s part of the charm. The sizzle when you bring it to the table always gets a reaction.
One more thing: if you’re making this for a party, you can do steps 1-8 ahead of time. Let the skillet cool, cover it, and refrigerate. When your guests arrive, just reheat it on the stove with a splash of broth, add the cheese, and serve. Your future self will thank you.
Cooking Tips & Techniques
I’ve made every mistake possible with this recipe so you don’t have to. Let me save you some trouble.
Don’t rush the browning. The biggest mistake people make is moving the beef around too much while it cooks. Let it sit and develop that deep brown crust. That’s where the flavor lives. I once tried to speed things up by cranking the heat to high—ended up with dry, tough beef and burnt bits stuck to the pan. Medium-high is your friend. Be patient.
Watch your rice-to-liquid ratio. This is the most critical part of the recipe. Too much liquid and you’ll end up with mushy rice. Too little and it’ll be crunchy in the middle. The 1 cup rice to 2 cups broth ratio is tried and true. If you’re adding extra vegetables like bell peppers or mushrooms, reduce the broth by a quarter cup to compensate for the moisture they release.
Use room temperature cheese. Cold cheese takes longer to melt and can clump up. Let your shredded cheese sit out while you cook the beef. It’ll melt into a smooth, even layer instead of forming weird rubbery patches. I learned this after serving a skillet where half the cheese was still solid—not my finest moment.
Toast your rice. That quick minute of stirring the rice in the hot pan before adding liquid makes a noticeable difference. The grains stay separate instead of clumping together. It’s a small step that pays off big time.
Timing strategy for hosting: Cook the base up to the point where you add the broth and tomatoes. Let it cool, cover it, and pop it in the fridge. About 30 minutes before your guests arrive, put it back on the stove, bring it to a simmer, and finish cooking. Add the cheese right before serving. You get all the fresh-from-the-oven appeal without the last-minute stress.
Variations & Adaptations
This recipe is endlessly flexible. Here are some variations I’ve tried and loved.
Southwest Style: Add a can of drained black beans and a cup of frozen corn along with the broth. Swap the oregano for cumin and chili powder. Top with pepper jack cheese instead of cheddar. I made this version for a Cinco de Mayo party and it was gone before the guacamole.
Vegetable Loaded: Sauté a diced bell pepper and a chopped zucchini along with the onion. Stir in a handful of fresh spinach right before adding the cheese. The spinach wilts down into the rice and adds color and nutrients without overpowering the dish. My sister-in-law, who claims to hate vegetables, ate two servings of this version.
Spicy Kick: Add a diced jalapeño with the onion and a teaspoon of red pepper flakes with the spices. Use pepper jack cheese and finish with a drizzle of hot sauce. My friend Dave, who measures spice tolerance by how much his forehead sweats, gave this version a solid 8 out of 10.
Cheesy Ground Turkey Version: Substitute ground turkey for the beef and add a tablespoon of olive oil. Turkey is leaner and needs a little fat to stay moist. Season with poultry seasoning instead of oregano for a different flavor profile. It’s lighter but still satisfying.
Low-Carb Adaptation: Replace the rice with cauliflower rice. Sauté the cauliflower rice in the pan after cooking the beef, then add the broth and simmer for 5-7 minutes instead of 20. The texture is different but still delicious. My neighbor Carol, who’s been doing keto for years, requests this version every time I host.
Serving & Storage Suggestions
This cheesy ground beef and rice skillet is best served hot, straight from the pan. The cheese should be bubbly and slightly golden around the edges. I like to set the skillet on a trivet in the middle of the table and let everyone dig in family-style. It creates that communal, sharing vibe that makes dinner parties feel special.
What to serve alongside: A simple green salad with a tangy vinaigrette cuts through the richness perfectly. I also love serving it with warm tortillas or crusty bread for scooping up every last bit. For a complete meal, add a side of roasted vegetables like broccoli or asparagus. If you’re hosting a bigger spread, this skillet pairs beautifully with refried beans and a fresh salsa bar.
Beverage pairings: A cold beer—something light like a lager or pilsner—complements the savory flavors. For wine drinkers, a medium-bodied red like Merlot or Zinfandel works well. Non-alcoholic options include sparkling water with lime or a tangy hibiscus iced tea.
Storage: Leftovers keep in an airtight container in the refrigerator for up to 4 days. The flavors actually deepen overnight as the rice absorbs more of the seasonings. I often make a double batch just for the leftovers.
Reheating: The best way to reheat is in a skillet over medium-low heat with a splash of broth or water. Cover and let it steam for 5-7 minutes, stirring occasionally. The microwave works in a pinch, but the rice can dry out. If using the microwave, cover the bowl with a damp paper towel to add moisture.
Freezing: This recipe freezes beautifully. Let it cool completely, then transfer to a freezer-safe container. It keeps for up to 3 months. Thaw overnight in the refrigerator and reheat as directed. The cheese might not be as perfectly melty after freezing, but the flavor is still spot-on.
Nutritional Information & Benefits
Here’s a rough estimate per serving (based on 6 servings):
- Calories: 485
- Protein: 32g
- Carbohydrates: 38g
- Fat: 22g
- Fiber: 3g
- Calcium: 350mg
This dish packs a solid protein punch from the ground beef and cheese, which helps keep you full and satisfied. The rice provides quick energy, making it a great option before or after physical activity. The tomatoes add a dose of vitamin C and lycopene, an antioxidant linked to heart health. If you use fire-roasted tomatoes, you get a little extra depth of flavor without any added sugar.
For those watching sodium, use low-sodium broth and go easy on the added salt. You can also reduce the cheese by half a cup without sacrificing too much of the creamy texture. This recipe is naturally gluten-free as written, but always double-check your broth label to be safe. The main allergens here are dairy and, well, that’s about it. Easy to adapt for most dietary needs.
I’m not a nutritionist, but I’ve learned to balance indulgence with practicality. This isn’t a health food—it’s comfort food. And sometimes that’s exactly what your body and soul need.
Conclusion
This cheesy ground beef and rice skillet has become my secret weapon for hosting. It’s the dish I turn to when I want to impress without stress, feed a crowd without breaking the bank, and actually enjoy my own party. Every time I make it, I think about that Tuesday night when my brother proved me wrong. Sometimes the best recipes come from letting go of what you think you know.
I hope you’ll try this recipe and make it your own. Add your favorite vegetables, adjust the spice level, swap in whatever cheese you have on hand. That’s the beauty of a one-pan meal—it’s forgiving and flexible. And if you discover a variation that blows your mind, I’d love to hear about it. Drop a comment below and tell me how it went. Share a photo of your skillet on Pinterest or tag me in your Instagram stories. There’s nothing I love more than seeing this recipe bring people together around the table.
Now go ahead—grab that skillet and get cooking. Your guests are going to love you for it.
Frequently Asked Questions
Can I use brown rice instead of white rice?
Yes, but you’ll need to adjust the cooking time and liquid. Brown rice takes about 35-40 minutes to cook and needs an extra half cup of broth. Keep the skillet covered and check it at the 30-minute mark. The texture will be chewier and nuttier, which some people actually prefer.
How do I prevent the rice from getting mushy?
Don’t stir the rice too much once it’s simmering, and resist the urge to lift the lid while it cooks. Stirring releases starch that can make the rice gummy. Also, make sure you’re using the right ratio—1 cup rice to 2 cups liquid. Too much liquid is the number one cause of mushy rice.
Can I make this in a slow cooker or Instant Pot?
For the Instant Pot, brown the beef using the sauté function, then add the remaining ingredients except the cheese. Cook on high pressure for 5 minutes with a natural release. For a slow cooker, brown the beef first on the stovetop, then transfer everything except the rice and cheese to the slow cooker. Cook on low for 4-6 hours, then stir in cooked rice and top with cheese before serving.
What’s the best cheese for melting?
Sharp cheddar is my go-to for flavor, but it doesn’t melt as smoothly as some other cheeses. That’s why I mix it with Monterey Jack, which has a higher moisture content and melts like a dream. Gouda, mozzarella, or Colby Jack are all excellent substitutes. Avoid pre-shredded cheese—the anti-caking coating prevents smooth melting.
Can I add vegetables without changing the cooking time?
Yes, but choose vegetables that cook quickly. Bell peppers, zucchini, and spinach are great options. Sauté them along with the onion so they soften before the rice goes in. Avoid adding watery vegetables like mushrooms or tomatoes without adjusting the liquid. If you add mushrooms, reduce the broth by a quarter cup to compensate for the moisture they release.
Pin This Recipe!

Best Cheesy Ground Beef and Rice Skillet Recipe

A one-pan wonder featuring savory ground beef, tender rice, and a bubbly cheese topping. Perfect for busy weeknights or feeding a crowd, this budget-friendly dish is packed with flavor and comes together in under 30 minutes.
- Prep Time: 15 minutes
- Cook Time: 25 minutes
- Total Time: 40 minutes
- Yield: 6 servings 1x
- Category: Main Course
- Cuisine: American
Ingredients
- 1 pound ground beef (80/20 blend)
- 1 medium yellow onion, diced
- 3 cloves garlic, minced
- 1 cup long-grain white rice, uncooked
- 2 cups beef broth, low-sodium
- 1 can (14.5 oz) diced tomatoes, drained
- 1 teaspoon smoked paprika
- 1 teaspoon dried oregano
- ½ teaspoon salt
- ½ teaspoon black pepper, freshly ground
- 2 cups shredded sharp cheddar cheese
- ½ cup shredded Monterey Jack cheese
- ¼ cup grated Parmesan cheese
- Fresh parsley or cilantro, chopped (optional)
- Green onions, sliced (optional)
- Hot sauce (optional)
Instructions
- Prep your ingredients first: dice the onion, mince the garlic, shred the cheese, and drain the tomatoes.
- Heat your skillet over medium-high heat. Add the ground beef and cook for 5-7 minutes, breaking it up with a wooden spoon as it browns. Let it sit for a minute between stirs to develop a good sear.
- Add the diced onion and cook for 3-4 minutes until translucent. Add the minced garlic and cook for 30 seconds until fragrant.
- Drain excess fat if there is more than a tablespoon or two.
- Stir in the smoked paprika, dried oregano, salt, and pepper. Let the spices toast for about 30 seconds.
- Add the uncooked rice and stir for 1 minute to lightly toast it in the beef fat.
- Pour in the beef broth and drained diced tomatoes. Stir, scraping up any browned bits from the bottom of the pan.
- Bring the mixture to a boil, then reduce the heat to low. Cover the skillet and simmer for 18-20 minutes. Do not lift the lid.
- After 18 minutes, check the rice. It should be tender and most of the liquid absorbed. If still crunchy, add 2-3 tablespoons of water, re-cover, and cook for another 3-5 minutes.
- Remove the skillet from heat. Sprinkle the shredded cheddar and Monterey Jack evenly over the top, then finish with the Parmesan. Cover and let sit for 3-5 minutes until the cheese melts.
- Garnish with fresh parsley or cilantro and sliced green onions if desired. Serve straight from the skillet.
Notes
For best results, use room temperature cheese for smoother melting. Toast the rice briefly in the beef fat to keep grains separate. If making ahead, cook the base up to step 8, cool, refrigerate, then reheat with a splash of broth before adding cheese. For brown rice, increase cooking time to 35-40 minutes and add an extra ½ cup broth.
Nutrition
- Serving Size: 1 serving (about 1.5
- Calories: 485
- Sugar: 4
- Sodium: 680
- Fat: 22
- Saturated Fat: 10
- Carbohydrates: 38
- Fiber: 3
- Protein: 32
Keywords: cheesy ground beef and rice skillet, one-pan meal, ground beef recipe, rice skillet, comfort food, easy dinner, budget-friendly meal