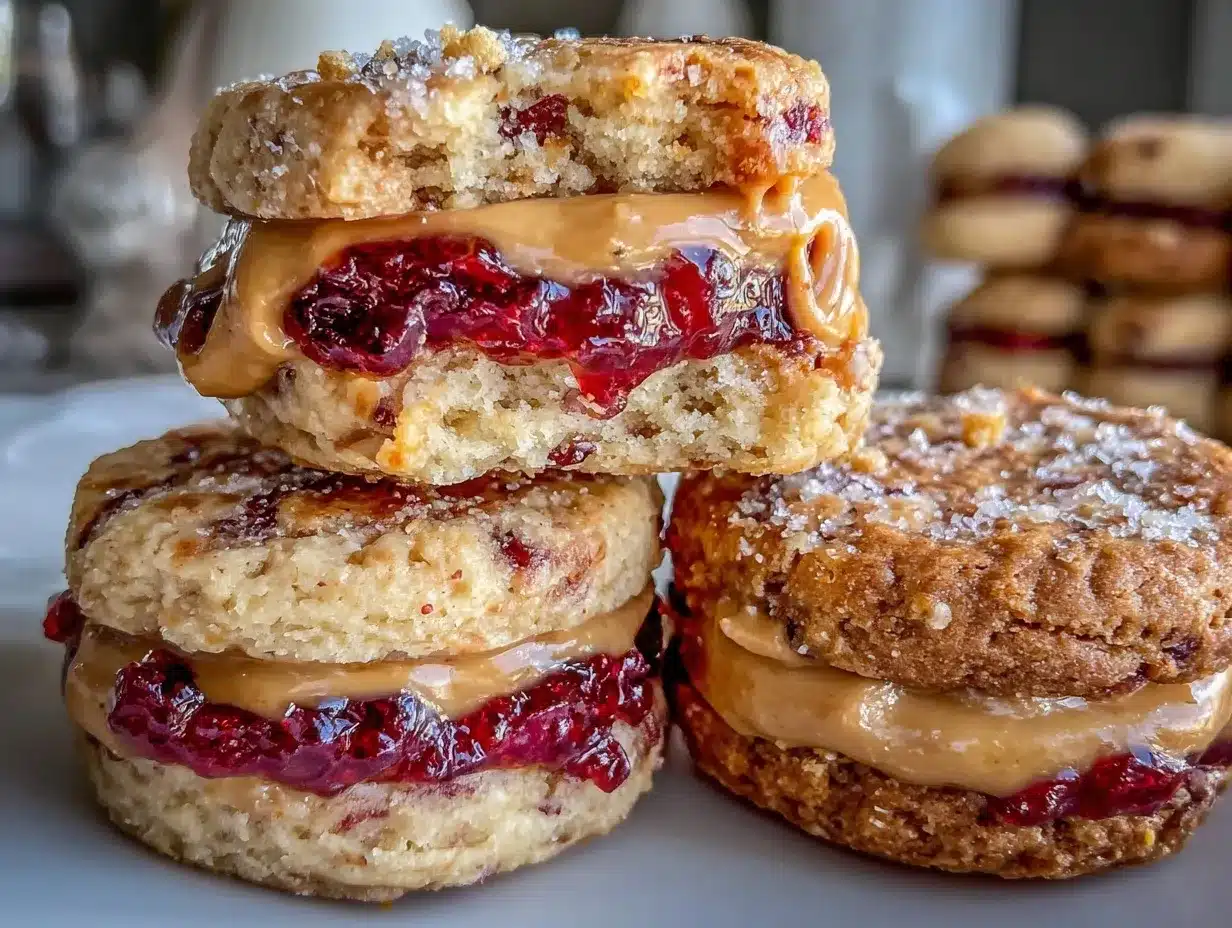
The last sandwich disappeared before I even had a chance to sit down. Third time this week, no kidding. My kids were texting their friends for the recipe, which honestly caught me off guard. I mean, it’s just peanut butter and jelly, right? But these easy homemade Uncrustables peanut butter & jelly sandwiches have this way of turning the usual lunchbox routine into something a bit more special. It all started one hectic morning when I ran out of the store-bought kind and figured, why not make them myself? I never expected the fuss they’d cause.
What surprised me most was how the little details—soft, pillowy bread sealed perfectly around the sweet and creamy filling—made such a huge difference. Plus, making them at home means I can control the ingredients, which feels better for everyone. I’m quietly proud every time I pull these out for lunch or snack time, especially knowing the empty plates and happy faces that follow. It’s a simple recipe, but there’s something about these sandwiches that sticks with you, the kind that feels like an easy win in the chaos of daily life.
Honestly, this recipe has lingered in my kitchen routine because it’s quick, fuss-free, and packs a nostalgic punch. If you’re looking for a no-fail, kid-friendly treat (or a grown-up’s midday comfort snack), this might just be your new go-to. It’s one of those rare recipes that make you pause and appreciate how something so straightforward can feel just right.
Why You’ll Love This Recipe
Having made these easy homemade Uncrustables peanut butter & jelly sandwiches more times than I can count, I can say this recipe has a few standout perks that keep me coming back:
- Quick & Easy: Ready in about 10 minutes, perfect when you’re short on time but want something homemade.
- Simple Ingredients: You only need pantry staples—bread, peanut butter, and jelly—which means no last-minute grocery runs.
- Perfect for Lunchboxes and Snacks: These sandwiches travel well and make lunch feel a little more exciting for kids and adults alike.
- Crowd-Pleaser: The sealed edges keep the filling inside, so no mess and no complaints from picky eaters.
- Customizable: You can swap the jelly for honey, jam, or even a nut-free spread to suit dietary needs.
- Homemade Control: No preservatives or added sugars that come with store-bought versions—just the flavors you trust.
What really sets this recipe apart is the sealing technique. I’ve tried many ways, but using a simple sandwich press or even a heavy pan works wonders to create that classic Uncrustable edge that kids adore. Plus, I often blend a bit of creamy cottage cheese into the peanut butter for a smoother texture—trust me, it’s a little secret that makes the filling extra luscious.
Making these sandwiches feels like a tiny act of care, especially when I see my kids’ eyes light up at lunchtime. It’s comfort food, but with a homemade twist that feels thoughtful—not rushed. This recipe isn’t just about feeding hungry tummies; it’s about those quiet moments where food connects us in the middle of busy days.
What Ingredients You Will Need
This recipe uses simple, wholesome ingredients to deliver that classic peanut butter and jelly flavor with a soft, sealed crust. Most of these are pantry staples, so you likely have them on hand already.
- White sandwich bread: Use soft, square slices without crusts if you want the traditional Uncrustable look. I prefer a fresh, fluffy loaf like Wonder Bread or similar for the best texture.
- Peanut butter: Creamy or chunky, depending on your preference. I usually go for a no-stir creamy peanut butter (such as Skippy Natural) for easy spreading.
- Jelly or jam: Grape or strawberry are classic choices, but feel free to use your favorite flavor. Homemade jams work beautifully here too.
- Optional add-ins: A little honey or a pinch of cinnamon mixed into the peanut butter can add a subtle twist.
If you’re dealing with allergies or prefer alternatives, you can swap peanut butter for almond butter, sunflower seed butter, or even a sunflower seed spread to keep it nut-free. For jelly, pure fruit preserves or natural fruit spreads without added sugar make a healthier choice. In summer, fresh berries mashed with a bit of honey can replace the jelly for a seasonal variation.
Pro tip: If you want an ultra-smooth filling, blend the peanut butter with a spoonful of cream cheese or cottage cheese to get that perfect creamy texture that holds together well inside the sandwich. This little trick also keeps the filling from oozing out when you press and seal the edges.
Equipment Needed
- Round cookie cutter or sandwich cutter: Essential for shaping the sandwiches and sealing the edges neatly. A 3-4 inch diameter cutter works best.
- Butter knife or small spatula: For spreading peanut butter and jelly evenly.
- Cutting board: Provides a clean surface for assembly.
- Optional sandwich press or heavy skillet: For pressing the sandwiches to seal the edges tightly and create that familiar Uncrustables look.
- Plastic wrap or parchment paper: For wrapping sandwiches for storage or lunchboxes.
If you don’t have a sandwich cutter, a simple round biscuit cutter or even a small glass rim works fine. I’ve even used my hands carefully to pinch the edges closed when in a pinch, though it takes a little patience. When it comes to pressing, a heavy pan works just as well as a dedicated sandwich press—just press firmly to seal the edges without squashing the bread too much.
Preparation Method
- Prepare your work area: Lay out your bread slices on a clean cutting board. If you want your sandwiches crust-free, gently trim the crusts with a sharp knife. This helps the edges seal better.
- Spread the peanut butter: Using a butter knife or small spatula, spread about 1 tablespoon (15 g) of peanut butter evenly over one slice of bread, leaving a small border around the edges (about ½ inch / 1.3 cm) to help seal later.
- Add the jelly: On top of the peanut butter, spread about 1 tablespoon (15 g) of jelly or jam, again keeping the edges clear.
- Top with another slice: Place a second slice of bread over the filling, pressing gently to ensure the sandwich holds together.
- Cut and seal: Use your round cookie cutter (about 3-4 inches / 7.5-10 cm in diameter) to cut through the sandwich, applying firm pressure to seal the edges. If you’re using a sandwich press or heavy skillet, place the sandwich inside and press down firmly for about 10-15 seconds, then cut with the cookie cutter and press again to reinforce the seal.
- Wrap for storage or packing: Wrap each sandwich tightly in plastic wrap or parchment paper to keep them fresh and easy to grab.
Time estimates: Overall prep takes roughly 10 minutes for 4 sandwiches.
Troubleshooting tips: If your bread feels too dry and cracks when sealing, try lightly misting the edges with water before pressing—they’ll stick together better. For fillings that ooze, slightly chill the peanut butter and jelly before assembly to make spreading easier and reduce mess. Also, don’t overload the filling; less is more when it comes to clean edges.
My favorite tip? Toast the bread lightly before assembling for a slight crunch that contrasts nicely with the creamy filling. Just be sure to cool the bread before spreading so it doesn’t melt the jelly.
Cooking Tips & Techniques
While these sandwiches don’t require cooking, there are a few kitchen tricks that make the process smoother and the end result better:
- Choose the right bread: Soft, fresh sandwich bread is key. Older or drier bread tears easily and doesn’t seal well.
- Don’t overfill: Too much peanut butter or jelly can burst out during pressing or storage, making a mess. Stick to about 1 tablespoon each per sandwich.
- Seal edges carefully: Press firmly with a cookie cutter or sandwich press to create a tight seal that keeps the filling inside and the sandwich neat.
- Chill before packing: Wrapping the sandwiches and chilling them for 30 minutes helps them firm up and hold shape, especially if you’re packing for lunch later.
- Multitask efficiently: While the sandwiches chill, you can prep a quick side salad like the fresh creamy cucumber dill salad to round out a well-balanced meal.
Early on, I made the mistake of trying to press the sandwiches with too much force, which flattened the bread into a pancake—lesson learned. A firm but gentle press is enough to seal without squashing. Also, I once skipped trimming the crusts, and the sandwiches didn’t stick together as well. Little things like these add up.
Variations & Adaptations
There’s plenty of room to customize these easy homemade Uncrustables peanut butter & jelly sandwiches, depending on your family’s tastes or dietary needs:
- Nut-free option: Use sunflower seed butter or soy nut butter with your favorite jelly to keep it allergy-friendly.
- Flavor swaps: Try swapping the jelly for honey, Nutella, or even cream cheese mixed with jam for a richer twist.
- Whole grain or gluten-free bread: For a healthier or gluten-free option, use whole wheat sandwich bread or a sturdy gluten-free variety. Just watch for moisture differences when sealing.
- Frozen sandwiches: Make a batch ahead and freeze them wrapped tightly. Thaw in the lunchbox or fridge overnight for ready-to-go snacks.
Personally, I once mixed in a bit of mashed banana with the peanut butter for a natural sweetness boost, and it was a hit. For a summer picnic, I swapped jelly with fresh sliced strawberries and a drizzle of honey to brighten things up.
Serving & Storage Suggestions
These homemade Uncrustables are best served chilled or at room temperature. They make a great grab-and-go snack or a no-fuss lunchbox main.
Pair them with crunchy sides like creamy southern style coleslaw or the loaded baked potato salad for a picnic-perfect combo. For drinks, a cold glass of milk or a fresh fruit smoothie balances the sweetness nicely.
To store, wrap each sandwich tightly in plastic wrap or parchment paper and place them in an airtight container in the fridge for up to 3 days. For longer storage, freeze wrapped sandwiches for up to 2 months. Thaw overnight in the fridge or pack frozen for lunch and let thaw by midday.
Flavors tend to meld and soften a bit after chilling, which makes the bread even more tender and the filling creamier. If you like a bit of texture, toast the sandwiches lightly before serving to refresh the bread.
Nutritional Information & Benefits
Per sandwich (approximate): 250-300 calories, 10-12g fat, 30-35g carbohydrates, 6-8g protein.
Peanut butter provides healthy fats and protein, while the jelly adds natural fruit sugars for quick energy. Using homemade or low-sugar jelly options can reduce added sugars significantly.
Choosing whole grain bread boosts fiber content, which is great for digestion and keeping kids full longer. For those with dietary restrictions, swapping peanut butter for sunflower seed butter keeps it nut-free and allergy conscious.
This recipe fits well into balanced meals, especially when paired with fresh veggies or fruit. From a wellness perspective, it’s a comforting, wholesome snack that’s easy to make without artificial ingredients or preservatives.
Conclusion
These easy homemade Uncrustables peanut butter & jelly sandwiches have quietly become one of my favorite little kitchen wins. They’re straightforward, fuss-free, and bring a smile every time—plus, I feel good knowing exactly what goes inside. Whether you’re packing lunchboxes, planning a snack, or just craving a nostalgic treat, this recipe is simple enough to make on a whim but special enough to feel thoughtful.
Go ahead and tweak the fillings to your family’s tastes; that’s part of the fun. I love how these sandwiches make everyday moments feel a bit more cared-for without extra hassle. If you try this recipe, I’d love to hear about your favorite variations or how it fits into your routine—it’s the little stories that make food meaningful.
Enjoy making and sharing these homemade classic sandwiches that bring back smiles and empty plates every time.
FAQs about Easy Homemade Uncrustables Peanut Butter & Jelly Sandwiches
Can I make these sandwiches ahead of time?
Absolutely! They store well in the fridge for up to 3 days and freeze beautifully for up to 2 months. Just wrap them tightly and thaw before eating.
What’s the best bread to use for homemade Uncrustables?
Soft, fresh sandwich bread works best—white or whole wheat. Avoid very dense or crusty breads as they don’t seal as well.
How can I prevent the peanut butter and jelly from leaking out?
Don’t overfill the sandwiches and press the edges firmly with a cookie cutter or sandwich press to seal tightly. Chilling the sandwiches before packing helps too.
Can I use other nut butters or spreads?
Yes! Almond butter, sunflower seed butter, or soy nut butter all work well, especially to accommodate allergies or preferences.
Is it necessary to remove the crusts?
Removing crusts is traditional and helps create a neat seal, but it’s not mandatory. If you leave crusts on, just press carefully to seal the edges.
Pin This Recipe!
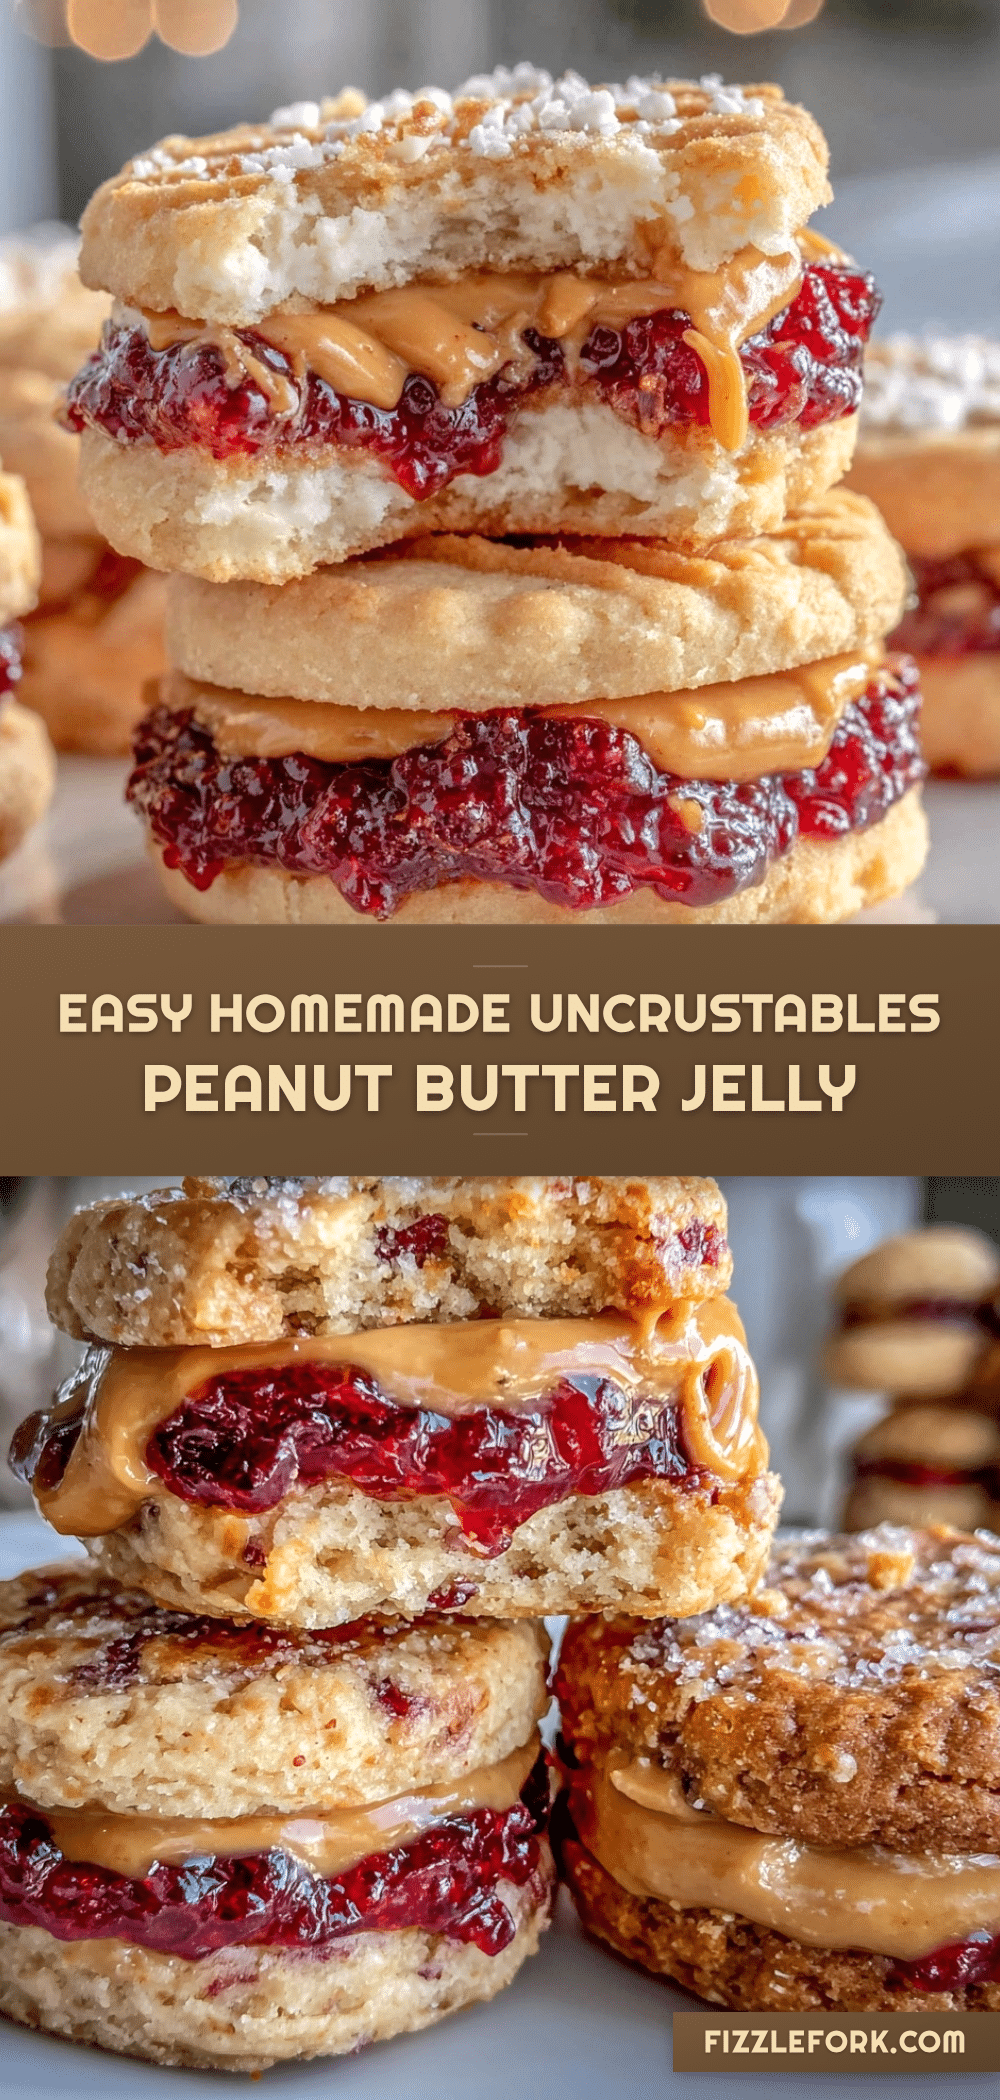
Easy Homemade Uncrustables Peanut Butter Jelly Sandwiches Recipe for Kids

These easy homemade Uncrustables peanut butter & jelly sandwiches are quick, fuss-free, and perfect for lunchboxes or snacks. They feature soft, sealed bread with creamy peanut butter and sweet jelly filling, customizable to suit dietary needs.
- Prep Time: 10 minutes
- Cook Time: 0 minutes
- Total Time: 10 minutes
- Yield: 4 sandwiches
- Category: Snack
- Cuisine: American
Ingredients
- White sandwich bread (soft, square slices, crusts removed if desired)
- Peanut butter (creamy or chunky, about 1 tablespoon per sandwich)
- Jelly or jam (grape, strawberry, or favorite flavor, about 1 tablespoon per sandwich)
- Optional: honey or a pinch of cinnamon mixed into peanut butter
- Optional: blend peanut butter with cream cheese or cottage cheese for smoother texture
- Nut-free alternatives: almond butter, sunflower seed butter, or soy nut butter
- Optional: fresh berries mashed with honey as jelly substitute
Instructions
- Prepare your work area by laying out bread slices on a clean cutting board. Trim crusts if desired.
- Spread about 1 tablespoon of peanut butter evenly over one slice of bread, leaving a ½ inch border around edges.
- Spread about 1 tablespoon of jelly or jam on top of the peanut butter, keeping edges clear.
- Place a second slice of bread over the filling, pressing gently to hold together.
- Use a round cookie cutter (3-4 inch diameter) to cut through the sandwich, applying firm pressure to seal edges.
- If using a sandwich press or heavy skillet, press the sandwich firmly for 10-15 seconds, then cut and press again to reinforce seal.
- Wrap each sandwich tightly in plastic wrap or parchment paper for storage or packing.
Notes
If bread is too dry and cracks when sealing, mist edges lightly with water before pressing. Chill peanut butter and jelly slightly before assembly to reduce oozing. Do not overfill to maintain clean edges. Toast bread lightly before assembling for a slight crunch, but cool before spreading. Sandwiches store well in fridge up to 3 days and freeze up to 2 months.
Nutrition
- Serving Size: 1 sandwich
- Calories: 275
- Sugar: 10
- Sodium: 250
- Fat: 11
- Saturated Fat: 2
- Carbohydrates: 33
- Fiber: 2
- Protein: 7
Keywords: Uncrustables, peanut butter and jelly, homemade sandwiches, kids lunch, easy snack, no crust sandwich, lunchbox ideas


