Introduction
I wasn’t planning on making cupcakes that day. Honestly, I’d stopped by my neighbor’s house to borrow a ladder—our gutters were clogged, and it was that awkward in-between hour where you’re not sure if three o’clock is too late for coffee. But the smell hit me before I even got to the front door. It was rich, a little sweet, and unmistakably chocolatey, but with something deeper underneath. Vanilla, maybe, or something almost floral.
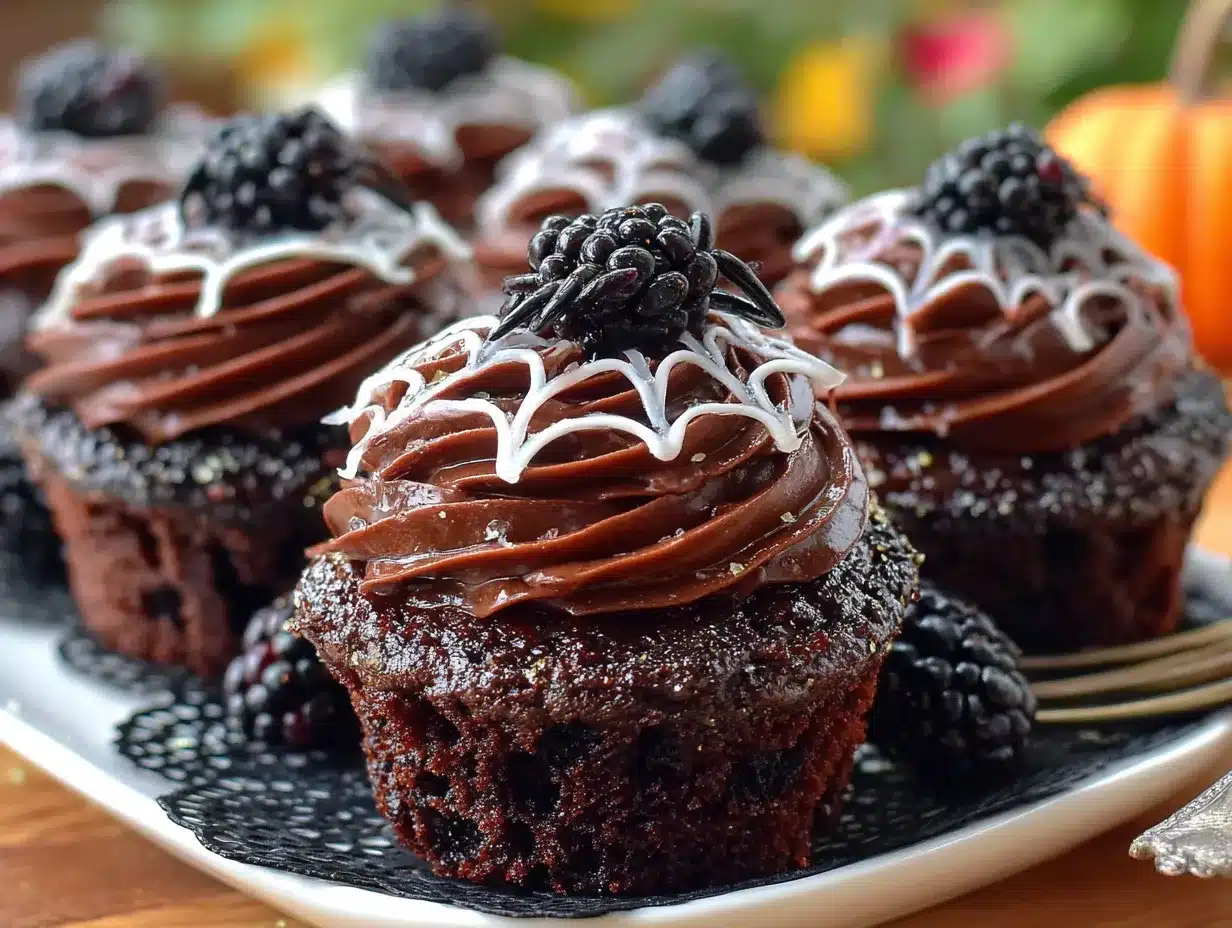
She opened the door holding a piping bag like it was no big deal. “Oh, these?” she said when I asked. “Just messing around with a box mix.” But these weren’t box-mix cupcakes. They were black. Not just dark chocolate black, but proper, deep, almost-spooky black, with white frosting swirled into perfect little webs on top. She shrugged and said her kid wanted something “creepy but classy” for the school Halloween party. She made it sound like nothing. I stood there holding my ladder, absolutely mesmerized.
I ended up staying for twenty minutes, watching her work. She wasn’t trying to impress me—she was just making cupcakes for her son. But there was something about the way she moved, the casual confidence of it, that stuck with me. I asked for the recipe, and she scribbled it on the back of an old grocery list. I’ve been making them every Halloween since. And honestly? They’re the first thing to disappear at every party.
Maybe you’ve been there—standing in someone’s kitchen, watching them whip up something incredible without breaking a sweat, and thinking, I need to learn how to do that. Well, here’s your chance. These Spooky Black Velvet Spider Web Cupcakes are easier than they look, and they taste even better than they look. Let’s get into it.
Why You’ll Love This Recipe
I’ve tested this recipe more times than I care to admit. The first batch? Dry. The second? Too sweet. The third? Perfect. That’s the thing about black velvet—it’s a finicky beast. You need the right balance of cocoa, buttermilk, and color to get that signature dark crumb without sacrificing moisture. After a few rounds in my kitchen (and a few panicked texts to my neighbor), I landed on a version that’s foolproof. Here’s why it works:
- Quick & Easy: From start to finish, these come together in about 45 minutes. The batter takes ten minutes flat, and the frosting is a one-bowl situation. Perfect for busy Halloween prep.
- Simple Ingredients: No weird stabilizers or hard-to-find extracts. You probably have most of this in your pantry right now. The only “special” thing is black food coloring, and you can grab that at any grocery store.
- Perfect for Halloween: These are the star of any spooky spread. They look impressive, but they’re secretly simple. Your guests will think you spent hours on them.
- Crowd-Pleaser: Kids love the spider web design, and adults love the rich, velvety texture. I’ve brought these to three different Halloween parties now, and they’re always the first empty tray.
- Unbelievably Delicious: The cake is moist, tender, and deeply chocolatey. The frosting is light, creamy, and just sweet enough. Together, they’re next-level comfort food with a spooky twist.
What makes these different from every other Halloween cupcake out there? It’s the texture. Black velvet isn’t just red velvet dyed black—it’s a slightly different balance of ingredients. I use a touch more cocoa powder and a bit less vinegar, which gives you a darker, richer crumb without any weird aftertaste. Plus, the cream cheese frosting is stabilized just enough to hold those perfect web swirls without being stiff. Trust me, this is the version you’ll come back to year after year.
What Ingredients You Will Need
This recipe uses simple, wholesome ingredients to deliver that signature black velvet flavor and tender crumb. Most of these are pantry staples, which makes this an easy last-minute Halloween treat. Here’s what you’ll need:
For the Cupcakes
- All-purpose flour – 1 ½ cups (190g). Provides structure without making the cake dense. I use Gold Medal, but any brand works.
- Granulated sugar – 1 cup (200g). Adds sweetness and helps with browning. Don’t reduce this—it’s essential for texture.
- Unsweetened cocoa powder – ¼ cup (25g). I use Hershey’s Special Dark for a deeper color, but regular works too.
- Baking soda – 1 teaspoon. Helps the cake rise and creates that tender crumb.
- Salt – ½ teaspoon. Balances the sweetness and enhances the chocolate flavor.
- Vegetable oil – ½ cup (120ml). Keeps the cupcakes incredibly moist. You can use canola or melted coconut oil too.
- Buttermilk – ¾ cup (180ml), room temperature. Adds tanginess and activates the baking soda. No buttermilk? Add 1 tablespoon of lemon juice to regular milk and let it sit for 5 minutes.
- Large eggs – 2, room temperature. Provides structure and richness. Let them sit out for 30 minutes before baking.
- White vinegar – 1 teaspoon. Reacts with the baking soda for extra lift. You won’t taste it, I promise.
- Vanilla extract – 1 teaspoon. Adds warmth and depth. Use pure vanilla if you can—it makes a difference.
- Black gel food coloring – 2-3 teaspoons. Gel is better than liquid because it doesn’t thin the batter. I use Americolor Super Black.
For the Cream Cheese Frosting
- Cream cheese – 8 ounces (226g), softened. Full-fat is best for stability. Let it sit out for at least an hour.
- Unsalted butter – ½ cup (113g), softened. Adds richness and helps the frosting hold its shape.
- Powdered sugar – 3 cups (360g), sifted. Sifting prevents lumps. Trust me on this one.
- Vanilla extract – 1 teaspoon. For flavor.
- Heavy cream – 2-3 tablespoons (30-45ml). Adjusts consistency. Use as needed.
For Decoration
- Black sanding sugar – Optional, for sprinkling. Adds a little sparkle.
- Candy spiders – Optional, for topping. A fun touch for kids.
Equipment Needed
You don’t need a professional bakery setup for these. Here’s what you’ll need:
- Muffin tin – Standard 12-cup. I prefer non-stick for easy release.
- Paper cupcake liners – Black or Halloween-themed ones look great. I got a pack of bat-print liners from the dollar store once, and they were perfect.
- Mixing bowls – At least two medium-sized ones.
- Whisk and spatula – For combining ingredients. A silicone spatula is my favorite for scraping every last bit of batter.
- Electric hand mixer or stand mixer – For the frosting. You can whisk by hand, but your arm will thank you for using a mixer.
- Piping bags – Two disposable ones. One for frosting, one for the web design.
- Piping tips – A large round tip (like Wilton 1A) for the base frosting, and a small round tip (like Wilton 3) for the web. If you don’t have tips, you can snip the end of a piping bag.
- Toothpicks – For creating the spider web design. This is the secret weapon.
- Cooling rack – Essential for even cooling. Don’t skip this, or your frosting will melt.
Preparation Method
Alright, let’s make some magic. This method is broken down into clear steps, and I’ve included little notes from my own trial-and-error along the way.
- Preheat your oven to 350°F (175°C). Line your muffin tin with 12 paper liners. I like to double up the liners for extra support—black velvet batter is a bit thinner than regular cake batter.
- Mix the dry ingredients. In a medium bowl, whisk together the flour, sugar, cocoa powder, baking soda, and salt. Make sure there are no lumps. I use a fork to break up any cocoa clumps—it’s faster than sifting.
- Combine the wet ingredients. In a separate larger bowl, whisk together the vegetable oil, buttermilk, eggs, vinegar, and vanilla extract. Whisk until smooth and slightly frothy. This should take about 30 seconds.
- Add the black gel food coloring. Start with 2 teaspoons and whisk it into the wet ingredients. The batter will look grayish at this point—don’t panic. It will darken as you add the dry ingredients and during baking. If you want a deeper black, add another teaspoon now.
- Combine wet and dry. Pour the dry ingredients into the wet ingredients. Fold gently with a spatula until just combined. Do NOT overmix—this is the number one mistake I made in my first batch. Overmixing develops gluten and makes the cupcakes tough. A few small lumps are fine.
- Fill the liners. Use a cookie scoop or a measuring cup to divide the batter evenly among the 12 liners. Fill each about ⅔ full. The batter will be thin, so don’t worry if it looks runny—that’s normal for black velvet.
- Bake for 18-20 minutes. Rotate the pan halfway through for even baking. The cupcakes are done when a toothpick inserted into the center comes out clean or with a few moist crumbs. Mine usually take exactly 19 minutes. Let them cool in the pan for 5 minutes, then transfer to a wire rack to cool completely. This is crucial—warm cupcakes will turn your frosting into a puddle.
- Make the frosting. While the cupcakes cool, beat the softened cream cheese and butter together in a large bowl with an electric mixer on medium speed. Beat for about 2 minutes until smooth and fluffy. Scrape down the sides of the bowl.
- Add the powdered sugar. With the mixer on low, gradually add the sifted powdered sugar, about ½ cup at a time. After each addition, increase the speed to medium and beat until smooth. This prevents a sugar cloud from exploding in your kitchen—learned that one the hard way.
- Add vanilla and cream. Beat in the vanilla extract and 2 tablespoons of heavy cream. If the frosting is too thick, add the remaining tablespoon of cream. It should be smooth, spreadable, and hold its shape when you lift the beater.
- Frost the cupcakes. Fit a piping bag with the large round tip and fill it with frosting. Pipe a generous swirl onto each cooled cupcake. I start from the outside and work my way in, creating a tall, round dome. Smooth the top slightly with a spatula if needed—this gives you a flat canvas for the web.
- Create the spider web design. This is the fun part. Fit a second piping bag with the small round tip and fill it with a small amount of frosting. Pipe three concentric circles on top of the frosted cupcake—start with a small circle in the center, then a medium one, then a large one near the edge. Don’t worry about perfection; the toothpick does the magic.
- Drag the toothpick. Take a toothpick and gently drag it from the center circle outward to the edge. Then drag it from the edge inward to the center. Repeat this every ¼ turn around the cupcake, alternating directions. You’ll see the web pattern emerge immediately. It’s honestly so satisfying. I did this about 8 times per cupcake—four outward drags, four inward drags.
- Add finishing touches. Sprinkle with black sanding sugar if using, and place a candy spider on top or near the edge of the web. Repeat with all 12 cupcakes.
A quick sensory note: the batter should be smooth, dark, and slightly glossy. When you drag the toothpick through the frosting, you should feel a slight resistance but not too much. If the frosting is too stiff, the web lines will tear instead of dragging. If it’s too soft, the lines will blur. That Goldilocks consistency comes from the cream cheese and butter being properly softened.
Cooking Tips & Techniques
I’ve made these cupcakes more times than I can count, and I’ve messed up plenty along the way. Here’s what I’ve learned:
Don’t overmix the batter. I cannot stress this enough. The first time I made these, I used a hand mixer and beat the batter until it was perfectly smooth. The cupcakes came out dense and tough. Black velvet batter should be folded gently by hand. A few lumps are totally fine—they’ll bake out.
Room temperature ingredients matter. Cold buttermilk and eggs will make the batter seize up and create a dense texture. Take them out of the fridge 30 minutes before you start. I usually set them on the counter while I preheat the oven and gather my tools.
Gel food coloring is non-negotiable. Liquid food coloring will thin out your batter and give you a grayish, muddy color. Gel is concentrated and won’t affect the texture. I use Americolor Super Black, and 2-3 teaspoons is the sweet spot. If you want a truly black cupcake, add the coloring to the wet ingredients before combining with dry—this helps it distribute evenly.
Let the cupcakes cool completely. I know it’s tempting to frost them while they’re still warm, but trust me—you’ll end up with a melted mess. I usually bake them the night before and frost them the next day. The flavor actually develops overnight, and the texture stays perfectly moist.
Practice the web technique on a plate first. Before you pipe onto the cupcakes, do a few practice webs on a plate or piece of wax paper. This helps you get a feel for the pressure and spacing. My first attempt looked more like a tangled fishing net than a spider web. Practice makes perfect.
Keep the frosting cool. If your kitchen is warm, the frosting can get too soft for the web design. Pop the frosted cupcakes in the fridge for 10 minutes before piping the webs. This firms up the base and makes the lines crisp.
Variations & Adaptations
One of the best things about this recipe is how adaptable it is. Here are a few variations I’ve tried:
Gluten-Free Version: Substitute the all-purpose flour with a 1:1 gluten-free baking flour blend. I’ve used Bob’s Red Mill with great results. Add an extra tablespoon of buttermilk to compensate for the drier flour. The texture is slightly more tender, but the flavor is spot on.
Dairy-Free Version: Use a plant-based buttermilk (1 cup almond milk + 1 tablespoon lemon juice) and dairy-free cream cheese and butter. I like Kite Hill’s cream cheese and Miyoko’s butter for the best texture. The frosting will be slightly softer, so chill the cupcakes before piping the webs.
Chocolate Lover’s Twist: Add ½ cup of mini chocolate chips to the batter before baking. They sink to the bottom and create a fudgy layer. I did this for a friend’s birthday, and she said they were the best cupcakes she’d ever had.
Peppermint Spider Webs: Add ½ teaspoon of peppermint extract to the frosting and crush some candy canes for sprinkling. This gives a festive winter vibe that works for Christmas too. I made these for a holiday party, and they were a hit.
Nutella Swirl: Before baking, drop a teaspoon of Nutella into the center of each cupcake and swirl it with a toothpick. The Nutella sinks slightly and creates a gooey center. It’s decadent, but hey—it’s Halloween.
Serving & Storage Suggestions
These cupcakes are best served at room temperature. The cream cheese frosting softens slightly, and the cake is perfectly tender. If you’ve refrigerated them, let them sit out for 20-30 minutes before serving.
For presentation, I like to arrange them on a black cake stand or a wooden board with some fake spider webs and plastic spiders scattered around. It makes for a great photo and adds to the spooky vibe. If you’re bringing them to a party, keep them in a single layer in a container—stacking will smudge the webs.
Storage: Store unfrosted cupcakes in an airtight container at room temperature for up to 3 days. Frosted cupcakes should be stored in the refrigerator for up to 5 days. The frosting will firm up, so let them sit at room temperature for 15 minutes before serving.
Freezing: You can freeze the unfrosted cupcakes for up to 3 months. Wrap each one individually in plastic wrap, then place in a freezer bag. Thaw at room temperature, then frost and decorate. The frosting can also be frozen for up to 2 months—thaw in the refrigerator overnight and re-whip before using.
Reheating: If you want a warm cupcake (which I sometimes do), microwave an unfrosted one for 10-15 seconds. Don’t microwave the frosted ones—the frosting will melt into a puddle.
A note on flavor development: these cupcakes actually taste better the next day. The cocoa and vanilla meld together, and the texture becomes even more tender. I often bake them a day ahead and frost them the morning of the party.
Nutritional Information & Benefits
Let’s be real—these are cupcakes, not health food. But there are a few redeeming qualities. Here’s the estimated nutrition per cupcake (based on 12 servings):
| Nutrient | Amount |
|---|---|
| Calories | 385 |
| Total Fat | 18g |
| Saturated Fat | 8g |
| Cholesterol | 55mg |
| Sodium | 290mg |
| Total Carbohydrates | 52g |
| Dietary Fiber | 1g |
| Sugars | 38g |
| Protein | 4g |
On the plus side, the cocoa powder provides antioxidants, and the buttermilk adds a bit of calcium and probiotics. The cream cheese frosting has less sugar than a traditional buttercream, so it’s a slight upgrade in that department. But honestly? These are a treat. They’re meant to be enjoyed in moderation, especially on a fun night like Halloween.
If you’re looking to lighten them up, you can reduce the sugar in the frosting by ¼ cup and use a low-fat cream cheese. The texture will be slightly less stable, but the flavor will still be great.
Allergen note: This recipe contains dairy, eggs, and gluten. For dairy-free and gluten-free options, see the variations section above.
Conclusion
These Spooky Black Velvet Spider Web Cupcakes have become my go-to Halloween recipe for a reason. They’re impressive enough to steal the show at any party, but simple enough that you don’t need to stress about them. The black velvet cake is rich, moist, and deeply chocolatey, and the cream cheese frosting with its delicate web design is the perfect finishing touch.
I love that this recipe came from a casual afternoon at my neighbor’s house—a moment that wasn’t supposed to be special but turned into something I look forward to every year. That’s the kind of recipe I want to share with you. One that feels like a secret you’ve stumbled upon, and now you get to pass it on.
So go ahead—make a batch for your Halloween party, your kid’s classroom, or just for yourself on a cozy October evening. Customize it, make it your own, and don’t forget to have fun with the spider web design. It’s easier than it looks, I promise.
I’d love to see how yours turn out! Tag me in your photos or leave a comment below with your favorite variation. Happy Halloween, and happy baking!
Frequently Asked Questions
Can I use liquid food coloring instead of gel?
You can, but I don’t recommend it. Liquid food coloring will thin out your batter and give you a grayish color instead of a deep black. Gel food coloring is concentrated and won’t affect the texture. If you only have liquid, use at least 2 tablespoons and reduce the buttermilk by 2 tablespoons to compensate.
Why did my cupcakes turn out dry?
This usually happens from overmixing the batter or overbaking. Black velvet batter should be folded gently until just combined—overmixing develops gluten and makes the cake tough. Also, check your oven temperature with an oven thermometer. Mine runs hot, so I bake at 340°F instead of 350°F.
Can I make these cupcakes ahead of time?
Absolutely! You can bake the cupcakes up to 3 days in advance and store them in an airtight container at room temperature. Frost them the day you plan to serve them for the best presentation. You can also freeze the unfrosted cupcakes for up to 3 months.
How do I get the spider web design perfect?
Practice on a plate first! The key is to pipe three concentric circles that are evenly spaced, then drag the toothpick from the center outward and from the edge inward, alternating every ¼ turn. If the frosting is too soft, chill the cupcakes for 10 minutes before piping the webs.
Can I use a different frosting?
Of course! A classic vanilla buttercream works great, or you can try a chocolate frosting for an extra-rich version. Just keep in mind that the web design works best with a frosting that’s firm enough to hold its shape but soft enough to drag a toothpick through. Cream cheese frosting is my favorite for its tangy contrast to the sweet cake.
Pin This Recipe!
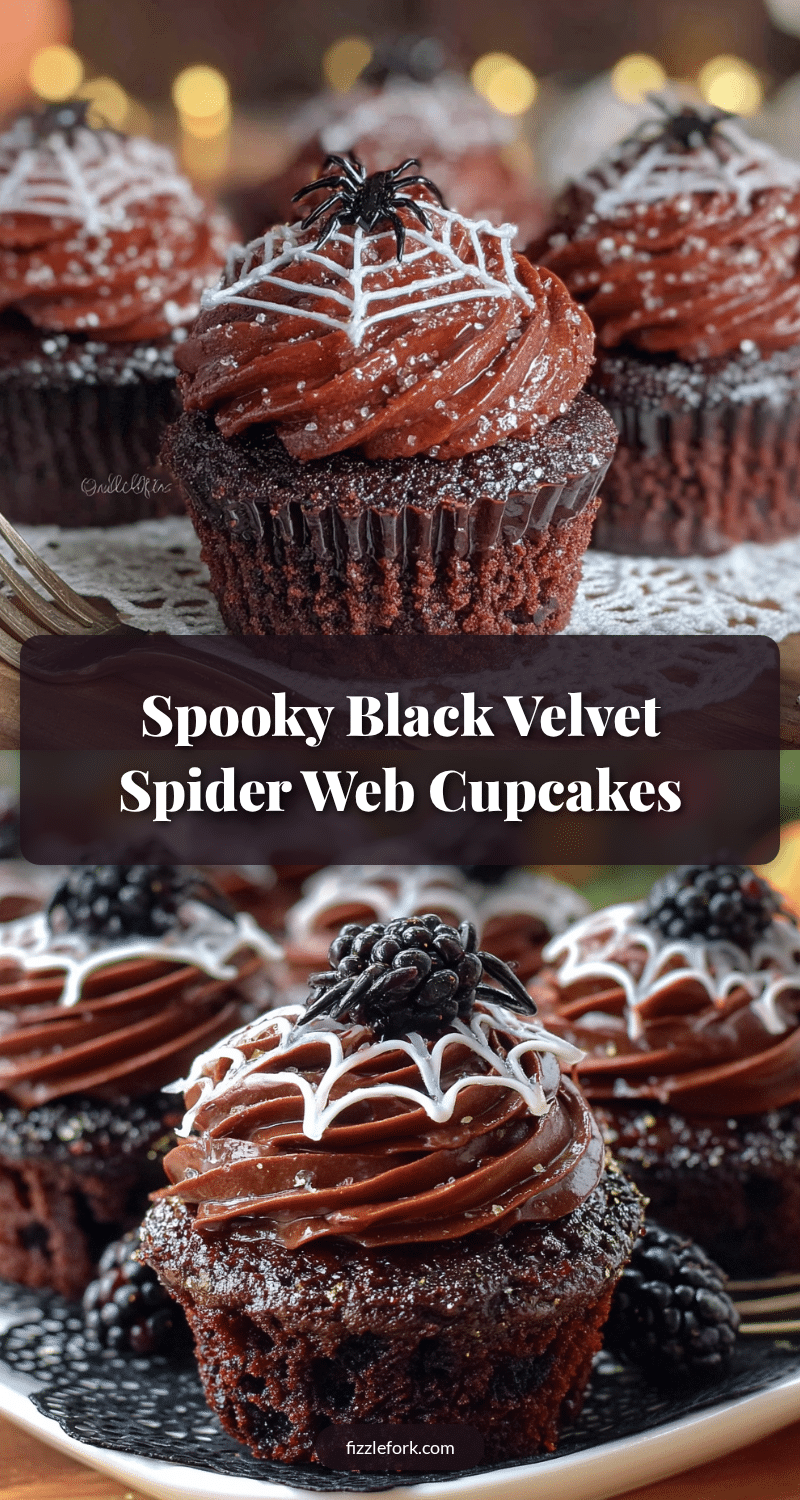
Spooky Black Velvet Spider Web Cupcakes – Easy Halloween Recipe
These Spooky Black Velvet Spider Web Cupcakes are rich, moist, and deeply chocolatey, topped with a creamy cream cheese frosting and a delicate spider web design. Perfect for Halloween parties, they’re impressive yet simple to make.
- Prep Time: 15 minutes
- Cook Time: 20 minutes
- Total Time: 45 minutes
- Yield: 12 servings 1x
- Category: Dessert
- Cuisine: American
Ingredients
- 1 ½ cups (190g) all-purpose flour
- 1 cup (200g) granulated sugar
- ¼ cup (25g) unsweetened cocoa powder
- 1 teaspoon baking soda
- ½ teaspoon salt
- ½ cup (120ml) vegetable oil
- ¾ cup (180ml) buttermilk, room temperature
- 2 large eggs, room temperature
- 1 teaspoon white vinegar
- 1 teaspoon vanilla extract
- 2–3 teaspoons black gel food coloring
- 8 ounces (226g) cream cheese, softened
- ½ cup (113g) unsalted butter, softened
- 3 cups (360g) powdered sugar, sifted
- 1 teaspoon vanilla extract
- 2–3 tablespoons (30-45ml) heavy cream
- Black sanding sugar (optional, for sprinkling)
- Candy spiders (optional, for topping)
Instructions
- Preheat your oven to 350°F (175°C). Line a muffin tin with 12 paper liners.
- In a medium bowl, whisk together the flour, sugar, cocoa powder, baking soda, and salt.
- In a separate larger bowl, whisk together the vegetable oil, buttermilk, eggs, vinegar, and vanilla extract until smooth and slightly frothy.
- Add 2 teaspoons of black gel food coloring to the wet ingredients and whisk. Add more if desired for a deeper black.
- Pour the dry ingredients into the wet ingredients and fold gently with a spatula until just combined. Do not overmix.
- Divide the batter evenly among the 12 liners, filling each about ⅔ full.
- Bake for 18-20 minutes, rotating the pan halfway through. Cupcakes are done when a toothpick inserted into the center comes out clean or with a few moist crumbs.
- Let the cupcakes cool in the pan for 5 minutes, then transfer to a wire rack to cool completely.
- While the cupcakes cool, make the frosting: Beat the softened cream cheese and butter together in a large bowl with an electric mixer on medium speed until smooth and fluffy, about 2 minutes.
- Gradually add the sifted powdered sugar, ½ cup at a time, beating on medium speed until smooth after each addition.
- Beat in the vanilla extract and 2 tablespoons of heavy cream. Add more cream if needed to reach a smooth, spreadable consistency that holds its shape.
- Fit a piping bag with a large round tip and fill with frosting. Pipe a generous swirl onto each cooled cupcake, smoothing the top slightly.
- Fit a second piping bag with a small round tip and fill with a small amount of frosting. Pipe three concentric circles on top of each frosted cupcake.
- Use a toothpick to gently drag from the center circle outward to the edge, then from the edge inward to the center. Repeat every ¼ turn around the cupcake, alternating directions, to create a spider web pattern.
- Sprinkle with black sanding sugar and top with a candy spider if desired. Repeat with all 12 cupcakes.
Notes
Don’t overmix the batter to avoid dense cupcakes. Use room temperature ingredients for best texture. Gel food coloring is essential for a deep black color. Let cupcakes cool completely before frosting. For perfect spider webs, practice on a plate first and chill frosted cupcakes for 10 minutes before piping the webs. Cupcakes taste even better the next day.
Nutrition
- Serving Size: 1 cupcake
- Calories: 385
- Sugar: 38
- Sodium: 290
- Fat: 18
- Saturated Fat: 8
- Carbohydrates: 52
- Fiber: 1
- Protein: 4
Keywords: Halloween cupcakes, black velvet cupcakes, spider web cupcakes, easy Halloween recipe, cream cheese frosting