I was standing in the middle of a grocery store parking lot last October when the smell hit me—that mix of cold air, wet leaves, and someone a few cars over warming up their engine. And just like that, I was seven years old again, standing in my neighbor Mrs. Kowalski’s tiny kitchen, watching her peel apples with a knife she’d probably owned since the 1970s. She wasn’t my grandmother or my aunt, just the lady next door who let me come over after school when my mom worked late. She’d make these things she called “apple squares”—a buttery crust, a layer of something creamy, a pile of cinnamon apples on top. I never got the recipe. She moved away when I was nine, and I spent years trying to remember exactly what made those squares so good. Was it the crust? The filling? The way she’d always sneak me an extra piece while it was still warm? Last week, standing in my own kitchen with a bag of Honeycrisps and a block of cream cheese, I finally figured it out. These salted caramel apple cheesecake bars are the closest I’ve ever come to catching that feeling again. And honestly? They might be even better.
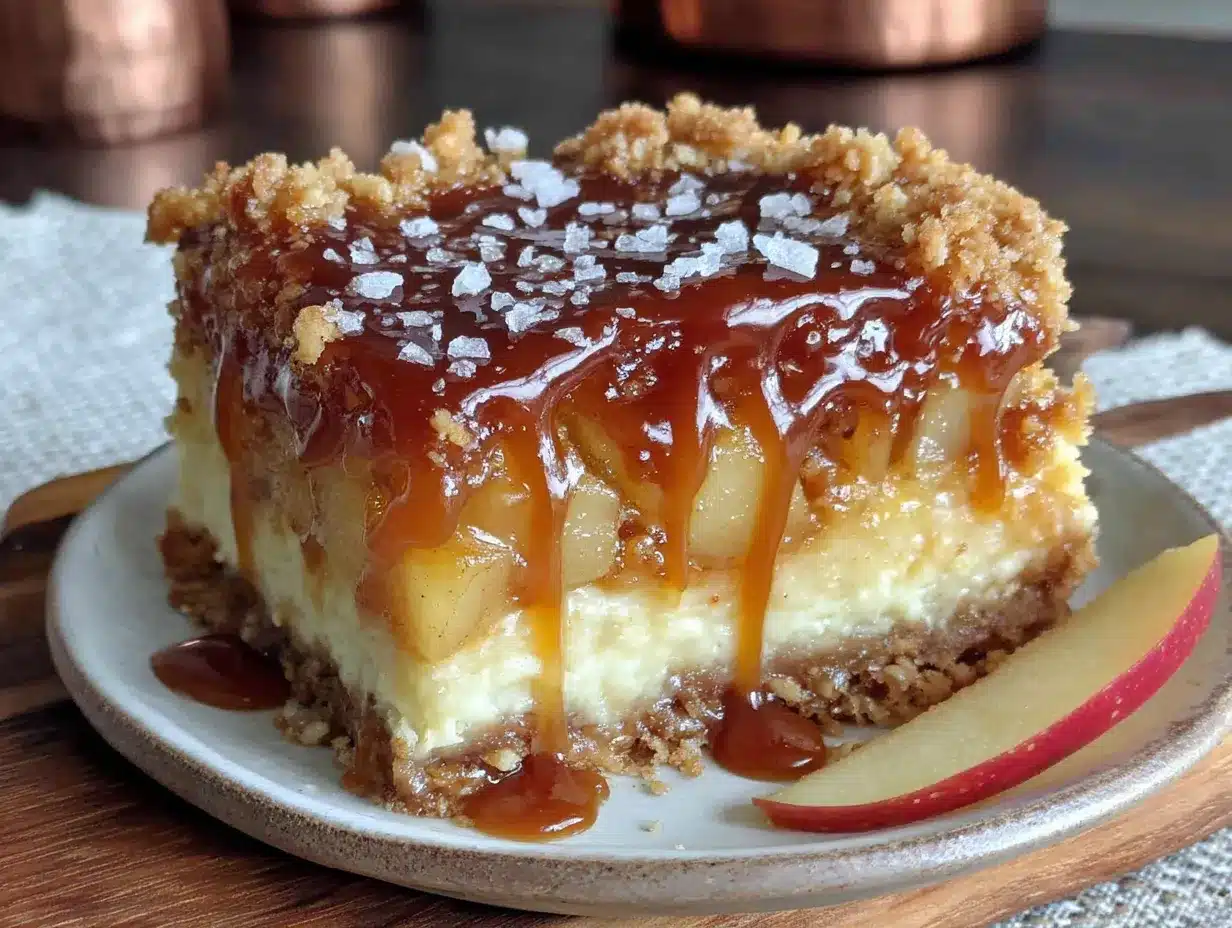
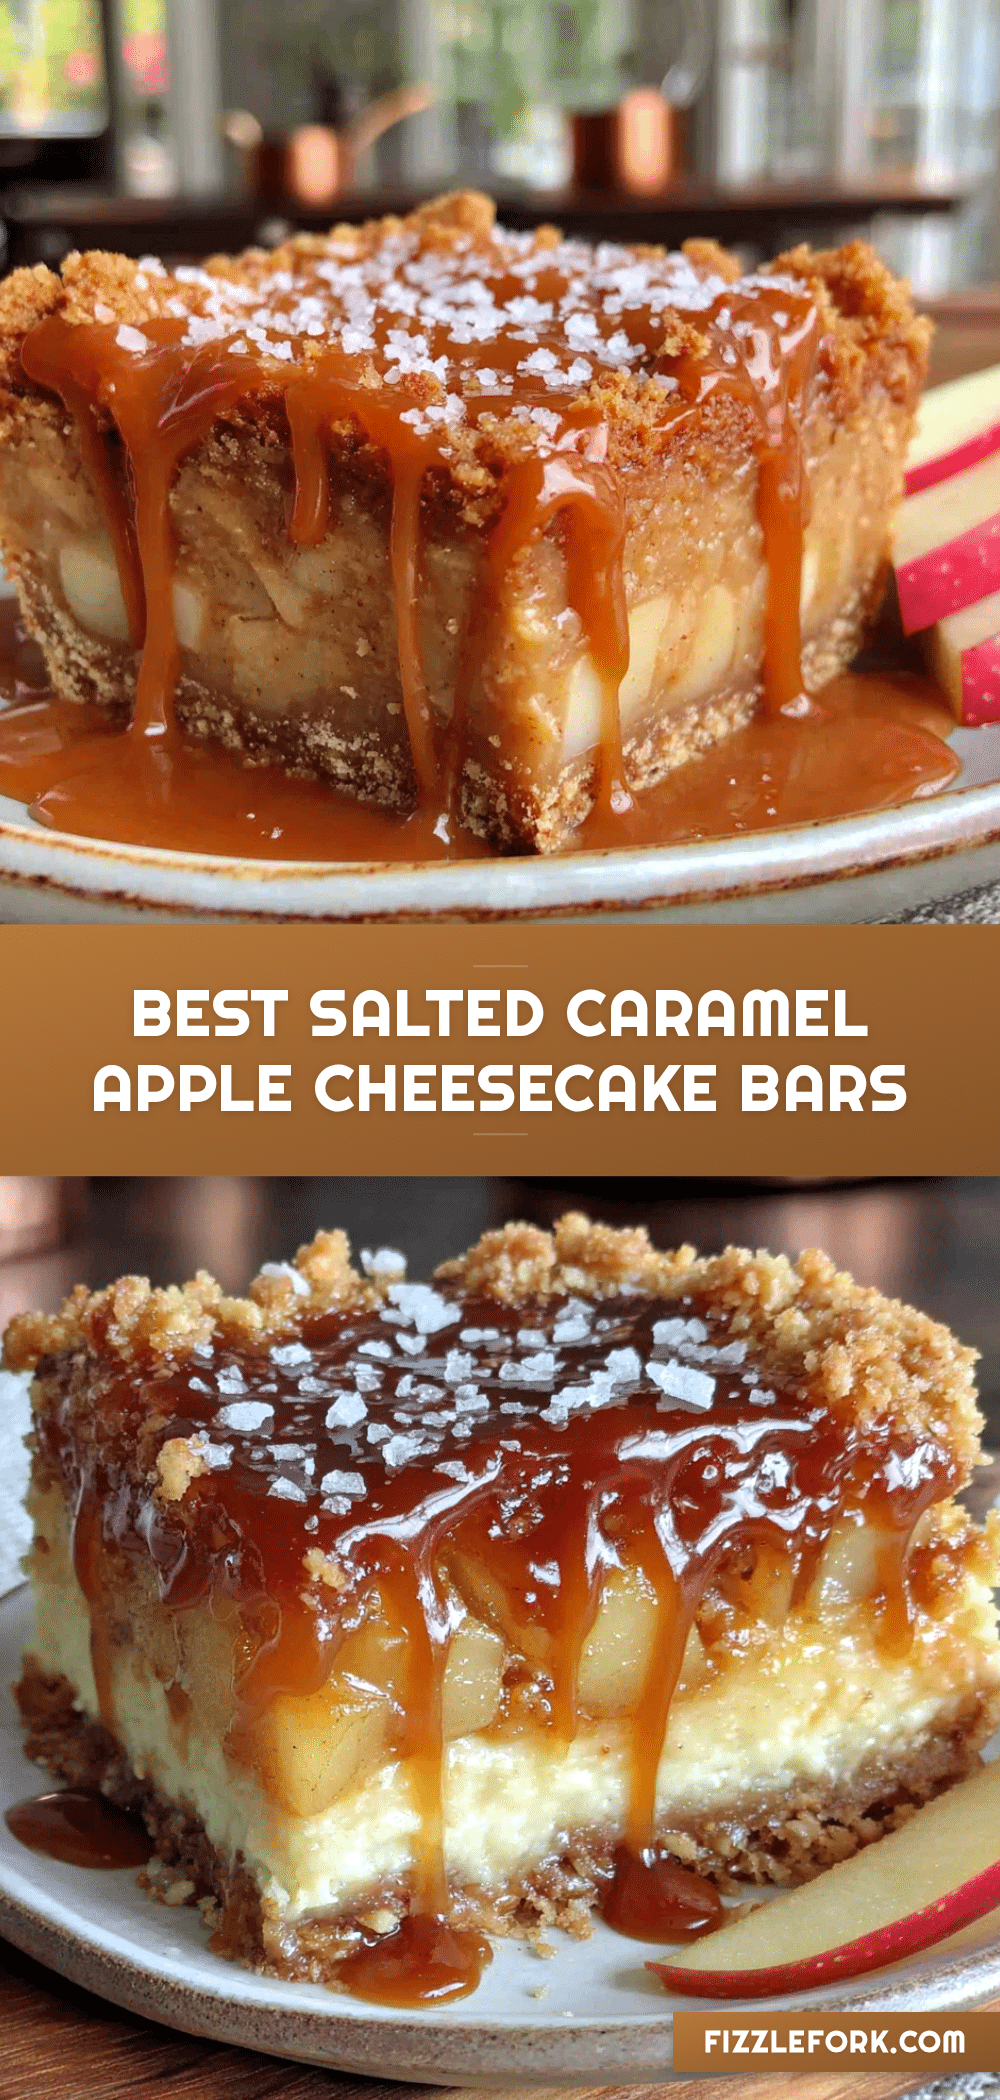
You know that moment when you take a bite of something and your brain just stops processing anything else? That’s what we’re going for here. A buttery shortbread crust that crumbles just right, a silky cheesecake layer that’s not too sweet, and a blanket of tender apples swimming in salted caramel. It’s the kind of dessert that makes people close their eyes at the table. I’ve tested this recipe six times to get the balance perfect—the apples need to be soft but not mushy, the caramel needs to be salty enough to cut through the richness, and the crust needs to hold everything together without getting soggy. Maybe you’ve been there, hunting through old recipes or trying to recreate something from your childhood that exists mostly in your memory now. These bars are my answer to that hunt.
Why You’ll Love This Recipe
Let me tell you why these bars have become my go-to for every fall gathering. I’ve brought them to potlucks, Thanksgiving dinners, and casual Sunday suppers, and they’ve never let me down.
- Easy to Make Ahead: These bars actually taste better after a night in the fridge. The flavors meld together, the caramel sinks into the apples just a little more—it’s magic. You can make them two days ahead and just add the final drizzle of caramel before serving.
- Simple Ingredients: Nothing weird here. Butter, flour, cream cheese, apples, sugar, and a jar of good caramel sauce. You probably have most of this in your kitchen right now.
- Perfect for Entertaining: When you’re hosting a dinner party or a festive get-together, you need a dessert that doesn’t require last-minute fussing. These bars slice cleanly, look gorgeous on a plate, and everyone always asks for the recipe.
- Crowd-Pleaser: I’ve seen people who “don’t like cheesecake” go back for seconds. The balance of tart apples, creamy filling, and salty-sweet caramel wins over even the pickiest eaters.
- Unbelievably Delicious: The texture combo is what gets me every time. That crumbly crust, the smooth cheesecake, the tender apples, and that ribbon of caramel running through everything. It’s comfort food at its finest.
What makes these bars different from every other apple dessert out there? It’s the technique. Instead of just layering everything and hoping for the best, we’re par-cooking the apples first so they release some of their moisture. That little step means your crust stays crisp and your cheesecake layer doesn’t get watery. It’s a game-changer, honestly. I learned this trick after my first batch turned into a soggy mess, and I’ve never gone back.
What Ingredients You Will Need
This recipe uses simple, wholesome ingredients to deliver bold flavor and satisfying texture without the fuss. Most of these are pantry staples, especially during apple season.
For the Crust
- 1 ½ cups all-purpose flour (190g) – Spoon and level it, don’t scoop directly from the bag or you’ll end up with too much.
- ½ cup granulated sugar (100g) – Just regular white sugar here.
- ½ cup unsalted butter, cold and cubed (113g, 1 stick) – Cold butter is key for that shortbread texture. I like using Kerrygold for the richness.
- ¼ teaspoon salt – Balances the sweetness.
For the Cheesecake Layer
- 16 oz cream cheese, softened (two 8-oz blocks) – Full-fat is non-negotiable here. Low-fat cream cheese gets grainy and won’t set properly. Let it sit on the counter for an hour before you start.
- ½ cup granulated sugar (100g)
- 2 large eggs, room temperature – If you forgot to take them out, place them in a bowl of warm water for 5 minutes.
- 1 teaspoon vanilla extract – Pure vanilla, not imitation. It makes a difference.
- 2 tablespoons all-purpose flour (16g) – This helps stabilize the cheesecake layer so it doesn’t crack.
For the Apple Layer
- 3 medium apples, peeled and thinly sliced (about 450g) – I recommend Honeycrisp or Granny Smith. Honeycrisp gives you that sweet-tart balance, while Granny Smith stays firmer. Gala works in a pinch but gets softer.
- 2 tablespoons granulated sugar (25g)
- 1 teaspoon ground cinnamon – Fresh cinnamon smells so much better than the stuff that’s been sitting in your pantry for years.
- 1 tablespoon all-purpose flour (8g) – Helps thicken the apple juices so they don’t make the cheesecake layer watery.
For the Caramel
- ½ cup salted caramel sauce (store-bought or homemade) – I’m partial to Trader Joe’s jarred caramel or making my own with this homemade salted caramel sauce recipe. If using store-bought, warm it slightly so it drizzles easily.
- Flaky sea salt for finishing – Maldon is my go-to. That little crunch of salt on top is what makes these bars unforgettable.
Equipment Needed
Nothing too fancy here, which is one of the reasons I love this recipe. You’ll need a 9×13-inch baking pan—glass or metal both work, but if you use glass, reduce the oven temperature by 25°F. A hand mixer or stand mixer makes the cheesecake layer silky smooth, but a sturdy whisk and some elbow grease will do the job too. Parchment paper is essential for easy removal—leave some overhang on the long sides so you can lift the whole thing out like a giant cookie bar. You’ll also need a medium skillet for par-cooking the apples, a sharp knife for peeling and slicing, and a small saucepan if you’re warming your caramel sauce. A cooling rack helps the bars set evenly after baking. If you have a kitchen scale, use it for the flour—it’s more accurate than measuring cups and your crust will thank you.
Preparation Method
Step 1: Make the Crust
Preheat your oven to 350°F (175°C). Line your 9×13-inch pan with parchment paper, leaving about 2 inches of overhang on the long sides. In a medium bowl, whisk together the flour, sugar, and salt. Drop in the cold, cubed butter and work it into the flour mixture using a pastry cutter or your fingertips. You want it to look like coarse meal with some pea-sized butter pieces still visible. Dump the mixture into your prepared pan and press it firmly into an even layer. I use the bottom of a measuring cup to really pack it down. Bake for 15-17 minutes, until the edges are just starting to turn golden. Set aside to cool slightly while you make the filling.
Step 2: Par-Cook the Apples
While the crust bakes, toss your sliced apples with the sugar, cinnamon, and flour in a medium bowl. Heat a skillet over medium heat and add the apple mixture. Cook for 4-5 minutes, stirring occasionally, until the apples have softened slightly and released some of their liquid. Don’t cook them until they’re mushy—you still want some bite. Remove from heat and set aside. This step is crucial, I learned the hard way. Skipping it means watery bars with a soggy crust.
Step 3: Make the Cheesecake Layer
In a large bowl, beat the softened cream cheese with an electric mixer on medium speed until smooth and creamy, about 2 minutes. Scrape down the sides of the bowl. Add the sugar and beat for another minute until well combined. Add the eggs one at a time, beating on low speed after each addition just until incorporated. Overbeating at this stage adds too much air, which can cause cracks. Mix in the vanilla extract, then sprinkle the 2 tablespoons of flour over the top and mix on low until just combined. The batter should be smooth and silky.
Step 4: Assemble the Bars
Pour the cheesecake batter over the slightly cooled crust and spread it into an even layer. Spoon the par-cooked apples evenly over the cheesecake layer. They’ll sink in slightly as they bake, which is exactly what you want. Drizzle about ⅓ cup of your salted caramel sauce over the top in a zigzag pattern. Use a knife to gently swirl the caramel into the apples and cheesecake—don’t overdo it, you want distinct ribbons of caramel.
Step 5: Bake
Bake at 350°F (175°C) for 35-40 minutes. The edges should be set and slightly puffed, but the center will still jiggle slightly when you shake the pan. That’s okay—it will set as it cools. Remove from the oven and let cool completely on a wire rack. Once at room temperature, refrigerate for at least 4 hours, preferably overnight. This is the hardest part, I know. But trust me, the bars slice so much cleaner when they’re fully chilled.
Step 6: Finish and Serve
Once chilled, use the parchment overhang to lift the entire block out of the pan. Place on a cutting board and slice into 12-16 bars. Warm the remaining caramel sauce slightly and drizzle it over the top. Sprinkle with flaky sea salt just before serving. That final touch of salt is what transforms these from “good” to “I need this recipe immediately.”
Cooking Tips & Techniques
Here’s what I’ve learned from making these bars more times than I can count. First, don’t rush the cooling process. I once tried to speed things up by putting the pan in the freezer for an hour, and the texture was off—grainy and weird. Patience pays off here. The long chill time allows the cheesecake to set properly and the flavors to meld together.
Second, slice your apples uniformly. If some slices are paper-thin and others are chunky, they’ll cook unevenly. Aim for about ⅛-inch thickness. A mandoline slicer makes quick work of this, but a sharp knife and steady hand work fine.
Third, if your cream cheese isn’t fully softened, you’ll end up with lumps in your cheesecake layer that won’t bake out. I’ve been there, staring at little white specks in an otherwise beautiful dessert. Let it sit out for a full hour. If you’re in a hurry, unwrap the blocks and microwave them in 10-second bursts, flipping after each one.
One more thing—don’t skip the flour in the apple mixture. I tried making these without it once, thinking it was unnecessary. The apple layer released so much liquid that the cheesecake layer never set properly. That tablespoon of flour absorbs the excess moisture and keeps everything stable.
Variations & Adaptations
This recipe is surprisingly flexible. Here are a few ways I’ve adapted it for different situations.
Gluten-Free Version: Substitute the all-purpose flour in the crust with a 1:1 gluten-free baking flour blend. I’ve had good luck with King Arthur Measure for Measure. For the flour in the cheesecake and apple layers, use a gluten-free all-purpose flour or cornstarch.
Dairy-Free Version: Use dairy-free cream cheese (I like Miyoko’s or Kite Hill) and a plant-based butter substitute in the crust. The texture will be slightly less firm, so chill the bars for at least 6 hours before slicing.
Spiced Apple Variation: Add ¼ teaspoon of nutmeg, ⅛ teaspoon of cloves, and a pinch of cardamom to the apple mixture. It gives the bars a chai-like warmth that’s incredible for holiday gatherings. I made this version for a Friendsgiving last year and it was gone in fifteen minutes.
Nutty Crust: Replace ¼ cup of the flour in the crust with finely chopped pecans or walnuts. Toast them first for extra flavor. This adds a lovely crunch that complements the soft apple layer.
Bourbon Caramel: If you’re making your own caramel, add 2 tablespoons of bourbon at the end. It adds a smoky depth that pairs beautifully with the apples. Just warm it for a minute to cook off the alcohol.
Serving & Storage Suggestions
These bars are best served cold or at room temperature. I like to take them out of the fridge about 15 minutes before serving so the cheesecake softens slightly. For a dinner party, slice them neatly and arrange on a platter with a small bowl of extra caramel sauce and a sprinkle of flaky salt on each bar. They look stunning on a cake stand.
For a festive gathering, serve these alongside a scoop of vanilla bean ice cream or a dollop of lightly sweetened whipped cream. The cold creaminess against the dense bars is heavenly. A cup of hot apple cider or a dark roast coffee pairs beautifully.
To store, keep leftovers in an airtight container in the refrigerator for up to 5 days. The bars actually improve after a day or two as the caramel continues to soak into the apples. To freeze, wrap individual bars tightly in plastic wrap, then place them in a freezer bag. They’ll keep for up to 3 months. Thaw overnight in the refrigerator before serving. I wouldn’t recommend microwaving to reheat—the cheesecake layer gets rubbery.
Nutritional Information & Benefits
Per serving (based on 16 bars): approximately 320 calories, 18g fat, 36g carbohydrates, 5g protein, 2g fiber, 22g sugar. These are estimates and will vary based on specific ingredients used.
While these bars are definitely a treat, there are some redeeming qualities. Apples provide fiber and vitamin C, and the cinnamon has anti-inflammatory properties. The cream cheese offers a small amount of calcium and protein. That said, this is a dessert meant for enjoyment, not health optimization. I make them for the joy they bring, not the nutritional profile. If you’re watching your sugar intake, you could reduce the sugar in the apple layer by a tablespoon or two, but I wouldn’t cut more than that—the structure relies on it.
These bars are not gluten-free, dairy-free, or low-carb as written, but see the variations section for adaptations.
Conclusion
These salted caramel apple cheesecake bars are more than just a dessert—they’re the recipe I’ve been chasing since I was seven years old, standing in Mrs. Kowalski’s kitchen. Every time I make them, I get a little closer to that feeling of warmth and comfort that I remember so vividly. They’re the kind of bars that make people pause mid-bite and just look at you with wide eyes.
I’d love for you to try them and make them your own. Maybe you’ll use Granny Smiths instead of Honeycrisps, or add extra cinnamon, or drizzle them with homemade caramel. Whatever you do, don’t forget that final sprinkle of flaky salt—it’s what ties everything together. If you make these, come back and let me know how they turned out. Did your family fight over the last piece? Did you bring them to a party and watch them disappear? I want to hear about it. Drop a comment below or tag me in your photos. Happy baking, friends.
Frequently Asked Questions
Can I use pre-made pie crust instead of making the shortbread crust?
You can, but the texture won’t be the same. The shortbread crust is sturdy enough to hold the heavy cheesecake and apple layers, while a pie crust is flakier and might get soggy. If you’re short on time, a graham cracker crust (1 ½ cups crumbs + 6 tablespoons melted butter) works well, just pre-bake it for 8 minutes.
Why did my cheesecake layer crack?
Cracks usually happen from overmixing or overbaking. Mix the batter on low speed once you add the eggs, and stop as soon as everything comes together. Bake just until the edges are set and the center still jiggles slightly. Rapid temperature changes can also cause cracks—let the bars cool gradually on the counter before refrigerating.
Can I use a different type of apple?
Absolutely. Honeycrisp and Granny Smith are my top picks, but Fuji, Braeburn, and Pink Lady also work well. Avoid Red Delicious or McIntosh—they break down too much during cooking and turn mushy. The key is choosing apples that hold their shape when baked.
How do I know when the bars are done baking?
The edges should be set and lightly golden, and the center should still have a slight jiggle when you gently shake the pan. A toothpick inserted near the center should come out with a few moist crumbs, not wet batter. If the toothpick comes out clean, the bars are overbaked.
Can I make these bars vegan?
Yes, with some modifications. Use vegan cream cheese and a plant-based butter substitute. Replace the eggs with a flax egg (1 tablespoon ground flaxseed + 3 tablespoons water per egg, let sit for 5 minutes). The texture will be slightly denser, but the flavor is still fantastic. Chill the bars for at least 6 hours for the best sliceability.
Pin This Recipe!
Best Salted Caramel Apple Cheesecake Bars: Easy Fall Dessert
A buttery shortbread crust, silky cheesecake layer, tender cinnamon apples, and ribbons of salted caramel come together in these irresistible bars. Perfect for fall gatherings, they taste even better after a night in the fridge.
- Prep Time: 30 minutes
- Cook Time: 55 minutes
- Total Time: 5 hours 25 minutes (includes chilling)
- Yield: 12-16 servings 1x
- Category: Dessert
- Cuisine: American
Ingredients
- 1 ½ cups all-purpose flour (190g)
- ½ cup granulated sugar (100g)
- ½ cup unsalted butter, cold and cubed (113g, 1 stick)
- ¼ teaspoon salt
- 16 oz cream cheese, softened (two 8-oz blocks)
- ½ cup granulated sugar (100g)
- 2 large eggs, room temperature
- 1 teaspoon vanilla extract
- 2 tablespoons all-purpose flour (16g)
- 3 medium apples, peeled and thinly sliced (about 450g)
- 2 tablespoons granulated sugar (25g)
- 1 teaspoon ground cinnamon
- 1 tablespoon all-purpose flour (8g)
- ½ cup salted caramel sauce (store-bought or homemade)
- Flaky sea salt for finishing
Instructions
- Preheat oven to 350°F (175°C). Line a 9×13-inch baking pan with parchment paper, leaving overhang on the long sides.
- Make the crust: In a medium bowl, whisk together flour, sugar, and salt. Cut in cold cubed butter using a pastry cutter or fingertips until mixture resembles coarse meal with pea-sized butter pieces. Press firmly into prepared pan. Bake 15-17 minutes until edges are lightly golden. Cool slightly.
- Par-cook the apples: Toss sliced apples with sugar, cinnamon, and flour. Heat a skillet over medium heat and cook apple mixture 4-5 minutes until softened slightly but not mushy. Set aside.
- Make the cheesecake layer: Beat softened cream cheese with an electric mixer on medium speed until smooth, about 2 minutes. Add sugar and beat 1 minute. Add eggs one at a time on low speed, then mix in vanilla. Sprinkle 2 tablespoons flour over batter and mix on low until just combined.
- Assemble: Pour cheesecake batter over crust and spread evenly. Spoon par-cooked apples over cheesecake. Drizzle ⅓ cup caramel sauce in a zigzag pattern and gently swirl with a knife.
- Bake 35-40 minutes until edges are set and center jiggles slightly. Cool completely on a wire rack, then refrigerate at least 4 hours, preferably overnight.
- Finish: Use parchment to lift bars from pan. Slice into 12-16 bars. Warm remaining caramel sauce and drizzle over top. Sprinkle with flaky sea salt before serving.
Notes
Don’t skip par-cooking the apples—it prevents a soggy crust. Chill bars thoroughly before slicing for clean cuts. For best flavor, make a day ahead. Store in refrigerator up to 5 days or freeze up to 3 months.
Nutrition
- Serving Size: 1 bar (based on 16 s
- Calories: 320
- Sugar: 22
- Sodium: 220
- Fat: 18
- Saturated Fat: 10
- Carbohydrates: 36
- Fiber: 2
- Protein: 5
Keywords: salted caramel apple cheesecake bars, apple cheesecake bars, fall dessert, apple dessert, cheesecake bars, salted caramel dessert