Easy Halloween Pumpkin Fruit Tray: Best Guest Favorite
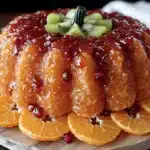
A stunning fruit tray shaped like a pumpkin, perfect for Halloween parties. Easy to assemble with no cooking required, it’s a healthy and crowd-pleasing centerpiece that will impress your guests.
- Prep Time: 30 minutes
- Cook Time: 0 minutes
- Total Time: 30 minutes
- Yield: 12-15 servings 1x
- Category: Appetizer
- Cuisine: American
Ingredients
Scale
- 1 medium to large carving pumpkin (about 8–10 inches in diameter)
- 1 small sugar pumpkin or mini pumpkin (optional, for stem)
- 2 pounds clementines or mandarin oranges, peeled and separated into segments
- 1 pound green grapes, washed and patted dry
- 1 pound red or black grapes, washed and patted dry
- 1 large honeydew melon, cut into cubes or scooped into balls
- 1 pint fresh blackberries
- 1 pint fresh raspberries
- 2 large Granny Smith apples, cored and cut into thin wedges
- 1 small pineapple, peeled, cored, and cut into chunks (optional)
- Fresh mint leaves (for garnish)
- Edible googly eyes (optional)
- Pomegranate seeds (optional)
Instructions
- Wash the outside of your large pumpkin thoroughly with soap and water. Dry it completely. Using your sharp knife, carefully cut off the top of the pumpkin, about 2-3 inches from the stem, just like you would for a jack-o’-lantern. Set the top aside. If you have a small sugar pumpkin, you can place it on top of the cut lid later for a more dramatic stem effect.
- Use your large spoon to scoop out all the seeds and stringy pulp from inside the pumpkin. Get it as clean as you can—you want a smooth, dry cavity. Use a paper towel to wipe down the inside walls to remove any remaining moisture.
- If you want a more finished look, you can use a small knife to create a zigzag or scalloped edge on the cut rim of the pumpkin. For a party, a straight cut is perfectly fine.
- Wash all your fruit thoroughly. Peel the clementines and separate them into segments. Cut the honeydew in half, remove the seeds, and use your melon baller or knife to create cubes or balls. Core the apples and cut them into thin wedges—toss them in a bowl with a squeeze of lemon juice to prevent browning. Cut the pineapple into chunks if using. Keep all the fruit separate in bowls for now.
- Start by placing a layer of the larger, heavier fruits at the bottom of the pumpkin cavity—use the honeydew balls and pineapple chunks first. Then, start layering in the clementine segments, grapes, and apple wedges. The goal is to create a mix of colors and textures that rises above the rim of the pumpkin. Don’t be afraid to pile it high—it should look abundant and overflowing.
- Gently place the blackberries and raspberries on top and around the edges. They’re fragile, so don’t bury them.
- Tuck fresh mint leaves here and there for a pop of green. If you’re using edible googly eyes, stick them onto the front of the pumpkin with a tiny dab of cream cheese or peanut butter. Scatter pomegranate seeds around the base of the tray on your serving platter for a dramatic effect.
- Serve immediately or refrigerate. This is best served within an hour of assembly. If you need to prep ahead, cut all the fruit and store it in separate airtight containers in the fridge. Assemble the pumpkin bowl and fill it just before your guests arrive.
Notes
Choose a pumpkin with a flat bottom for stability. Dry the pumpkin cavity thoroughly to prevent soggy fruit. Cut fruit into uniform sizes for a professional look. Place the pumpkin on a rimmed platter to catch stray fruit or juice. Prep fruit the night before to save time on party day.
Nutrition
- Serving Size: 1 cup of fruit
- Calories: 120150
- Sugar: 2025
- Sodium: 510
- Fat: 0.5
- Carbohydrates: 3035
- Fiber: 46
- Protein: 12
Keywords: Halloween fruit tray, pumpkin fruit tray, Halloween appetizer, fruit platter, healthy Halloween snack, party fruit tray