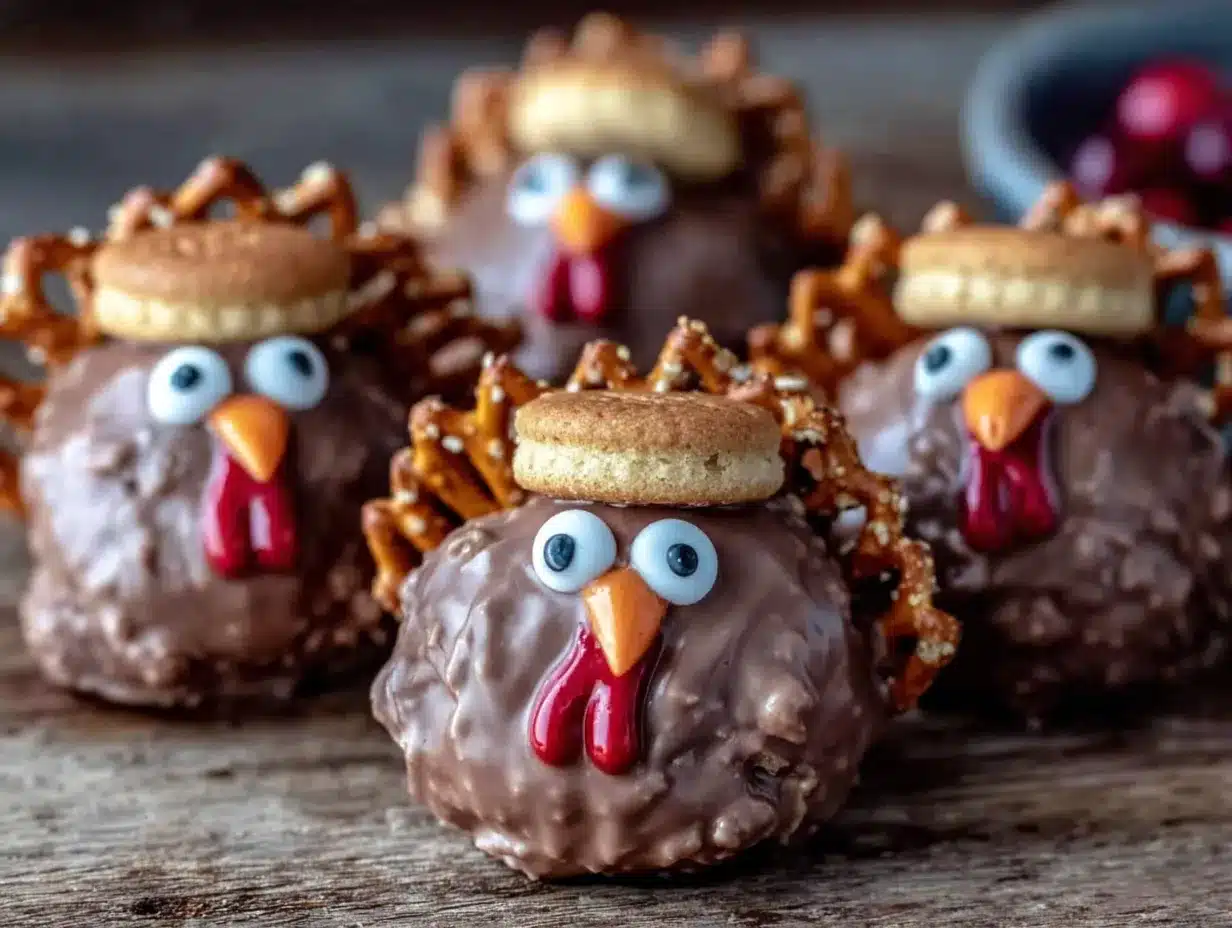
Meredith wasn’t trying to impress anyone. I’d stopped by her place last November to pick up a casserole dish I’d loaned her, and the smell of something sweet and a little bit nutty hit me before I even got through the front door. She was standing at her kitchen counter with a bowl of something dark and crumbly, completely unfazed, while her three kids swirled around her like little tornados. “Oh, these are just the turkey cake pops for the school party,” she said, like she was describing a bag of chips. She didn’t even look up from rolling the mixture into neat little balls. I mean, honestly. There I was, still in my grocery-store sweats, and she was casually creating the most adorable Thanksgiving treat I’d ever seen. It was the kind of thing that made you stop and just watch, you know? Her youngest, maybe four, was already sneaking bites of the coating, and she just handed him a spoonful without missing a beat. That’s when I knew this recipe was something special. It wasn’t about being fancy or perfect. It was about making something fun with what you had on hand, and not sweating the small stuff. I kept coming back to those little turkey cake pops all season, and now I make them every year. They’re the one thing that makes me feel like I’ve got my act together, even when I absolutely don’t.
Why You’ll Love This Recipe
Let’s be real for a second. Thanksgiving week is chaos. You’ve got a turkey to brine, pies to bake, and somehow you’re supposed to show up to the school party with something cute. These no-bake turkey cake pops are your secret weapon. They come together in under 30 minutes, and you don’t even have to turn on the oven. That’s a win in my book.
Here is why this recipe works for families on a budget:
- Quick & Easy: From start to finish, you’re looking at about 25 minutes of active work. No baking, no complicated steps. Just mix, shape, and decorate.
- Simple Ingredients: You probably already have most of these in your pantry. Chocolate sandwich cookies, cream cheese, candy corn, and a few pretzels. No fancy grocery trips required.
- Perfect for School Parties: These little guys are a total crowd-pleaser. Kids go nuts for them, and adults can’t resist snapping a picture. They’re the star of the snack table without any stress.
- Crowd-Pleaser: I’ve brought these to three different gatherings now, and they disappear every single time. Even the picky eaters at my house ask for seconds.
- Unbelievably Delicious: The combination of the creamy filling with the crunchy coating is just next-level. It’s like a little bite of heaven, honestly.
What makes this recipe different from all the other turkey cake pops out there? It’s the no-bake factor. Most recipes want you to bake a cake, crumble it up, and then shape it. Who has time for that? This version uses crushed cookies, so you skip the whole baking step. Plus, the coating is a simple chocolate melt, not a fussy candy shell. It’s my best version because it’s the one I actually make, not just dream about making.
This recipe is the kind that makes you close your eyes after the first bite. It’s comfort food reimagined—faster, simpler, but with the same soul-soothing satisfaction. Perfect for impressing the other parents without breaking a sweat, or turning a regular Tuesday into something memorable.
What Ingredients You Will Need
This recipe uses simple, pantry-friendly ingredients to deliver big flavor and adorable looks without the fuss. Most of these are things you might already have lying around, which is exactly how I like to cook.
- Chocolate sandwich cookies (about 20 cookies): You want the classic kind, like Oreos. Keep the filling in—it helps bind the mixture. (I’ve tried this with generic brands, and they work fine, but the real deal gives a slightly better texture.)
- Cream cheese (4 ounces, softened): This is what makes the mixture smooth and rollable. Make sure it’s at room temperature, or you’ll end up with lumps. (I use Philadelphia, but any block-style cream cheese works.)
- Chocolate candy melts (1 cup): These are for coating the cake pops. You can use milk chocolate, dark chocolate, or even white chocolate if you want a different look. (I prefer Wilton brand for smooth melting.)
- Candy corn (about 30 pieces): These become the turkey feathers. Look for fresh candy corn—stale ones are too hard to stick in. (In a pinch, you can use candy corn pumpkins, but the shape is a little different.)
- Pretzel sticks (about 10, broken in half): These form the turkey’s neck and head. Thin pretzel sticks work best. (If you only have thick ones, just break them more carefully.)
- Candy eyes (20 pieces): You can find these in the baking aisle. They give the turkeys that cute, googly-eyed look. (No candy eyes? Use tiny dots of black frosting instead.)
- Orange candy melts or frosting (a small amount): This is for the turkey’s beak. A little goes a long way. (I’ve used orange jelly beans cut in half, and that works too.)
- Lollipop sticks (optional): If you want to serve them on sticks, grab a pack from the craft store. If not, they work fine as little free-form turkeys.
One thing I’ve learned the hard way: don’t skip softening the cream cheese. I tried rushing once with cold cream cheese, and the mixture was lumpy and hard to roll. Let it sit out for about 20 minutes before you start. Also, if you’re making these with kids, set out all the decorations in little bowls before you begin. It saves a lot of “Mom, where are the eyes?” moments.
Equipment Needed
You don’t need a fancy kitchen to pull these off. Here’s what you’ll need:
- Food processor or zip-top bag and rolling pin: You need to crush the cookies into fine crumbs. A food processor makes this a 30-second job. If you don’t have one, put the cookies in a zip-top bag and go at them with a rolling pin. It’s a good arm workout, honestly.
- Mixing bowl: Any medium bowl will do for combining the crumbs and cream cheese.
- Baking sheet lined with parchment paper: This is where the cake pops will chill. Parchment paper is non-negotiable unless you want them stuck to the pan.
- Microwave-safe bowl: For melting the chocolate. You can use a double boiler, but the microwave is faster and easier to clean.
- Small spoon or cookie scoop: For portioning the mixture evenly. A cookie scoop makes them all the same size, which is nice for presentation.
- Toothpicks or skewers: For dipping the cake pops into the chocolate. (I lost my lollipop sticks once and used wooden skewers cut in half. Worked like a charm.)
If you’re on a tight budget, skip the lollipop sticks and just shape the turkeys free-form on the baking sheet. They’ll still look adorable, and you save a few bucks. I’ve done it both ways, and honestly, the free-form ones are easier for little hands to grab.
Preparation Method
Alright, let’s get to the fun part. Here’s how to make these little guys step by step.
- Crush the cookies. Place the chocolate sandwich cookies in your food processor and pulse until they become fine crumbs. You want them to look like dark sand, no big chunks. If you’re using the bag-and-rolling-pin method, make sure you really go at it. (I once left a few bigger pieces, and the cake pops were lumpy. Lesson learned.)
- Mix in the cream cheese. Transfer the crumbs to a mixing bowl. Add the softened cream cheese and stir until everything is well combined. The mixture should feel like a stiff dough that holds together when you squeeze it. If it’s too dry, add a tiny bit more cream cheese. If it’s too wet, add a few more crushed cookies. (Trust your hands here—it’s the best way to tell.)
- Shape the balls. Scoop out about 1 tablespoon of the mixture and roll it into a smooth ball. Place each ball on the parchment-lined baking sheet. You should get about 20 balls, depending on the size. Pop the sheet in the fridge for about 15 minutes to firm up. (This step is crucial. If the balls are too soft, they’ll fall apart when you dip them.)
- Melt the chocolate. While the balls are chilling, put the chocolate candy melts in a microwave-safe bowl. Microwave in 30-second bursts, stirring between each, until the chocolate is smooth and fully melted. Be careful not to overheat it, or the chocolate will seize up. (I ruined a whole batch once by microwaving for a full minute. Don’t be like me.)
- Dip the cake pops. Remove the chilled balls from the fridge. If using lollipop sticks, dip the tip of a stick into the melted chocolate, then insert it into a ball. This helps the stick stay put. Then, using a spoon or your fingers, coat the ball completely in the melted chocolate. Let any excess drip off, then place it back on the parchment. Repeat for all the balls. (Work quickly—the chocolate sets fast.)
- Add the turkey feathers. While the chocolate is still wet, stick 3 to 4 pieces of candy corn into the back of each cake pop to form the tail feathers. Press them in gently but firmly. (I like to fan them out a little, like a real turkey tail.)
- Add the pretzel neck. Break a pretzel stick in half. Gently insert one half into the front of the cake pop at a slight upward angle. This will be the turkey’s neck and head. (If the pretzel seems loose, dab a little melted chocolate on the tip before inserting.)
- Add the face. Attach two candy eyes to the front of the pretzel “head” using a tiny dab of melted chocolate. Then, use the orange candy melts or frosting to pipe a small triangle beak just below the eyes. (I use a toothpick for this—it gives me more control.)
- Let them set. Place the finished turkey cake pops back on the parchment and let them sit at room temperature until the chocolate is completely set. This takes about 20 minutes. If you’re in a hurry, pop them in the fridge for 10 minutes. (Just don’t leave them in too long, or the chocolate might get a little cloudy.)
One more thing: if the chocolate starts to thicken as you work, just pop it back in the microwave for 10 seconds to loosen it up. It happens to everyone, so don’t panic.
Cooking Tips & Techniques
I’ve made these turkey cake pops more times than I can count, and I’ve learned a few things along the way. Here are my best tips for getting them just right.
Don’t skip the chilling step. I know it’s tempting to rush, but the balls need to be cold and firm before you dip them. If they’re too soft, they’ll fall apart in the chocolate. I once tried to rush through this step because the kids were getting impatient, and I ended up with a chocolatey mess. Not my finest moment.
Use a fork for dipping. If you don’t have lollipop sticks, you can dip the balls using a fork. Just place a ball on the fork, lower it into the chocolate, and tap the fork on the edge of the bowl to let the excess drip off. Then slide the ball off the fork onto the parchment with a toothpick. It’s a little messy, but it works.
Work in small batches. Only take a few cake pop balls out of the fridge at a time. If you take them all out at once, they’ll start to warm up and get soft. I usually work with 4 or 5 at a time, keeping the rest in the fridge until I’m ready for them.
Keep the decorations within reach. Before you start dipping, set up your assembly line. Have the candy corn, pretzel sticks, and candy eyes all laid out and ready to go. Once the chocolate is on the ball, you only have a few seconds to add the decorations before the chocolate sets. (I learned this the hard way when I was frantically digging through a bag of candy corn while my cake pop sat there hardening.)
If the chocolate is too thick, add a teaspoon of coconut oil. This thins it out and makes dipping easier. Just stir it in while the chocolate is still warm. (I keep a little jar of coconut oil in my baking drawer just for this purpose.)
Variations & Adaptations
One of the best things about this recipe is how easy it is to change up. Here are a few variations I’ve tried over the years.
Peanut Butter Turkey Cake Pops: Swap the cream cheese for peanut butter. Use about 1/4 cup of creamy peanut butter instead of the cream cheese. The flavor is amazing, and it gives the pops a little protein boost. (Just check for peanut allergies if you’re bringing these to a school party.)
White Chocolate Turkeys: Use white chocolate candy melts instead of milk chocolate for the coating. The white chocolate makes the candy corn colors pop even more. My kids actually prefer this version because it looks “prettier.” (You can add a drop of orange food coloring to the white chocolate to make it look like a pumpkin spice treat.)
Gluten-Free Version: Use gluten-free chocolate sandwich cookies for the base. Most major brands now make a gluten-free version, and they work just as well. The rest of the ingredients are naturally gluten-free, so you’re good to go. (I’ve tested this with my gluten-sensitive friend, and she gave it two thumbs up.)
Mini Turkey Bites: Instead of making 20 regular-sized cake pops, make 40 mini ones. Use a teaspoon to scoop the mixture, and use smaller candy corn pieces. These are perfect for little hands or for a party where you want people to grab and go. (I made these for a preschool party once, and they were gone in five minutes.)
Chocolate-Covered Pretzel Variation: Instead of sticking the pretzel into the cake pop, dip the pretzel in chocolate first and let it set. Then attach it to the cake pop. This gives the turkey a sturdier “neck” and adds an extra layer of chocolate flavor. (It’s a little more work, but the result is pretty impressive.)
Serving & Storage Suggestions
These turkey cake pops are best served at room temperature. The chocolate coating is nice and snappy, and the filling is creamy without being too soft. If you’ve kept them in the fridge, let them sit out for about 10 minutes before serving.
For presentation, I like to arrange them on a platter with a few fall leaves or a small pumpkin in the center. It makes the table look festive without any extra effort. If you’re bringing them to a party, you can stick them into a block of Styrofoam covered with a fall-themed napkin. It looks like you went all out, but it took you two minutes.
These go great with a warm cup of apple cider or a mug of hot chocolate. They’re also perfect alongside a plate of pumpkin bars or a slice of pecan pie. Basically, they fit right in with any fall gathering.
Storage: Keep the turkey cake pops in an airtight container in the refrigerator. They’ll stay fresh for up to 5 days. If you’re stacking them, put a layer of parchment paper between the layers to keep the decorations from getting squished. (I learned this the hard way when my turkey feathers got all bent out of shape.)
Freezing: You can freeze the undipped cake pop balls for up to 2 months. Just shape them, place them on a baking sheet, and freeze until solid. Then transfer them to a freezer bag. When you’re ready to use them, thaw them in the fridge overnight, then dip and decorate as usual. (I do this every year in October so I have a stash ready for Thanksgiving week.)
Reheating: There’s no need to reheat these. Just take them out of the fridge and let them come to room temperature. The flavors actually get better after a day or two, as the filling softens and melds together. So don’t be afraid to make them a day ahead.
Nutritional Information & Benefits
Let’s be honest, these are a treat, not a health food. But here’s a rough breakdown for one turkey cake pop (based on a standard recipe with milk chocolate coating):
- Calories: Approximately 180-200 calories per pop
- Fat: 10-12 grams (mostly from the cream cheese and chocolate)
- Carbohydrates: 22-25 grams
- Protein: 2-3 grams
- Sugar: 14-16 grams
On the plus side, the cream cheese adds a little calcium and protein, and the dark chocolate (if you use it) has some antioxidants. But honestly, these are about fun and celebration, not daily nutrition. I make them once a year for Thanksgiving, and I don’t feel bad about it at all.
If you’re watching your sugar intake, you can use sugar-free chocolate candy melts and reduce the amount of candy corn on each pop. You could also skip the candy corn entirely and use small pretzel pieces for the feathers instead. It changes the look a bit, but it still tastes great.
Allergen Note: This recipe contains dairy (cream cheese, chocolate), wheat (cookies, pretzels), and may contain soy. If you’re making these for a school party, check for allergies beforehand. The gluten-free version I mentioned earlier is a good option for those with wheat sensitivities.
Conclusion
These no-bake turkey cake pops have become a Thanksgiving tradition in my house, and I have a feeling they’ll become one in yours too. They’re fun, they’re easy, and they make you look like a total rockstar with minimal effort. Honestly, what more could you ask for?
I love that this recipe gives me a chance to get creative with my kids. We sit at the kitchen table, and they help me stick the candy corn feathers in and place the googly eyes. It’s messy and imperfect, and that’s exactly why I love it. The turkeys never look quite the same twice, and that’s part of the charm.
So go ahead, give these a try. Customize them however you like—add some sprinkles, use different colored candy melts, or make them extra tiny for little hands. The possibilities are endless, and the results are always delicious. When you make them, I’d love to hear how they turned out. Drop a comment below and tell me about your turkey cake pop adventures. Did your kids love them? Did you add your own twist? Share it all—I read every single comment. Happy Thanksgiving, friends!
Frequently Asked Questions
Can I make these turkey cake pops without a food processor?
Absolutely. Put the cookies in a zip-top bag and crush them with a rolling pin. It takes a little more elbow grease, but it works just fine. Just make sure the crumbs are fine and even.
Can I use a different type of cookie?
Yes, you can. Chocolate wafer cookies or even graham crackers work in a pinch. Just keep in mind that the flavor and texture will change slightly. If you use a lighter cookie, the cake pops will be less sweet and a little more crumbly.
How far in advance can I make these?
You can make the undipped cake pop balls up to 2 months ahead and freeze them. The finished, decorated turkey cake pops will stay fresh in the fridge for up to 5 days. I recommend making them no more than 2 days ahead for the best texture.
My chocolate is too thick. What do I do?
Add a teaspoon of coconut oil or vegetable shortening to the melted chocolate and stir well. This will thin it out and make it easier to dip. Just don’t add too much, or the chocolate won’t set properly.
Can I make these nut-free?
Yes, the basic recipe is nut-free as long as you use nut-free cookies and chocolate. Just double-check the labels on your ingredients, especially the chocolate candy melts, as some brands may be processed in facilities that handle nuts.
Pin This Recipe!
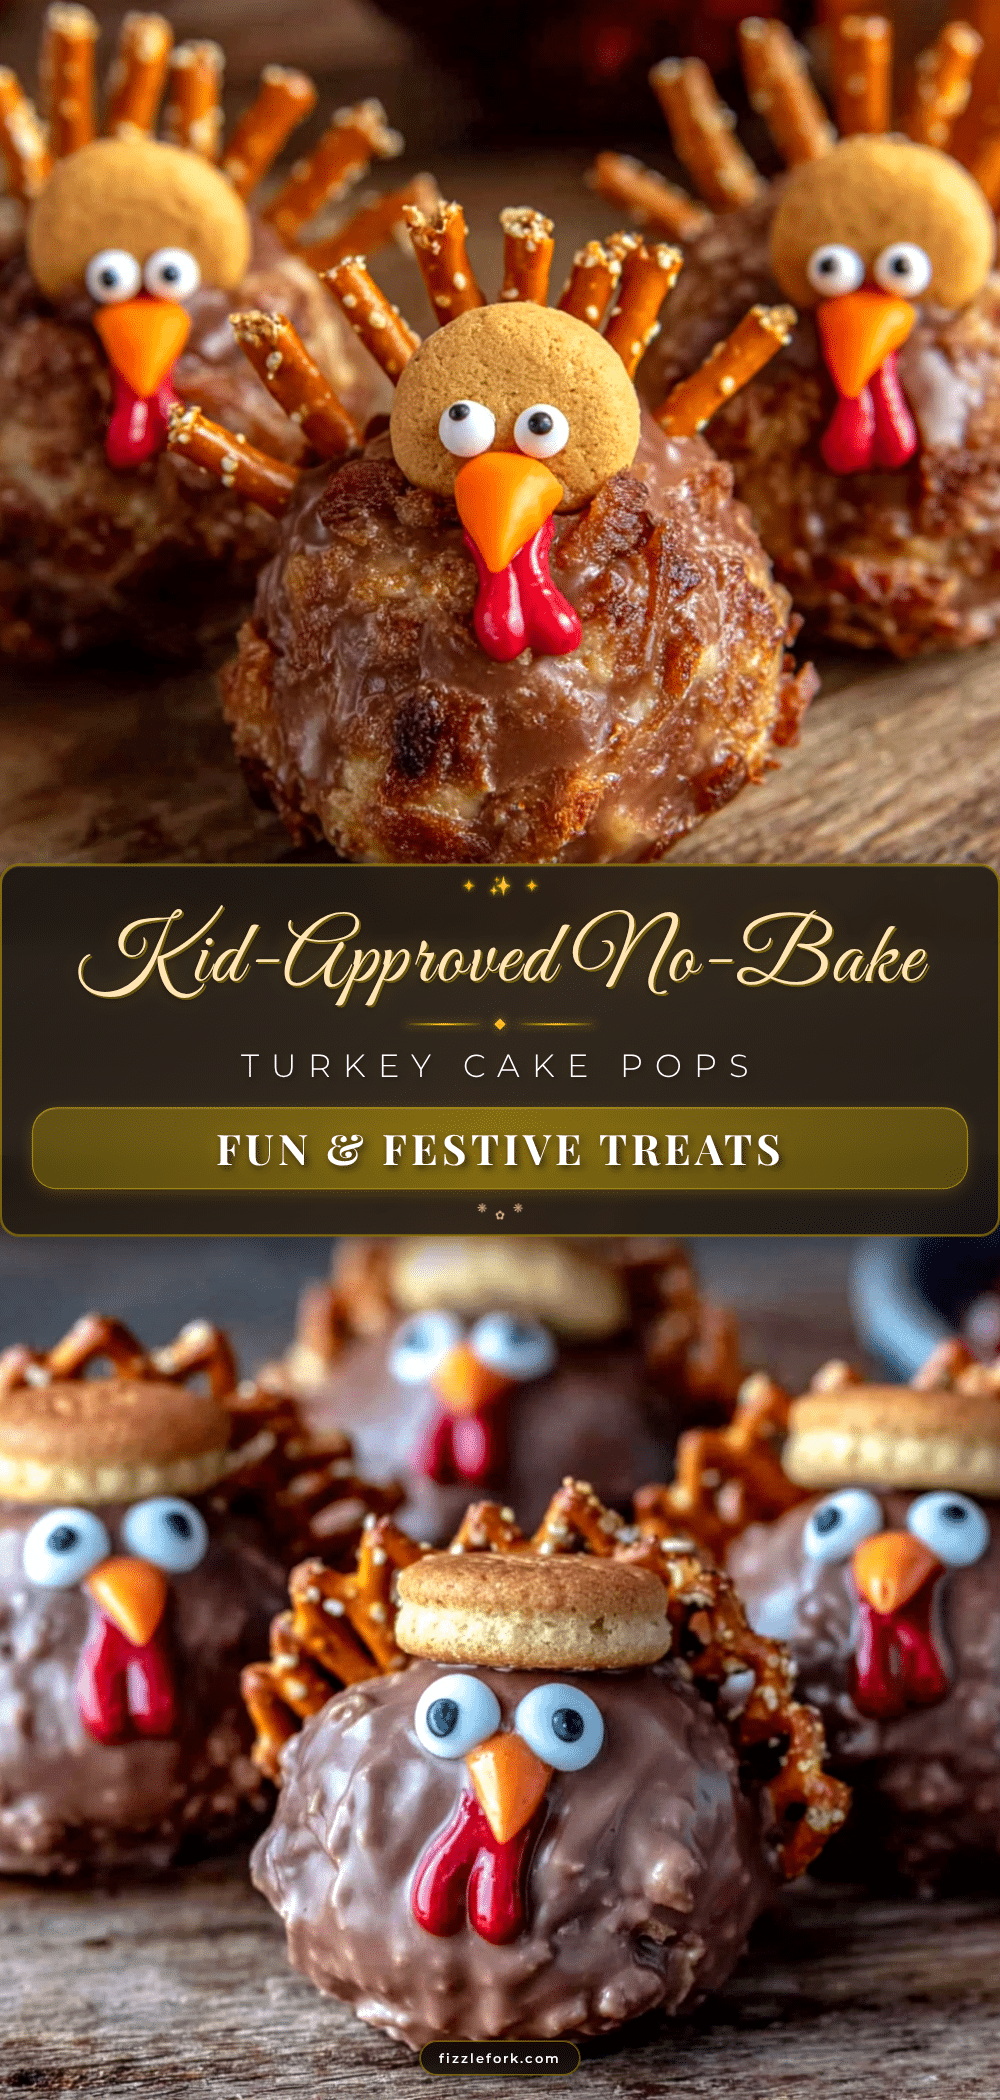
Easy No-Bake Turkey Cake Pops – Kid Approved!
These no-bake turkey cake pops are a quick and adorable Thanksgiving treat made with crushed chocolate sandwich cookies, cream cheese, and candy corn. Perfect for school parties or holiday gatherings, they come together in under 30 minutes without turning on the oven.
- Prep Time: 25 minutes
- Cook Time: 0 minutes
- Total Time: 25 minutes
- Yield: 20 servings 1x
- Category: Dessert
- Cuisine: American
Ingredients
- 20 chocolate sandwich cookies (e.g., Oreos)
- 4 ounces cream cheese, softened
- 1 cup chocolate candy melts
- 30 pieces candy corn
- 10 pretzel sticks, broken in half
- 20 candy eyes
- Small amount orange candy melts or frosting
- Lollipop sticks (optional)
Instructions
- Crush the cookies in a food processor until they become fine crumbs (or place in a zip-top bag and crush with a rolling pin).
- Transfer crumbs to a mixing bowl. Add softened cream cheese and stir until well combined, forming a stiff dough that holds together when squeezed.
- Scoop about 1 tablespoon of the mixture and roll into a smooth ball. Place on a parchment-lined baking sheet. Repeat to make about 20 balls. Refrigerate for 15 minutes to firm up.
- While balls chill, melt chocolate candy melts in a microwave-safe bowl in 30-second bursts, stirring between each, until smooth.
- Remove chilled balls from fridge. If using lollipop sticks, dip the tip of a stick into melted chocolate, then insert into a ball. Coat each ball completely in melted chocolate, letting excess drip off. Place back on parchment.
- While chocolate is still wet, stick 3-4 pieces of candy corn into the back of each cake pop to form turkey feathers.
- Break a pretzel stick in half. Gently insert one half into the front of the cake pop at a slight upward angle to form the turkey’s neck and head.
- Attach two candy eyes to the front of the pretzel head using a tiny dab of melted chocolate. Pipe a small orange triangle beak below the eyes using orange candy melts or frosting.
- Let cake pops sit at room temperature until chocolate is set, about 20 minutes (or refrigerate for 10 minutes).
Notes
Don’t skip chilling the balls before dipping—they need to be firm. Work in small batches to keep balls cold. If chocolate thickens, microwave for 10 seconds. For a nut-free version, use nut-free cookies and chocolate. Store in an airtight container in the fridge for up to 5 days. Freeze undipped balls for up to 2 months.
Nutrition
- Serving Size: 1 cake pop
- Calories: 190
- Sugar: 15
- Sodium: 120
- Fat: 11
- Saturated Fat: 6
- Carbohydrates: 24
- Fiber: 1
- Protein: 3
Keywords: turkey cake pops, no-bake, Thanksgiving, kid-friendly, easy, school party, fall treat