I was maybe seven, and she’d just pulled a pan of marshmallow squares from the fridge. No candy eyes, no spooky designs — just sticky, buttery goodness. But even then, I knew this was the stuff childhood was made of. Fast forward a couple decades, and I’m standing in my own kitchen, a bag of candy eyes in one hand and a box of cereal in the other, trying to convince myself these Easy Rice Krispie Mummy Treats with Candy Eyes are for my niece’s Halloween party. Honestly? They’re just as much for me.
There’s something about wrapping a crispy square in white chocolate and sticking two googly eyes on it that makes you feel like a kid again. No fancy piping skills required. No complicated baking times. Just three basic ingredients, a little patience, and the kind of messy fun that leaves marshmallow residue on your counter — and a smile on your face. These aren’t just treats. They’re a little bit of nostalgia you can hold in your hand.
Why You’ll Love This Recipe
Let’s be real — Halloween treats can get complicated. Between royal icing that won’t set and cookies that spread into blobs, it’s easy to feel defeated before the candy even hits the bowl. These mummy treats? They’re the opposite of that. They’re forgiving, fast, and honestly, kind of adorable in their imperfection. My first batch had one eye higher than the other and a drizzle that looked more like a spiderweb than bandages — and everyone still gobbled them up.
- Super Simple Ingredients: You only need butter, marshmallows, Rice Krispies cereal, white melting wafers, and candy eyes. That’s it. No obscure baking supplies or specialty flours.
- No Baking Required: This is a stovetop-and-microwave situation. Perfect for hot Halloween days when you don’t want to turn on the oven.
- Kid-Friendly Activity: My five-year-old niece placed the eyes on half the batch. Did some look slightly possessed? Yes. Did we care? Not even a little.
- Perfect for Halloween Parties: These travel well, stay fresh for days, and look incredible on a dessert table next to other spooky snacks like these spooky witch finger pretzel treats.
- Customizable in Seconds: Swap the candy eyes for mini chocolate chips, use dark chocolate drizzle, or add orange sprinkles for a color pop.
- Massive Crowd Appeal: Even the adults who “don’t do sweets” end up grabbing one. You’ve been warned.
What Ingredients You Will Need
This recipe uses the simplest lineup of ingredients you probably already have in your pantry. The magic comes from how you assemble them — and those little candy eyes, of course.
- 3 tablespoons unsalted butter: Don’t use margarine here. Real butter gives the marshmallow mixture that rich, creamy flavor and helps the treats hold their shape. If you’re dairy-free, a plant-based butter stick works fine — just avoid the spreadable tub kind.
- 10 oz bag mini marshmallows (about 4 cups): Mini marshmallows melt faster and more evenly than the giant ones. Jet-Puffed is my go-to brand, but store brands work too. For a slightly less sweet version, try Kraft’s Jet-Puffed marshmallows — they melt like a dream.
- 6 cups Rice Krispies cereal: The original is best for that signature snap-crackle-pop texture. Generic puffed rice cereal works, but it tends to get soggier faster. Stick with the name brand for the crunchiest results.
- 1 cup white melting wafers (about 6 oz): These are also called candy melts or almond bark. Ghirardelli white melting wafers are my favorite — they melt silky smooth and set with a nice shine. White chocolate chips work in a pinch, but they can seize up if overheated. Add a teaspoon of coconut oil to thin them out if needed.
- 1 tablespoon coconut oil or shortening (optional): Stir this into your melted white wafers for a thinner, more drizzle-friendly consistency. It also helps the white chocolate set with a glossy finish.
- 1-2 bags candy eyes (about 50-60 eyes): Wilton makes great candy eyes that come in different sizes. I like using the 7mm or 10mm round eyes for these mummies — big enough to be silly, small enough to stay put. You can find them at craft stores, Walmart, or Amazon.
- Pinch of salt: A tiny sprinkle balances the sweetness and makes the marshmallow flavor pop. Don’t skip it.
Ingredient Selection Tip: If you’re making these for a classroom party, double-check the candy eye packaging. Some brands are labeled as “not for consumption” and are meant for decoration only. Stick with Wilton or CK Products for edible eyes.
Equipment Needed
You don’t need a fancy kitchen setup for these. Here’s what you’ll actually use:
- Large pot (4-quart or larger): You need room to stir the marshmallow mixture without flinging cereal everywhere. A nonstick pot makes cleanup a breeze — I learned this the hard way after scrubbing a stainless steel pot for twenty minutes.
- Silicone spatula or wooden spoon: Silicone is ideal because it won’t scratch your pot and the marshmallow slides right off. A wooden spoon works too, but expect some sticky cleanup.
- 9×13-inch baking pan: This gives you the perfect thickness for mummy treats — not too thin, not too thick. Line it with parchment paper or foil and grease it well. Parchment paper with overhang makes lifting the whole block out effortless.
- Microwave-safe bowl: For melting the white wafers. A glass measuring cup works great because the spout makes drizzling easier.
- Piping bag or zip-top bag: A small zip-top bag with the corner snipped off is the easiest way to drizzle the white chocolate. No piping tips needed.
- Small offset spatula or butter knife: For smoothing the marshmallow mixture into the pan and for lifting individual treats.
Budget Tip: Don’t have a 9×13 pan? Use an 8×8 square pan for thicker mummies, or a rimmed baking sheet for thinner, wider treats. Adjust the pressing time — thicker treats need a gentler hand.
Preparation Method

Alright, let’s make some mummies. This whole process takes about 25 minutes, plus about an hour for the white chocolate to set. The actual hands-on work is maybe 15 minutes — the rest is just waiting.
- Grease your pan and spatula. Spray a 9×13-inch baking pan with nonstick cooking spray, or line it with parchment paper and grease the paper. Also spray your spatula or your hands — marshmallow mixture sticks to everything. Trust me, you don’t want to be peeling cereal off your fingers while the mixture hardens. Set the pan aside.
- Melt the butter. In a large pot over medium-low heat, melt the 3 tablespoons of unsalted butter. Swirl the pot occasionally so it melts evenly without browning. You want it just melted, not sizzling or foaming.
- Add the marshmallows. Pour the entire 10-ounce bag of mini marshmallows into the pot. Stir constantly with your greased spatula until the marshmallows are completely melted and smooth. This takes about 3-4 minutes. The mixture will look glossy and stretchy when it’s ready. Don’t walk away — burnt marshmallow smells awful and ruins the whole batch.
- Remove from heat and add cereal. Take the pot off the burner immediately. Pour in the 6 cups of Rice Krispies cereal all at once. Stir gently but thoroughly, folding the cereal into the marshmallow mixture. You want every kernel coated, but you don’t want to crush the cereal. Overmixing leads to dense, tough treats. Fold until you see no more white marshmallow streaks — about 30 seconds of gentle folding.
- Press into the pan. Scrape the mixture into your prepared pan. Using your greased spatula or greased hands (I prefer hands for this), gently press the mixture into an even layer. Don’t smash it down hard — you want the treats to be tender, not compacted. Aim for an even thickness across the whole pan. Let the treats cool completely at room temperature — about 30 minutes. Don’t rush this step or the white chocolate will slide right off.
- Cut into rectangles. Once cooled, lift the whole block out using the parchment overhang. Use a sharp knife to cut the block into 12-15 rectangles, roughly 3 inches by 2 inches each. Wipe the knife clean between cuts for neater edges. If the treats are too sticky to cut cleanly, pop them in the fridge for 10 minutes first.
- Melt the white chocolate. Place the 1 cup of white melting wafers in a microwave-safe bowl. Microwave in 30-second intervals at 50% power, stirring after each interval. White chocolate burns easily, so don’t blast it on high. When the wafers are mostly melted with a few small lumps, stir until smooth. If the mixture is too thick for drizzling, stir in 1 tablespoon of coconut oil or shortening. The consistency should be like runny pancake batter.
- Drizzle the mummy wraps. Transfer the melted white chocolate to a small piping bag or a zip-top bag with a tiny corner snipped off. Working with one treat at a time, drizzle the white chocolate back and forth across the rectangle to create mummy bandage stripes. Don’t cover the whole surface — leave some gaps so the cereal shows through. The messier, the better. Imperfect drizzles look more like real bandages anyway.
- Add the eyes. While the white chocolate is still wet, press two candy eyes into the exposed cereal area. Position them close together in the upper third of the treat. Don’t press too hard or they’ll sink into the marshmallow. If the white chocolate has started to set, dab a tiny bit of fresh melted chocolate on the back of each eye to glue them in place.
- Let set and serve. Place the finished mummy treats on a parchment-lined baking sheet. Let the white chocolate set completely at room temperature — about 45 minutes to 1 hour. If you’re in a hurry, pop them in the fridge for 20 minutes. Once set, they’re ready to serve. Store in an airtight container at room temperature for up to 5 days.
Sensory Cue: When you press the marshmallow mixture into the pan, it should feel warm and slightly springy — like a freshly made pillow. If it feels stiff or crumbly, you overcooked the marshmallows. If it feels greasy, you used too much butter. Perfect treats feel tender and slightly tacky, but not sticky.
Cooking Tips & Techniques
I’ve made these treats more times than I can count, and I’ve messed up plenty along the way. Here’s what I’ve learned so you don’t have to repeat my mistakes.
Low and slow is your friend. When melting the marshmallows, keep the heat on medium-low. High heat scorches the sugar and gives the treats a bitter, burnt flavor. I once cranked the heat because I was in a rush, and the whole batch tasted like a campfire. Not the vibe we’re going for.
Don’t over-press the mixture. This is the number one mistake I see. People press the cereal mixture into the pan like they’re making a cheese press. The result? Rock-hard treats that crack your teeth. Use a gentle hand — just enough to level the surface. The treats should feel light and airy when you bite into them.
Work in batches when drizzling. Don’t try to drizzle all the treats at once. The white chocolate will start to set, and you’ll end up with thick globs instead of delicate stripes. Drizzle 3-4 treats at a time, add the eyes, then move on. This keeps the chocolate workable and the eyes secure.
White chocolate troubleshooting. If your white chocolate seizes up — turns grainy and stiff — you overheated it. Unfortunately, there’s no fixing seized white chocolate. Start fresh with new wafers and microwave at a lower power. Adding a teaspoon of coconut oil can sometimes rescue slightly thick chocolate, but seized chocolate is a lost cause.
Make ahead tip. You can prepare the plain Rice Krispies treats a day ahead and store them in an airtight container. Drizzle and add eyes the day you plan to serve them. The white chocolate stays shinier and the eyes stay put better when fresh. If you’re short on time, you can drizzle them up to 8 hours ahead — just keep them uncovered so the chocolate sets properly.
Variations & Adaptations
These mummy treats are endlessly adaptable. Here are some of my favorite twists:
Chocolate Mummies: Swap the white melting wafers for dark or milk chocolate. The contrast with the golden cereal is gorgeous, and chocolate lovers will thank you. Use the same melting technique — 30-second intervals at 50% power.
Gluten-Free Version: Rice Krispies are naturally gluten-free, but some generic brands use malt flavoring that contains gluten. Check the label. If you need a certified gluten-free option, look for “Gluten-Free Rice Krispies” or use a brand like Nature’s Path Organic Crispy Rice Cereal.
Colorful Mummies: Add a few drops of orange or purple food coloring to the melted white chocolate for a festive twist. Use gel food coloring — liquid drops can seize the chocolate. Stir gently until the color is even, then drizzle as usual.
Spider Mummies: Instead of two eyes, add four eyes in a row for a creepy spider look. Or add eight mini pretzel sticks as legs before the chocolate sets. This variation is always a hit at our Halloween parties — especially when paired with a spider web charcuterie board for a full spooky spread.
Mini Mummy Bites: Press the cereal mixture into a mini muffin tin instead of a 9×13 pan. Grease the tin well, press a small amount of mixture into each cup, and let cool. Drizzle and add eyes for bite-sized mummies. These are perfect for classroom parties or snack bags.
Nutty Mummies: Stir in ½ cup of chopped pecans or almonds with the cereal for extra crunch. The nuts add a savory note that balances the sweetness beautifully. My sister-in-law adds toasted coconut flakes — she swears by it.
Serving & Storage Suggestions
These treats are best served at room temperature. The marshmallow stays soft and chewy, and the white chocolate has that satisfying snap when you bite through it. If they’ve been in the fridge, let them sit out for 10-15 minutes before serving.
Presentation Ideas: Arrange the mummies on a black or orange platter for maximum Halloween vibes. Add a few candy corn white chocolate popcorn bars alongside for variety. You can also stand the mummies upright in a mason jar filled with candy corn — it looks adorable and keeps them from getting squished.
Storage: Place the treats in an airtight container at room temperature. Layer them between sheets of parchment paper so the white chocolate doesn’t stick. They’ll stay fresh for up to 5 days — though in my house, they’re gone within 48 hours. Do not refrigerate them long-term. The fridge dries out the marshmallow and makes the treats hard.
Freezing: You can freeze the plain Rice Krispies treats (without the white chocolate drizzle) for up to 3 months. Wrap them tightly in plastic wrap, then place in a freezer bag. Thaw at room temperature, then drizzle and add eyes fresh. The white chocolate doesn’t freeze well — it gets cloudy and loses its shine.
Flavor Development: These treats taste best within the first two days. The cereal stays crunchiest during that window. After day three, the marshmallow starts to soften the cereal, and the treats become chewier. Some people prefer them that way — it’s a matter of texture preference.
Nutritional Information & Benefits
Let’s be honest — these are a treat, not a health food. But here’s the breakdown if you’re curious. Per serving (1 mummy treat, based on 15 servings):
- Calories: 215
- Total Fat: 8g
- Saturated Fat: 5g
- Carbohydrates: 34g
- Sugar: 22g
- Protein: 2g
- Sodium: 190mg
- Fiber: 0g
Dietary Notes: These treats contain dairy (butter, white chocolate) and are not suitable for vegans unless you use vegan butter and dairy-free white chocolate. They are naturally egg-free, nut-free (if you skip the nut variations), and soy-free depending on your chocolate brand. Always check labels if you’re serving guests with allergies.
Health Perspective: Is this a nutritious snack? No. But it’s a Halloween tradition, and there’s value in that. One treat won’t derail anyone’s diet, and the joy of making them with kids or sharing them at a party has its own kind of wellness benefit. Balance, not restriction, is the name of the game.
Conclusion
These Easy Rice Krispie Mummy Treats with Candy Eyes are the kind of recipe that makes Halloween feel magical without making you feel overwhelmed. They’re simple enough for a five-year-old to help with, impressive enough to steal the show at a party, and nostalgic enough to make you feel like a kid again. Honestly, that’s the whole point.
I love that this recipe leaves room for imperfection. Some of my mummies look lopsided. Some have three eyes because my niece got carried away. But every single one gets eaten with a smile. That’s the kind of cooking I want to share — the kind that’s more about joy than perfection.
So grab a bag of candy eyes and a box of cereal. Get a little marshmallow on your counter. Make some mummies that look silly and taste incredible. And when you do, come back and tell me how they turned out. Did your kids go wild? Did you add your own twist? I’d love to hear about it in the comments. Happy Halloween, friend.
Frequently Asked Questions
Can I use homemade marshmallows for this recipe?
Technically yes, but I don’t recommend it. Homemade marshmallows have a much softer, stickier texture that doesn’t bind the cereal as well. The treats will be gooey and harder to cut into clean rectangles. Stick with store-bought mini marshmallows for the best structure.
How do I keep the candy eyes from falling off?
Press the eyes into the white chocolate while it’s still wet. If the chocolate has started to set, dab a tiny bit of fresh melted chocolate on the back of each eye before pressing it on. The chocolate acts like edible glue. Also, avoid pressing too hard — you don’t want the eyes sinking into the marshmallow.
Can I make these treats vegan?
Absolutely. Use vegan butter (like Earth Balance), vegan mini marshmallows (Dandies brand works great), and dairy-free white chocolate. The process is exactly the same. Just note that vegan marshmallows can be a bit stickier, so grease your hands and spatula extra well.
Why did my white chocolate turn out lumpy?
You likely overheated it. White chocolate is sensitive — microwave at 50% power in 30-second bursts, stirring thoroughly between each interval. If it seizes up (turns grainy and stiff), there’s no saving it. Start over with fresh wafers and go slower. Adding a teaspoon of coconut oil can sometimes help thin out slightly thick chocolate, but seized chocolate is a lost cause.
How far in advance can I make these for a party?
You can make the plain Rice Krispies treats up to 2 days ahead and store them in an airtight container. Drizzle with white chocolate and add the eyes the day of your party — the chocolate stays shinier and the eyes stay put better when fresh. If you need to make them fully assembled a day ahead, store them uncovered at room temperature so the white chocolate sets completely before stacking.
Pin This Recipe!
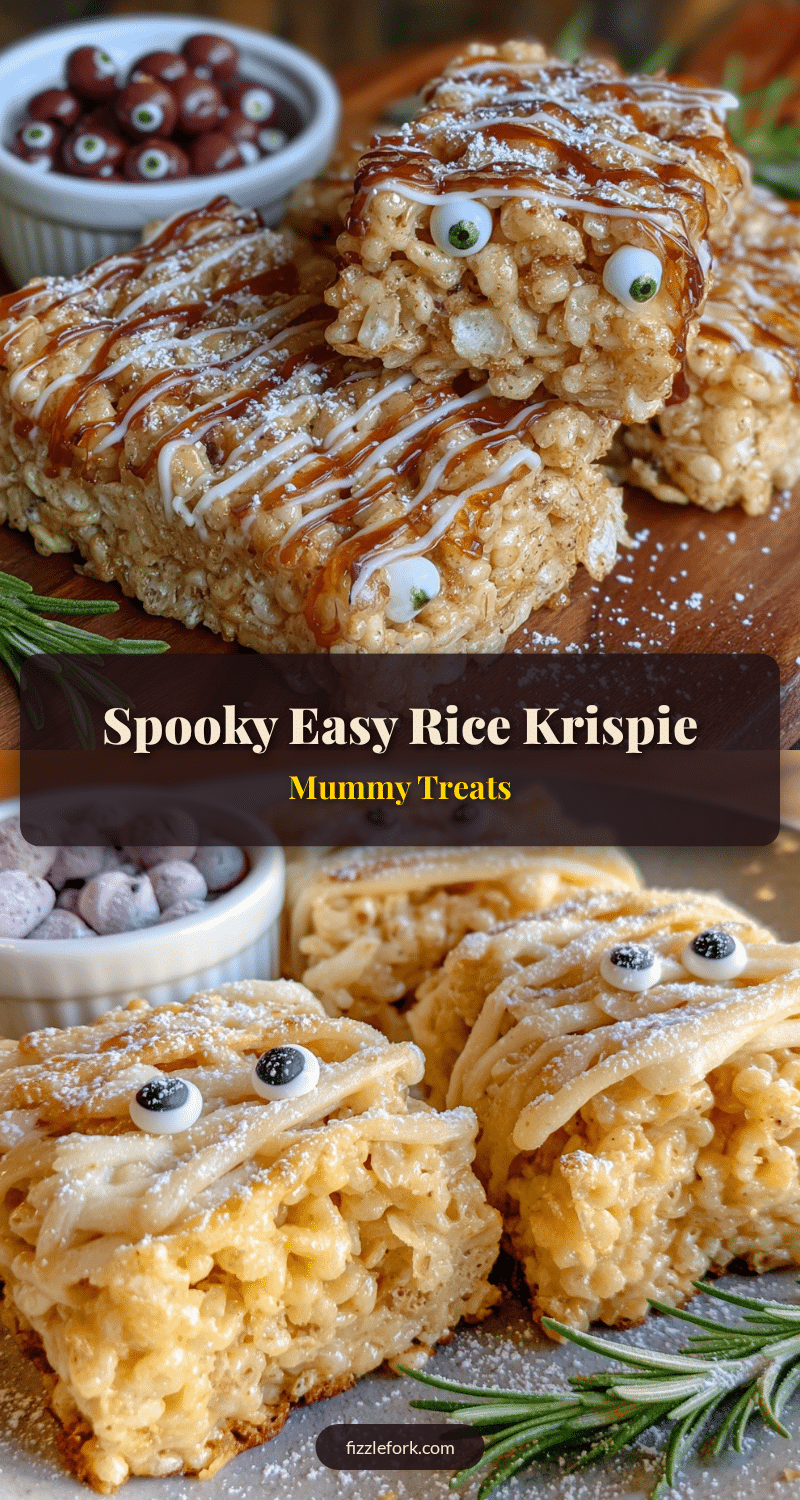
Easy Rice Krispie Mummy Treats: Best Halloween Candy Eyes Recipe
These Easy Rice Krispie Mummy Treats with Candy Eyes are a nostalgic, no-bake Halloween treat made with just a few simple ingredients. Perfect for parties, they’re fun to make with kids and irresistibly adorable.
- Prep Time: 15 minutes
- Cook Time: 10 minutes
- Total Time: 25 minutes (plus 1 hour setting time)
- Yield: 12-15 servings 1x
- Category: Dessert
- Cuisine: American
Ingredients
- 3 tablespoons unsalted butter
- 10 oz bag mini marshmallows (about 4 cups)
- 6 cups Rice Krispies cereal
- 1 cup white melting wafers (about 6 oz)
- 1 tablespoon coconut oil or shortening (optional)
- 1–2 bags candy eyes (about 50–60 eyes)
- Pinch of salt
Instructions
- Grease a 9×13-inch baking pan with nonstick cooking spray or line with parchment paper and grease the paper. Also grease a spatula or your hands.
- In a large pot over medium-low heat, melt the 3 tablespoons of unsalted butter.
- Add the entire 10-ounce bag of mini marshmallows to the pot. Stir constantly until completely melted and smooth, about 3-4 minutes.
- Remove the pot from heat and immediately pour in the 6 cups of Rice Krispies cereal. Stir gently until every kernel is coated and no white marshmallow streaks remain, about 30 seconds.
- Scrape the mixture into the prepared pan. Using a greased spatula or greased hands, gently press into an even layer. Let cool completely at room temperature, about 30 minutes.
- Once cooled, lift the block out using parchment overhang. Cut into 12-15 rectangles, roughly 3 inches by 2 inches each.
- Place the 1 cup of white melting wafers in a microwave-safe bowl. Microwave in 30-second intervals at 50% power, stirring after each interval, until smooth. If too thick, stir in 1 tablespoon of coconut oil or shortening.
- Transfer melted white chocolate to a piping bag or zip-top bag with a tiny corner snipped off. Drizzle back and forth across each rectangle to create mummy bandage stripes, leaving some gaps.
- While the white chocolate is still wet, press two candy eyes into the exposed cereal area in the upper third of each treat.
- Place finished treats on a parchment-lined baking sheet. Let white chocolate set completely at room temperature, about 45 minutes to 1 hour. Serve at room temperature.
Notes
For best results, use real butter and name-brand Rice Krispies. Don’t over-press the mixture into the pan to keep treats light and airy. White chocolate can seize if overheated; microwave at 50% power. Make plain treats up to 2 days ahead, but drizzle and add eyes the day of serving for best appearance.
Nutrition
- Serving Size: 1 mummy treat
- Calories: 215
- Sugar: 22
- Sodium: 190
- Fat: 8
- Saturated Fat: 5
- Carbohydrates: 34
- Protein: 2
Keywords: Rice Krispie treats, mummy treats, Halloween dessert, no-bake, candy eyes, easy Halloween recipe