My niece asked why I couldn’t just use black olives instead of trying to pipe intricate spider legs out of black food coloring and melted chocolate. I started to explain why that wouldn’t work — then stopped. She was eight. She didn’t care about my vision of “gourmet arachnids.” She wanted something that looked like a spider and tasted like the deviled eggs she already loved. I grabbed a can of black olives from the pantry, feeling a little bit like I was cheating. Honestly, I was sure the result would look like a hot mess — olives are slippery, they’re big, and they have that hole in the middle. But I let her slice them, arrange the “legs,” and place the little olive bodies right on top of the creamy yolk filling. The first one she made stared up at me with its little olive eyes, and I just laughed. It was perfect. It was also way more charming than anything I had planned.
That was the moment I learned that sometimes the best recipe ideas come from letting go of control. I mean, I had spent an hour researching edible spider decorations, and she solved it in thirty seconds with a pantry staple. The result was a deviled egg that was not only spooky but genuinely delicious — because let’s face it, nothing ruins a good deviled egg like a waxy, artificial-tasting topping. These classic homemade spider deviled eggs for Halloween have become our go-to party trick. They’re simple enough for a kid to help with, impressive enough to get a gasp from your guests, and they taste exactly like the creamy, tangy deviled eggs you remember from every family gathering. Maybe you’ve been there — overcomplicating something that was supposed to be fun. This recipe is my reminder to keep it simple, keep it tasty, and let the olives do the heavy lifting.
Why You’ll Love This Recipe
I have tested this recipe across three different Halloween parties, two family gatherings, and one very skeptical neighbor’s house. Every single time, these eggs disappeared first. Here is why this version stands out from the dozens of other spooky deviled egg recipes you might find online.
- Quick & Easy: These come together in about 30 minutes, with only 15 minutes of active prep. Perfect for last-minute Halloween party planning or a busy weeknight before trick-or-treating.
- Simple Ingredients: You need eggs, mayonnaise, mustard, paprika, salt, pepper, and a can of black olives. That is it. No specialty stores, no expensive food coloring, no weird ingredients you will never use again.
- Perfect for Halloween: These are the star of any spooky spread. They look creepy, but they are actually adorable — the perfect balance for a Halloween appetizer that both kids and adults will fight over.
- Crowd-Pleaser: I have watched people who “don’t like deviled eggs” eat three of these. Something about the olive spider design makes them feel like a treat rather than a side dish.
- Unbelievably Delicious: The classic creamy yolk filling is tangy, rich, and perfectly seasoned. The briny olive on top adds a salty pop that complements the filling beautifully. It is not just a gimmick — it actually tastes amazing.
What makes these different from every other Halloween deviled egg recipe is the technique. Most recipes try to make elaborate spider webs out of sour cream or struggle with chocolate legs that melt at room temperature. My version uses whole black olives sliced into natural leg shapes — no piping bags, no melted chocolate, no stress. It is the kind of recipe that makes you close your eyes after the first bite because it tastes like pure comfort food, just dressed up in its spookiest costume.
These are comfort food reimagined for the holiday — familiar, creamy, and soul-soothing, but with a playful twist that makes them feel special. Perfect for impressing guests without breaking a sweat, or turning a simple appetizer into the most memorable dish on the table.
What Ingredients You Will Need
This recipe uses simple, everyday ingredients to create something that looks like it took hours. The magic is in the presentation, not the shopping list. Here is everything you need, along with a few notes from my own kitchen trials.
- 12 large eggs — Use eggs that are at least a week old for easier peeling. Fresh eggs are harder to peel cleanly, so plan ahead. I prefer organic, pasture-raised eggs for their richer yolk color, but any large eggs work fine.
- 1/3 cup mayonnaise — Full-fat mayo gives the creamiest texture. I use Hellmann’s or Duke’s for their tangy flavor. If you are using a lighter mayo, expect a slightly thinner filling.
- 1 tablespoon yellow mustard — This adds that classic deviled egg tang. You can substitute Dijon for a sharper flavor, but yellow mustard is the traditional choice.
- 1 teaspoon white vinegar — A tiny splash brightens the whole filling. Apple cider vinegar works too, but it will slightly change the color.
- 1/2 teaspoon salt — Fine salt dissolves better than coarse salt in the filling.
- 1/4 teaspoon black pepper — Freshly ground is best, but pre-ground works in a pinch.
- 1/2 teaspoon paprika — Plus extra for dusting. Smoked paprika adds a lovely depth, but sweet paprika gives that classic red speckle on top.
- 1 can (6 ounces) large black olives — You need whole, pitted black olives. Do not get sliced olives — you need the whole ones to cut into spider shapes. I recommend Lindsay or Pearls brand for their firm texture and consistent size.
Optional add-ins for the filling:
- 1 tablespoon sweet pickle relish — This is a Southern classic that adds sweetness and crunch. Drain it well before adding.
- 1/4 teaspoon garlic powder — For a savory kick.
- 1/4 teaspoon onion powder — Adds subtle depth without overpowering.
- A dash of hot sauce — A tiny bit of Tabasco or Crystal hot sauce wakes up the filling nicely.
Ingredient selection tips: When choosing black olives for the spider bodies, look for the largest whole black olives you can find. Jumbo or colossal sizes work best because they give you more surface area to cut leg shapes. Avoid olives that are too soft or mushy — they will fall apart when you try to slice them. I learned this the hard way after a batch of sad, squished spider legs.
Substitution guidance: For a dairy-free version, use vegan mayonnaise. The filling will be slightly less rich, but it still works beautifully. For a lower-fat option, you can substitute half the mayo with plain Greek yogurt — just note that the filling will be tangier and slightly less creamy. If you cannot find large black olives, you can use jumbo pitted green olives, but the color will be different and they will not look as much like spiders.
Equipment Needed
You do not need any fancy kitchen gadgets for this recipe. Here is what you will need, along with a few alternative suggestions from my own experience.
- Large pot — For boiling the eggs. A 4-quart pot works perfectly. Make sure it is wide enough to hold the eggs in a single layer.
- Medium mixing bowl — For the yolk filling. Any bowl works, but a wide, shallow bowl makes mashing easier.
- Fork or potato masher — For mashing the yolks. A fork is my go-to because it gives you more control. A potato masher works faster but can over-mash if you are not careful.
- Sharp paring knife — For slicing the olives into spider legs. A dull knife will crush the olives. I use a small Wusthof paring knife, but any sharp, small knife works.
- Cutting board — A small cutting board dedicated to prep work is ideal.
- Serving platter — A white or black platter makes the spider deviled eggs pop visually. A dark slate board is especially striking for Halloween.
- Piping bag or zip-top bag — For filling the egg whites neatly. A zip-top bag with the corner snipped off is the budget-friendly option. If you do not have either, a small spoon works fine — it just takes a little more patience.
Budget-friendly tip: Do not buy a fancy piping bag for this. A sturdy zip-top bag works just as well and costs pennies. Just fill it, seal it, and snip off a tiny corner. I have been using this method for years and have never felt the need to upgrade.
Preparation Method
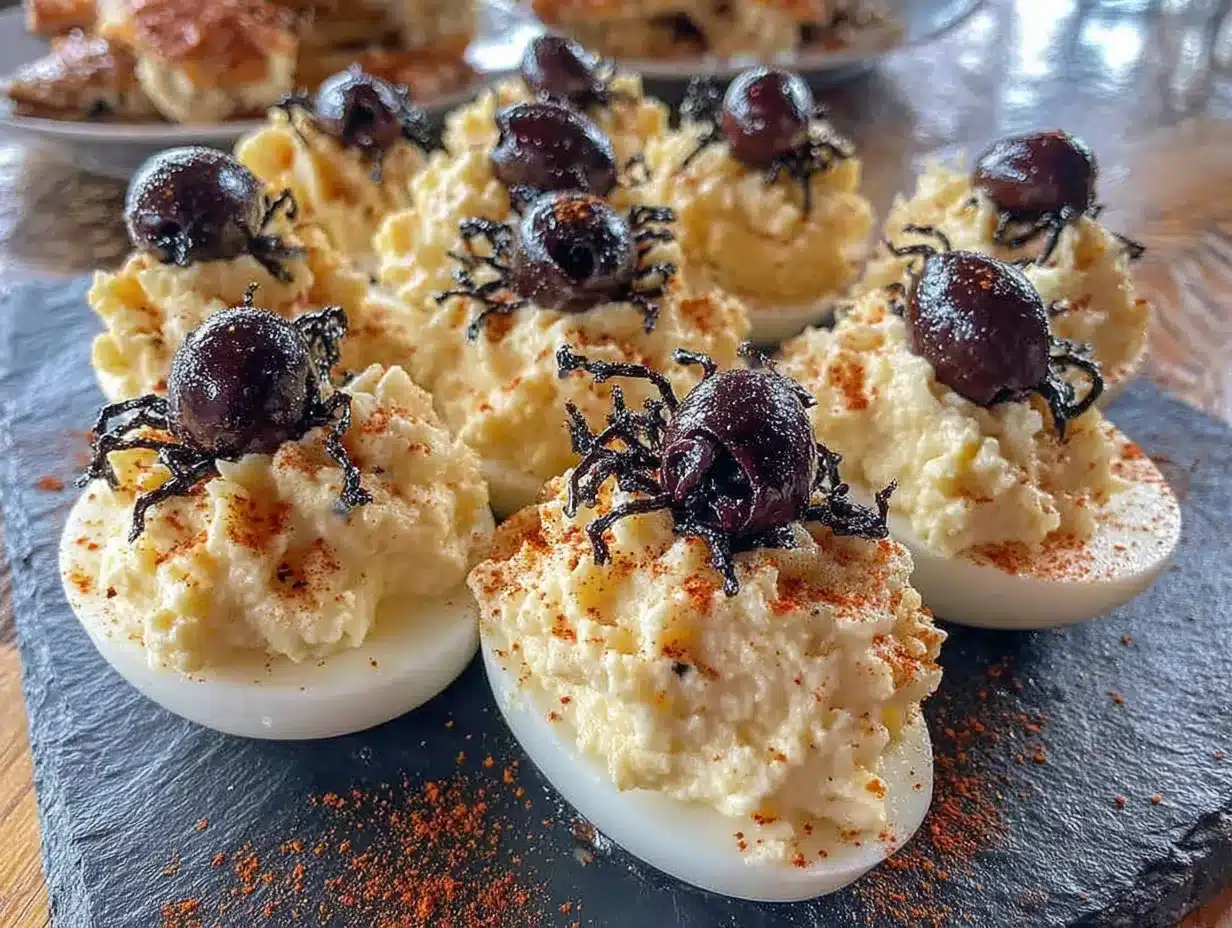
Follow these steps carefully, and you will have a platter of spooky, delicious spider deviled eggs that will be the talk of your Halloween party.
- Hard boil the eggs. Place the 12 eggs in a single layer in a large pot. Cover them with cold water by about an inch. Bring the water to a full, rolling boil over high heat. Once boiling, cover the pot, turn off the heat, and let the eggs sit for exactly 12 minutes. This method gives you perfectly hard-boiled yolks without that green ring around the yolk. While the eggs sit, prepare an ice bath by filling a large bowl with cold water and ice cubes.
- Cool and peel the eggs. After 12 minutes, transfer the eggs to the ice bath using a slotted spoon. Let them cool for at least 5 minutes — this stops the cooking process and makes peeling much easier. Gently tap each egg on the counter to crack the shell all over, then peel under running cold water. The water helps separate the shell from the egg white. Pat the peeled eggs dry with a paper towel.
- Prepare the egg whites. Using a sharp knife, slice each egg in half lengthwise. Gently pop out the yolks into a medium mixing bowl. Place the hollowed egg white halves on your serving platter, cut side up. Try to keep the whites intact — if a few tear, do not worry, you can hide them under the filling.
- Make the filling. Add the mayonnaise, yellow mustard, white vinegar, salt, pepper, and paprika to the bowl with the yolks. Mash everything together with a fork until smooth and creamy. Taste the filling and adjust seasoning — I usually add an extra pinch of salt and a dash more paprika. If you are using any optional add-ins like pickle relish or garlic powder, stir them in now. The filling should be thick but spreadable. If it is too thick, add a tiny splash of milk or extra mayo.
- Fill the egg whites. Transfer the yolk mixture to a piping bag or a zip-top bag with a small corner snipped off. Pipe the filling into each egg white half, mounding it slightly in the center. You want a nice, generous amount — these are supposed to be indulgent. If you do not have a bag, use a small spoon to carefully fill each white. Smooth the tops gently with the back of the spoon if needed.
- Create the spider legs. Drain the can of black olives and pat them dry with a paper towel. Using your sharp paring knife, slice each olive lengthwise into thin strips — aim for 4 to 5 strips per olive. Each strip will become one spider leg. You need 8 legs per spider, so plan accordingly. For 24 deviled egg halves, you will need about 48 olive strips, which means you will use roughly 10 to 12 olives just for legs.
- Create the spider bodies. Take the remaining whole olives and slice each one in half crosswise (through the middle, not lengthwise). Each half will become one spider body. You need 24 olive halves for 24 deviled eggs.
- Assemble the spiders. On each filled deviled egg, place 4 olive strips on each side of the filling to create the spider legs. Gently press them into the filling so they stay in place. Then place one olive half (cut side down) in the center of the filling, right on top of where the legs meet. Press down lightly so it sticks. The olive body should sit right in the middle, with the legs radiating out from underneath it.
- Add the finishing touches. Lightly dust the assembled spider deviled eggs with a sprinkle of paprika. This adds color and a bit of smoky flavor. For extra spooky effect, you can add a tiny dot of mayonnaise to each olive “head” to look like an eye — though I find the olives look perfectly spider-like on their own.
- Chill before serving. Refrigerate the platter for at least 30 minutes before serving. This helps the filling set and the olive pieces stay in place. They can be made up to 8 hours ahead — just cover the platter with plastic wrap and keep chilled.
Sensory cues: When you mash the yolks, they should break down into a fine, sandy texture before you add the wet ingredients. The finished filling should be pale yellow, smooth, and slightly glossy. When you pipe it into the whites, it should hold its shape without collapsing. The olive legs should feel firm and slightly springy when you press them into the filling.
Personal tip: I always make a few extra “practice” spiders on a separate plate before I start decorating the main platter. This lets me get the leg placement right without worrying about messing up a perfect egg. Plus, you get a snack out of it.
Cooking Tips & Techniques
Over the years, I have made plenty of mistakes with deviled eggs. Here is what I have learned so you do not have to repeat my failures.
The perfect hard-boiled egg is the foundation. I cannot stress this enough. If your eggs are overcooked, the yolks will be dry and chalky, and the filling will be crumbly. If they are undercooked, the yolks will be too soft to mash properly. The 12-minute off-heat method I shared above is foolproof. Do not skip the ice bath — it stops the cooking instantly and makes peeling infinitely easier.
Peeling eggs under running water is the secret. I used to struggle with peeling eggs until a friend showed me this trick. The water gets under the shell and helps separate it from the egg white. Start peeling from the wider end of the egg, where the air pocket is. That is usually the easiest place to get the shell started.
Dry your olives thoroughly. Wet olives will slide right off the filling. After draining, pat each olive dry with a paper towel. This small step makes a huge difference in how well the legs and bodies stay in place. I learned this after watching my first batch of spider legs slowly slide off the eggs onto the platter.
Cut olive legs evenly. Try to make each leg strip roughly the same thickness — about 1/8 inch wide. Too thin, and they will curl up and look like worms. Too thick, and they will look clunky and not spider-like. A steady hand and a sharp knife are your best friends here.
Use a piping bag for a professional look. A piping bag gives you clean, even filling that looks polished. If you are using a zip-top bag, do not snip off too much of the corner — start with a very small opening and cut more if needed. You can always make the hole bigger, but you cannot undo a cut that is too large.
Make ahead strategy. You can boil and peel the eggs up to 2 days in advance. Store the peeled eggs in a bowl of cold water in the refrigerator. You can also make the filling up to 1 day ahead — just keep it in a sealed container in the fridge. Assemble the spider deviled eggs no more than 8 hours before serving for the best appearance.
Variations & Adaptations
This recipe is wonderfully adaptable. Here are a few variations I have tried and loved.
Spicy Spider Deviled Eggs: Add 1/2 teaspoon of cayenne pepper or a teaspoon of sriracha to the yolk filling. The heat pairs beautifully with the cool, creamy filling and the briny olive. I made these for a Halloween party and they were a hit with the adults who wanted something with a little kick.
Smoky Bacon Spider Eggs: Crumble 2 slices of cooked bacon into the yolk mixture before piping. The smoky, salty bacon adds incredible depth. You can also place a tiny piece of bacon on top of the olive body for extra flavor — just be careful not to cover the spider design completely.
Guacamole Spider Eggs: For a completely different take, substitute the mayonnaise-based filling with a simple guacamole. Mash 2 ripe avocados with lime juice, salt, and a pinch of cumin, then pipe it into the egg whites. Top with the olive spiders as usual. This version is dairy-free and adds a fresh, vibrant twist.
Dill Pickle Spider Eggs: Add 1 tablespoon of finely chopped dill pickle and 1 teaspoon of dill pickle juice to the yolk mixture. This gives the filling a bright, tangy flavor that cuts through the richness. I tried this on a whim and now it is my second-favorite version after the classic.
Mini Spider Eggs: Use quail eggs instead of chicken eggs for an adorable, bite-sized version. Quail eggs are smaller and require a gentler hand when peeling, but the result is incredibly cute. You will need about 24 quail eggs to replace 12 large eggs. Adjust the boiling time to 5 minutes for quail eggs.
Vegan Spider Eggs: Substitute the eggs with halved, boiled potatoes or firm tofu. For the filling, mash chickpeas with vegan mayo, mustard, and turmeric for color. Top with the olive spiders as usual. This version is surprisingly satisfying and perfect for plant-based guests.
Serving & Storage Suggestions
These spider deviled eggs are best served chilled, straight from the refrigerator. The cold filling holds its shape better, and the olive pieces stay firmly in place. Arrange them on a dark platter or a slate board for maximum Halloween effect. A bed of fresh kale or spinach underneath adds a nice pop of green that contrasts with the black olives.
What to serve with them: These eggs are the perfect appetizer for a Halloween party spread. Pair them with other finger foods like:
- Mummy hot dogs (crescent dough wrapped around hot dogs with mustard eyes)
- Witch’s finger cookies (almond-shaped cookies with a green tint)
- A bowl of pumpkin-shaped cheese balls
- Spooky punch or apple cider
Storage instructions: Store leftover spider deviled eggs in an airtight container in the refrigerator for up to 2 days. The olive pieces may start to slip after a day, so they are best eaten fresh. Do not freeze deviled eggs — the texture of the filling will become watery and grainy upon thawing.
Reheating: These are served cold, so no reheating is needed. If you have made the filling ahead of time, let it sit at room temperature for 10 minutes before piping to soften slightly.
Flavor development: The filling actually tastes better after a few hours in the fridge. The flavors meld together, and the tanginess of the mustard and vinegar becomes more balanced. I always prefer the taste of deviled eggs that have been chilled for at least an hour before serving.
Nutritional Information & Benefits
Here is the estimated nutritional breakdown for one spider deviled egg (based on 24 servings):
| Nutrient | Amount per serving |
|---|---|
| Calories | |
| Total Fat | 7g |
| Saturated Fat | 1.5g |
| Cholesterol | 95mg |
| Sodium | 180mg |
| Total Carbohydrates | 1g |
| Protein | 6g |
Health benefits: Eggs are a fantastic source of high-quality protein and contain all nine essential amino acids. They are rich in choline, which supports brain health, and lutein, which is good for your eyes. The olive on top adds healthy monounsaturated fats and antioxidants. While deviled eggs are not a health food, they are a surprisingly nutrient-dense appetizer compared to many Halloween treats.
Dietary considerations: This recipe is naturally gluten-free and low-carb. For a keto-friendly version, use full-fat mayo and skip any sweet relish. For a dairy-free version, the recipe is already dairy-free as written. The main allergens are eggs and (if using traditional mayo) soy or canola oil.
Personal wellness perspective: I love that these spider deviled eggs feel indulgent and festive without being loaded with sugar or artificial ingredients. They are a protein-packed option that actually fills you up, which means your guests are less likely to overdo it on candy later. Plus, the olives add a savory, satisfying element that makes these feel like a real treat rather than a compromise.
Conclusion
These classic homemade spider deviled eggs for Halloween have become a staple in my holiday rotation, and I honestly cannot imagine a Halloween party without them. They are the perfect blend of spooky and delicious — the kind of recipe that makes people smile before they even take a bite. And when they do take that first bite? The creamy, tangy filling with that briny olive finish is pure comfort.
I love that this recipe is flexible enough to match your own tastes. Maybe you will add a little extra mustard for tang, or a sprinkle of cayenne for heat, or even a tiny piece of bacon for smokiness. The base is solid, but the variations are endless. That is what makes a recipe truly yours.
I would love to hear how your spider deviled eggs turn out! Did you try any of the variations? Did your kids help with the olive legs? Drop a comment below and let me know — your feedback helps other readers too. And if you loved this recipe, please share it with your friends and family. Here is to a spooky, delicious, and wonderfully simple Halloween!
Frequently Asked Questions
Can I make spider deviled eggs a day ahead?
Yes, you can prepare the hard-boiled eggs and the filling up to 2 days in advance. However, I recommend assembling the spider decorations no more than 8 hours before serving. The olive pieces can shift or dry out if left too long on the filling.
How do I keep the olive spider legs from falling off?
Make sure your olives are thoroughly dried before slicing. Pat them with a paper towel to remove excess brine. When placing the legs, gently press them into the filling so they are anchored. Chilling the assembled eggs for 30 minutes also helps everything stay in place.
Can I use canned black olives that are already sliced?
No, pre-sliced olives are too thin and small to create realistic spider legs and bodies. You need whole, pitted black olives so you can cut them into the right shapes. Look for jumbo or colossal whole black olives for the best results.
What if my deviled egg filling is too runny?
If your filling is too thin, you may have added too much mayonnaise or the yolks were not fully dry. To fix it, mash in an extra hard-boiled yolk (you can boil one more egg just for this purpose) or add a tablespoon of breadcrumbs to absorb the excess moisture. Chill the filling for 15 minutes before piping to help it firm up.
Can I freeze deviled eggs?
No, deviled eggs do not freeze well. The mayonnaise-based filling will separate and become watery when thawed, and the egg whites will become rubbery. These are best made fresh or up to 1 day ahead and stored in the refrigerator.
Pin This Recipe!

Classic Spider Deviled Eggs: Easy Halloween Appetizer
These classic homemade spider deviled eggs for Halloween are simple enough for a kid to help with, impressive enough to get a gasp from your guests, and they taste exactly like the creamy, tangy deviled eggs you remember from every family gathering.
- Prep Time: 15 minutes
- Cook Time: 12 minutes
- Total Time: 30 minutes
- Yield: 24 servings 1x
- Category: Appetizer
- Cuisine: American
Ingredients
- 12 large eggs
- 1/3 cup mayonnaise
- 1 tablespoon yellow mustard
- 1 teaspoon white vinegar
- 1/2 teaspoon salt
- 1/4 teaspoon black pepper
- 1/2 teaspoon paprika (plus extra for dusting)
- 1 can (6 ounces) large black olives (whole, pitted)
- 1 tablespoon sweet pickle relish (optional)
- 1/4 teaspoon garlic powder (optional)
- 1/4 teaspoon onion powder (optional)
- A dash of hot sauce (optional)
Instructions
- Hard boil the eggs: Place the 12 eggs in a single layer in a large pot. Cover them with cold water by about an inch. Bring the water to a full, rolling boil over high heat. Once boiling, cover the pot, turn off the heat, and let the eggs sit for exactly 12 minutes. While the eggs sit, prepare an ice bath by filling a large bowl with cold water and ice cubes.
- Cool and peel the eggs: After 12 minutes, transfer the eggs to the ice bath using a slotted spoon. Let them cool for at least 5 minutes. Gently tap each egg on the counter to crack the shell all over, then peel under running cold water. Pat the peeled eggs dry with a paper towel.
- Prepare the egg whites: Using a sharp knife, slice each egg in half lengthwise. Gently pop out the yolks into a medium mixing bowl. Place the hollowed egg white halves on your serving platter, cut side up.
- Make the filling: Add the mayonnaise, yellow mustard, white vinegar, salt, pepper, and paprika to the bowl with the yolks. Mash everything together with a fork until smooth and creamy. Taste and adjust seasoning. If using any optional add-ins like pickle relish or garlic powder, stir them in now.
- Fill the egg whites: Transfer the yolk mixture to a piping bag or a zip-top bag with a small corner snipped off. Pipe the filling into each egg white half, mounding it slightly in the center.
- Create the spider legs: Drain the can of black olives and pat them dry with a paper towel. Using your sharp paring knife, slice each olive lengthwise into thin strips – aim for 4 to 5 strips per olive. Each strip will become one spider leg.
- Create the spider bodies: Take the remaining whole olives and slice each one in half crosswise (through the middle, not lengthwise). Each half will become one spider body.
- Assemble the spiders: On each filled deviled egg, place 4 olive strips on each side of the filling to create the spider legs. Gently press them into the filling so they stay in place. Then place one olive half (cut side down) in the center of the filling, right on top of where the legs meet. Press down lightly so it sticks.
- Add the finishing touches: Lightly dust the assembled spider deviled eggs with a sprinkle of paprika.
- Chill before serving: Refrigerate the platter for at least 30 minutes before serving. They can be made up to 8 hours ahead – just cover the platter with plastic wrap and keep chilled.
Notes
Use eggs that are at least a week old for easier peeling. Dry olives thoroughly before slicing to help them stay in place. The filling tastes better after chilling for at least an hour. For a dairy-free version, use vegan mayonnaise.
Nutrition
- Serving Size: 1 spider deviled egg
- Calories: 85
- Sodium: 180
- Fat: 7
- Saturated Fat: 1.5
- Carbohydrates: 1
- Protein: 6
Keywords: spider deviled eggs, Halloween appetizer, deviled eggs, Halloween recipe, spooky appetizer, easy Halloween recipe