I was standing in the candy aisle last October — you know, that weird limbo between the back-to-school displays and the Christmas stuff that’s way too early — when a bag of candy corn practically jumped off the shelf at me. And just like that, I was seven years old at my Aunt Maggie’s kitchen table, carefully peeling apart the white, orange, and yellow layers of a single candy corn, trying to make it last an entire cartoon. She’d always have a bowl of them out, even though she claimed they were “strictly for decoration.” I’d sneak them anyway, and she’d pretend not to notice.
That memory hit me so hard I almost laughed out loud in the middle of Target. Aunt Maggie passed a few years back, and honestly, I’d forgotten about her candy corn rule until that moment. But standing there, I got this ridiculous idea — what if I could turn that layered look into something for grown-ups? Something that captured the nostalgia without the cloying sweetness that makes your teeth hurt? I grabbed the candy corn (for research, obviously), a few boxes of Jell-O, and headed home with a plan that felt equal parts brilliant and slightly unhinged.
Let me tell you, the first batch was a mess. The layers bled together, the gelatin set too fast, and I ended up with a sad, murky brown situation that looked nothing like candy corn. But I’m stubborn, and maybe you’ve been there too — that feeling when a recipe idea just won’t let you go. After three more tries (and a very sticky counter), these Easy Candy Corn Layered Jello Shots for Halloween came together exactly the way I’d imagined. They’re the party trick I didn’t know I needed, and every time I make them, I think of Aunt Maggie pretending those candy corns were just for show.
Why You’ll Love This Recipe
Look, I’ve tested a lot of Halloween recipes over the years, and most of them fall into one of two camps: they look amazing but take forever, or they’re quick but look like a hot mess. These layered Jell-O shots? They’re the rare unicorn that does both — stunning presentation with minimal actual effort. Here’s why they’ll become your go-to for every spooky gathering:
- Quick & Easy: Active prep time is about 15 minutes total. The rest is just waiting for layers to set, which means you can make them the night before your party and forget about them.
- Simple Ingredients: You need exactly three Jell-O flavors (lemon, orange, and strawberry), some unflavored gelatin, and vodka. That’s it. No weird candy melts or specialty baking supplies.
- Perfect for Halloween Parties: These are basically edible decorations. They look like candy corn in shot form, which means they double as table decor and party favors.
- Crowd-Pleaser: I’ve brought these to three different Halloween gatherings now, and people lose their minds every time. Even folks who don’t normally do shots want one just for the photo op.
- Unbelievably Delicious: The flavor combo is surprisingly good — the lemon and orange taste like a boozy creamsicle, and the strawberry adds just enough sweetness without being cloying.
What makes this recipe different from the dozen other layered Jell-O shot tutorials out there? It’s the technique. Most recipes tell you to use sweetened condensed milk for the white layer, which sounds good but actually makes the layers cloudy and weird. I use unflavored gelatin with a splash of vanilla instead — it stays crystal clear and tastes way cleaner. Plus, I’ve figured out the exact chilling times so your layers don’t bleed into each other. This isn’t my first rodeo with gelatin, and I’ve made every mistake so you don’t have to.
Honestly, these shots make me happy every single time I make them. There’s something about that perfect yellow-orange-white stripe that just feels like Halloween in a cup. And when you pull them out at a party and everyone goes “Wait, how did you DO that?” — that’s the moment that makes all the waiting worth it.
What Ingredients You Will Need
This recipe uses simple, straightforward ingredients that you can find at any grocery store. The key is getting the right Jell-O flavors and using unflavored gelatin for that clean white layer. Here’s what you’ll need:
For the Yellow Layer (Bottom)
- 1 box (3 oz) lemon Jell-O
- 1 cup boiling water
- 1/2 cup cold water
- 1/2 cup vodka (I recommend Tito’s for a clean taste, but any decent vodka works)
For the Orange Layer (Middle)
- 1 box (3 oz) orange Jell-O
- 1 cup boiling water
- 1/2 cup cold water
- 1/2 cup vodka
For the White Layer (Top)
- 1 packet (about 1 tablespoon) unflavored gelatin (Knox brand is my go-to)
- 1/4 cup cold water (for blooming the gelatin)
- 3/4 cup boiling water
- 1/4 cup sweetened condensed milk (adds creaminess without cloudiness)
- 1/2 cup vodka
- 1/2 teaspoon vanilla extract (optional, but adds nice depth)
For Assembly
- 2-ounce plastic shot cups with lids (you’ll need about 24-30 cups)
- Cooking spray or a tiny bit of oil (makes peeling cups off easier later)
A few notes on ingredients: I’ve tried this with generic store-brand gelatin mixes, and they work fine, but Jell-O brand gives you brighter, more consistent colors. For the vodka, you don’t need anything fancy — the Jell-O flavor masks the alcohol pretty well. But please don’t use flavored vodka, it throws off the balance. If you want to make these non-alcoholic, just replace the vodka with cold water in each layer. The texture stays the same, and kids can join in the fun (minus the booze, obviously).
The sweetened condensed milk in the white layer is non-negotiable — trust me on this. I tried using regular milk, half-and-half, and even coconut cream, and nothing gives you that opaque, creamy white layer quite like condensed milk. It also adds a slight sweetness that balances the tartness of the lemon and orange layers. Genius, right?
Equipment Needed
You don’t need much for this recipe, which is part of the beauty. Here’s what you’ll want to have on hand:
- Small mixing bowls (3 of them) — one for each color layer. I use my Pyrex glass measuring cups because they have spouts for easy pouring.
- Whisk or fork — for stirring the gelatin until it’s fully dissolved.
- Measuring cups and spoons — precise measurements matter here, especially for the white layer.
- 2-ounce plastic shot cups with lids — you can find these at party supply stores or on Amazon. I like the ones with clear lids so you can see the layers.
- A baking sheet or tray — to hold the cups while they set in the fridge. A rimmed baking sheet works great.
- A small offset spatula or butter knife — for smoothing the tops if needed.
- Cooking spray — just a tiny spritz makes peeling the cups off later much easier.
Pro tip: If you can’t find the plastic shot cups, you can use small glass shot glasses, but you’ll need more of them since they’re usually smaller. I’ve also used silicone ice cube trays in a pinch — just make sure they’re food-grade and clean. The plastic cups are cheap and disposable, though, which makes cleanup a breeze for parties.
Preparation Method
Okay, here’s where the magic happens. The key to perfect layers is patience — each layer needs to set completely before you add the next one. I know it’s tempting to rush, but trust me, rushing leads to bleeding layers and murky colors. Let’s do this right.
Step 1: Prep Your Cups
Arrange your plastic shot cups on a baking sheet or tray. Give each cup a tiny spritz of cooking spray — just a quick puff, not enough to pool. This helps the gelatin release from the cups later. You should have enough room for about 24-30 cups depending on how full you pour each layer.
Step 2: Make the Yellow Layer (Bottom)
In a small bowl, empty the lemon Jell-O powder. Add 1 cup of boiling water and stir for 2 full minutes until the powder is completely dissolved — no granules left. Then stir in 1/2 cup cold water and 1/2 cup vodka. Pour about 1 tablespoon of this mixture into each cup. You want the layer to be about 1/3 inch deep. Pop the tray into the fridge and let it set for at least 45 minutes, or until the gelatin is firm to the touch.
Step 3: Make the Orange Layer (Middle)
While the yellow layer is setting, make the orange layer the same way — dissolve the orange Jell-O in 1 cup boiling water, then add cold water and vodka. Let it cool to room temperature on the counter (about 15 minutes). You don’t want it hot when you pour it over the set yellow layer, or it’ll melt the bottom layer and cause bleeding. Once the yellow layer is firm and the orange mixture is cool, carefully pour about 1 tablespoon of orange mixture over each yellow layer. Back to the fridge for another 45 minutes.
Step 4: Make the White Layer (Top)
This one’s a little different. In a small bowl, sprinkle the unflavored gelatin over 1/4 cup cold water and let it sit for 5 minutes — this is called “blooming.” It’ll look like a weird, spongey mess. Don’t panic. After 5 minutes, add 3/4 cup boiling water and stir until the gelatin is completely dissolved. Then whisk in the sweetened condensed milk, vodka, and vanilla extract until smooth. Let this cool on the counter for 15-20 minutes. Once the orange layer is firm and the white mixture is cool (but still liquid), pour about 1 tablespoon over each orange layer. Fridge for at least 2 hours, or overnight for best results.
Step 5: The Big Reveal
Once everything is fully set (at least 4 hours total, but overnight is better), put the lids on your cups and arrange them on a platter. If you want to pop them out of the cups for a photo, run a thin knife around the edge and gently coax them out. They should slide right out thanks to that cooking spray. The layers should be perfectly distinct — yellow on bottom, orange in the middle, white on top. Just like candy corn!
Cooking Tips & Techniques
I’ve made these shots about a dozen times now, and I’ve learned a few things the hard way. Here’s what I wish someone had told me before my first attempt:
Temperature is everything. If you pour a warm liquid layer over a set layer, the heat will melt the boundary and you’ll get bleeding colors. Always let your mixtures cool to room temperature before pouring. I usually set a timer — 15 minutes on the counter is perfect. If you’re in a rush, you can speed this up by setting the bowl in an ice bath, but stir constantly so it doesn’t set unevenly.
Don’t skimp on the setting time. I know 45 minutes per layer feels like forever, but if you rush, the layers will mix together and you’ll end up with a sad, muddy mess. The gelatin needs time to fully set and create a firm barrier. I usually start these the night before a party and let them set overnight — that way, there’s zero stress.
Use a measuring spoon for consistent layers. Eyeballing it leads to uneven layers, and then your candy corn effect looks more like a weird, lumpy caterpillar. I use a tablespoon measure for each layer, and it gives me perfectly even stripes every time.
Watch out for condensation. When you take the tray out of the fridge, the cups will sweat. If water drips into the cups, it can mess up the top layer. I pat the cups dry with a paper towel before adding the next layer, and it makes a huge difference.
My biggest failure: The first time I made these, I used flavored vodka (peach, because I thought it would be “fun”). The flavor clashed horribly with the Jell-O, and the whole batch tasted like cough syrup. Stick with plain vodka — your taste buds will thank you.
Variations & Adaptations
Once you’ve mastered the basic candy corn look, there’s so much you can do with this technique. Here are a few variations I’ve tried and loved:
Non-Alcoholic Version: Replace the vodka with cold water in each layer. The texture stays exactly the same, and the flavors are still bright and fun. Perfect for parties where kids are running around or for designated drivers who still want to join the fun.
Different Color Combos: Try red, white, and blue for the Fourth of July (cherry, unflavored white, and berry blue Jell-O). Or green, white, and red for Christmas. The technique is the same — just swap the Jell-O flavors to match your holiday.
Creamy White Layer Variation: If you want an even creamier top layer, use half sweetened condensed milk and half coconut cream. It adds a subtle tropical note that pairs surprisingly well with the citrus layers. I tried this for a beach-themed party and it was a hit.
Spicy Kick: Add a pinch of cayenne pepper or a drop of hot sauce to the orange layer for a sweet-heat combo that’ll wake people up. Just make sure to label these clearly — not everyone expects a spicy Jell-O shot.
Dairy-Free White Layer: Use full-fat coconut milk instead of sweetened condensed milk. The texture won’t be quite as creamy, but it still gives you a nice opaque white layer. Add an extra tablespoon of sugar to compensate for the lost sweetness.
Serving & Storage Suggestions
These shots are best served cold, straight from the fridge. I like to arrange them on a black platter or tray to make the colors pop — the contrast is stunning. If you’re serving them at a party, put the tray out about 10 minutes before guests arrive so they’re not ice-cold, but still nicely chilled.
For presentation, I sometimes top each shot with a single candy corn (the real thing) or a tiny orange slice. It adds a cute garnish and helps guests immediately recognize the candy corn inspiration. Just don’t leave the candy corn on too long — it can get sticky and weird after a few hours.
Storage is easy: keep the lids on and store in the fridge for up to 5 days. The layers will stay distinct for about 3 days, then they might start to blend slightly. Honestly, they never last that long at my house — they disappear at parties within the first hour.
Can you freeze these? Technically yes, but I don’t recommend it. Freezing changes the texture of gelatin — it gets watery and grainy when thawed. If you need to make them ahead, just make them the night before and keep them in the fridge. They’re actually better after a full day of setting anyway.
One more tip: if you’re transporting them to a party, put the tray on a flat surface in your car and drive carefully. Sudden stops can cause the layers to slosh and mix. I learned this the hard way when I had to brake suddenly and ended up with a tray of sad, swirly messes.
Nutritional Information & Benefits
Let’s be real — these are Jell-O shots, not health food. But here’s the breakdown if you’re curious:
Per shot (using 2-ounce cups, filled to about 1.5 ounces):
- Calories: approximately 85-95
- Carbohydrates: 12-15g (mostly from sugar in the Jell-O and condensed milk)
- Protein: 1-2g (from the gelatin)
- Fat: 1g (from the condensed milk)
- Alcohol content: roughly 0.5 ounces of vodka per shot
On the bright side, gelatin is actually good for your joints and skin — it’s a great source of collagen. So there’s that tiny silver lining. And if you use the non-alcoholic version, these are basically just fun, colorful Jell-O cups that kids love.
Dietary considerations: These contain dairy (sweetened condensed milk) and gelatin (which is not vegetarian or vegan). For a vegan version, use agar-agar instead of gelatin and coconut cream instead of condensed milk. The texture will be a bit different — firmer and less wobbly — but the layered effect still works beautifully.
Allergens: Dairy (in the white layer), and the Jell-O may contain artificial colors that some people are sensitive to. Always check labels if you’re serving guests with allergies.
Conclusion
These Easy Candy Corn Layered Jello Shots for Halloween are the kind of recipe that makes you look like a party-planning genius without actually working that hard. They’re nostalgic, they’re fun, and honestly, they taste way better than actual candy corn. Every time I make them, I think about that moment in the candy aisle and how a silly memory turned into a recipe that’s brought so much joy to my Halloween parties.
I’d love to hear how yours turn out! Did you try a different color combo? Add a crazy garnish? Make a mess and learn something? Drop a comment below and tell me about it — I genuinely read every single one. And if you share a photo on social media, tag me so I can see your beautiful layers. Happy Halloween, and cheers to making memories (and Jell-O shots) that last!
Frequently Asked Questions
Can I make these Jell-O shots without alcohol?
Absolutely! Just replace the vodka with cold water in each layer. The texture stays exactly the same, and the flavors are still bright and fun. Kids love these too — just call them “candy corn Jell-O cups” instead of shots.
How far in advance can I make these?
I recommend making them the night before your party. They need at least 4 hours to set fully, and they actually get better after a full day in the fridge. They’ll keep for up to 5 days, but the layers start to blend after day 3.
My layers kept bleeding together — what did I do wrong?
Two most likely culprits: you poured the next layer while it was still too warm, or you didn’t let the previous layer set long enough. Always let your liquid mixtures cool to room temperature (about 15 minutes on the counter), and give each layer a full 45 minutes in the fridge before adding the next one. Patience is key!
Can I use different Jell-O flavors?
Yes! The candy corn look uses yellow, orange, and white, but you can try any color combo. Just keep in mind that lighter colors work better for the bottom layer since they’re more visible. Dark colors like berry blue or grape can make the layers look muddy if placed on the bottom.
How do I get the Jell-O shots out of the plastic cups?
Run a thin knife or offset spatula around the inside edge of the cup, then gently coax the Jell-O out. The cooking spray you used earlier should help it slide right out. If it’s stuck, dip the bottom of the cup in warm water for 5 seconds — that usually does the trick.
Pin This Recipe!
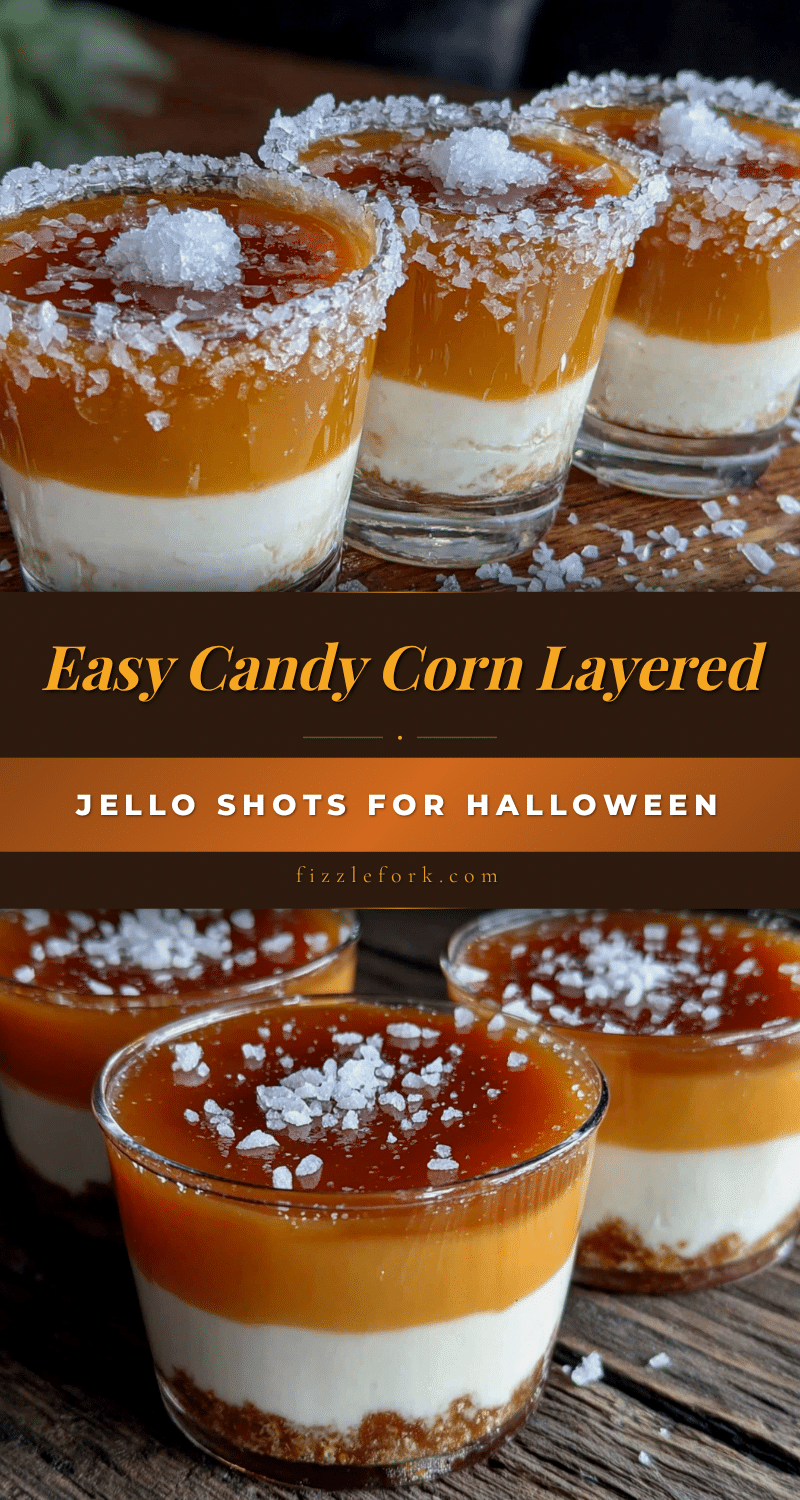
Easy Candy Corn Layered Jello Shots for Halloween
These layered Jell-O shots capture the nostalgic look of candy corn with bright yellow, orange, and white stripes. They’re quick to make, use simple ingredients, and are perfect for Halloween parties.
- Prep Time: 15 minutes
- Cook Time: 0 minutes
- Total Time: 4 hours 15 minutes (includes setting time)
- Yield: 24-30 servings 1x
- Category: Appetizer
- Cuisine: American
Ingredients
- 1 box (3 oz) lemon Jell-O
- 1 cup boiling water
- 1/2 cup cold water
- 1/2 cup vodka (e.g., Tito’s)
- 1 box (3 oz) orange Jell-O
- 1 cup boiling water
- 1/2 cup cold water
- 1/2 cup vodka
- 1 packet (about 1 tablespoon) unflavored gelatin (Knox brand)
- 1/4 cup cold water (for blooming gelatin)
- 3/4 cup boiling water
- 1/4 cup sweetened condensed milk
- 1/2 cup vodka
- 1/2 teaspoon vanilla extract (optional)
- Cooking spray or a tiny bit of oil
Instructions
- Arrange 24-30 plastic shot cups on a baking sheet. Give each cup a tiny spritz of cooking spray.
- Make the yellow layer: In a small bowl, dissolve lemon Jell-O in 1 cup boiling water, stirring for 2 minutes. Add 1/2 cup cold water and 1/2 cup vodka. Pour about 1 tablespoon into each cup. Refrigerate for 45 minutes until firm.
- Make the orange layer: Dissolve orange Jell-O in 1 cup boiling water, then add 1/2 cup cold water and 1/2 cup vodka. Let cool to room temperature (about 15 minutes). Once yellow layer is firm, pour about 1 tablespoon of orange mixture over each yellow layer. Refrigerate for 45 minutes.
- Make the white layer: In a small bowl, sprinkle unflavored gelatin over 1/4 cup cold water and let sit for 5 minutes (blooming). Add 3/4 cup boiling water and stir until dissolved. Whisk in sweetened condensed milk, 1/2 cup vodka, and vanilla extract. Let cool for 15-20 minutes. Once orange layer is firm, pour about 1 tablespoon over each orange layer. Refrigerate for at least 2 hours or overnight.
- Put lids on cups and serve cold. To remove from cups, run a thin knife around the edge and gently coax out.
Notes
Temperature is crucial: always let mixtures cool to room temperature before pouring over set layers to prevent bleeding. Don’t rush setting times—45 minutes per layer minimum. Use plain vodka, not flavored. For non-alcoholic version, replace vodka with cold water. Store in fridge for up to 5 days; layers stay distinct for about 3 days.
Nutrition
- Serving Size: 1 shot (about 1.5 ou
- Calories: 8595
- Sugar: 1114
- Sodium: 3040
- Fat: 1
- Saturated Fat: 0.5
- Carbohydrates: 1215
- Protein: 12
Keywords: candy corn, Jell-O shots, Halloween, layered Jell-O, party shots, boozy Jell-O