I had been looking for a Halloween snack that actually felt celebratory without requiring a full afternoon in the kitchen. For a while, I just accepted that holiday treats meant either baking for hours or grabbing a bag of something pre-made that looked better than it tasted. Then last October, with a party starting in 20 minutes and nothing on the counter, I started grabbing things from the pantry. The candy corn charcuterie board happened by accident—and honestly, it was the first time I actually enjoyed hosting instead of stressing.
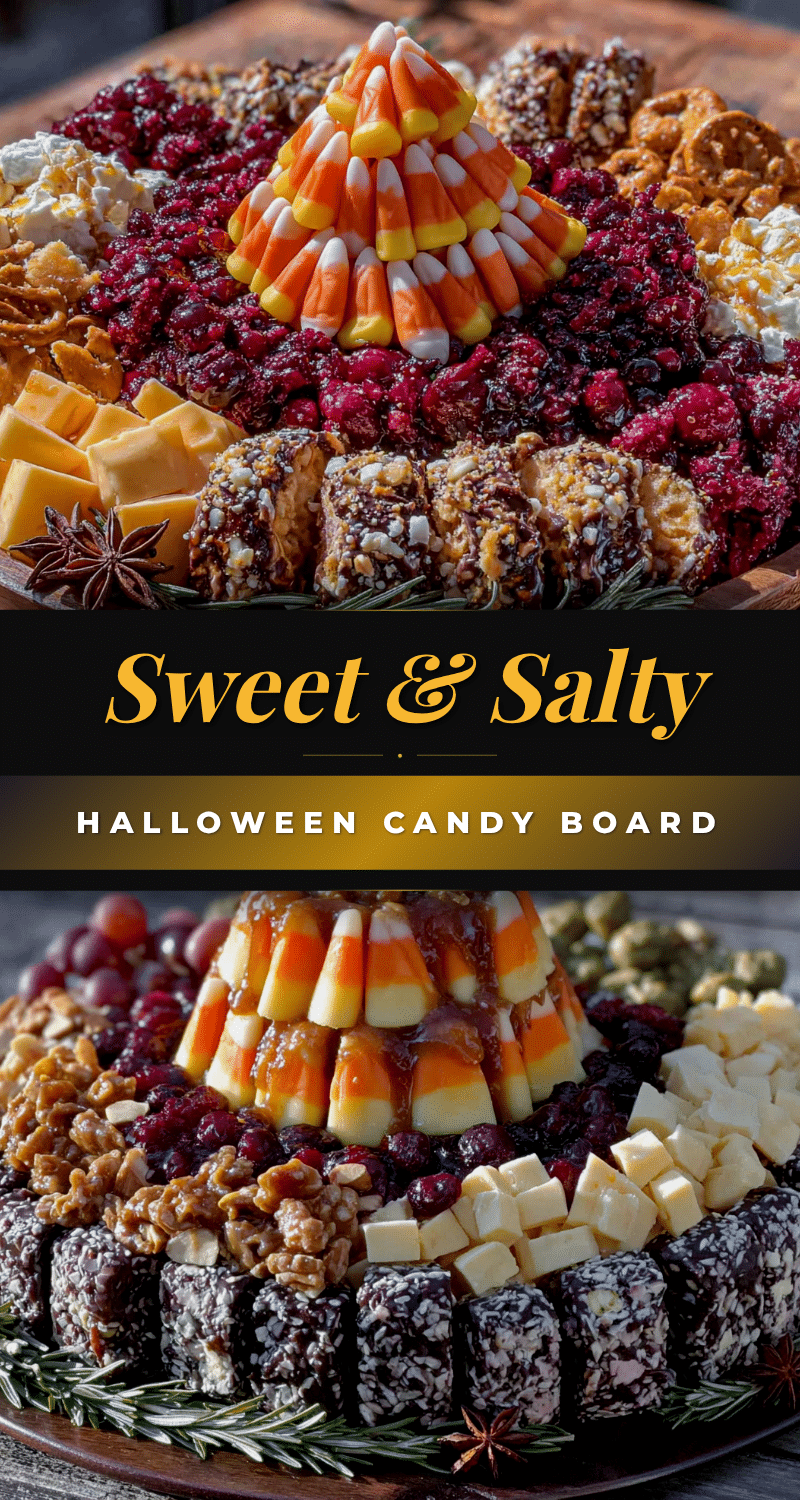
There’s something about arranging sweets and snacks on a board that feels less like cooking and more like playing. You know when you just start placing things and suddenly it looks intentional? That’s this board. It’s not fussy. It doesn’t require a recipe card or special equipment. You just need a big platter, some candy corn (obviously), and whatever else sounds good alongside it. I grabbed pretzels, some chocolate things, a few salty bits, and before I knew it, the board looked like something from a party catalog—only better because I made it in 15 minutes flat.
The candy corn charcuterie board became the thing people asked about after that party. Not the dip I spent an hour on. Not the cupcakes I stayed up late frosting. The board I threw together while waiting for the doorbell to ring. That’s when I realized simple wins every time.
Why You’ll Love This Halloween Candy Corn Charcuterie Board
Let’s be real for a second. Most Halloween treats look cute but taste like disappointment. Either they’re overly sweet or they require so much effort that by the time you’re done, you don’t even want to eat them. This board solves both problems. It’s genuinely delicious because you control what goes on it, and it takes almost no time to put together.
- Ready in 15 Minutes : No baking, no melting, no complicated steps. Just grab, arrange, and serve. Perfect for when guests are on their way or when you want a treat without the work.
- Totally Customizable : Use whatever candy you have on hand. Swap in your favorites, skip what you don’t like, or make it allergy-friendly. This board bends to your preferences, not the other way around.
- Perfect for Parties : Whether it’s a Halloween gathering, a movie night, or a classroom celebration, this board makes an impression. People love grazing, and a themed board feels special without being fussy.
- Crowd-Pleaser : Kids go for the candy corn and chocolate. Adults sneak the salty-sweet combos. Everyone finds something they love, and the board empties fast every time.
- Minimal Cleanup : One board, maybe a few small bowls. That’s it. No mixing bowls, no baking sheets, no frosting-covered spatulas. Your kitchen stays clean, and you get to enjoy the party too.
What makes this board different from a pile of candy on a plate is the thoughtfulness. The contrast of salty and sweet, crunchy and creamy, bright orange and dark chocolate—it’s intentional without being precious. I’ve tested this with my family, at parties, and even for a quiet night in. Every time, the board gets picked clean. There’s something about the mix of textures and flavors that keeps people coming back for just one more piece.
This is the kind of treat that makes you feel like you’ve got it together, even when you’re scrambling. That’s a rare thing during the busy Halloween season, and honestly, we all deserve a win like that.
What Ingredients You Will Need
The beauty of this candy corn charcuterie board is that it uses simple, readily available ingredients. You don’t need to hunt down specialty items or make a separate trip to a fancy grocery store. Everything here is stuff you can find at your local supermarket or probably already have in your pantry. The key is variety—different colors, textures, and flavors that make the board feel abundant and exciting.
For the Candy Corn Base
- Candy corn (about 2 cups) – The star of the show. I prefer Brach’s for that classic flavor, but any brand works. You can also use autumn mix or harvest blend for more color variety.
- Pumpkin-shaped candy corn (about 1 cup) – These little pumpkin candies add a fun shape contrast. They’re essentially the same flavor, but the different look makes the board more interesting.
For Chocolate and Sweet Elements
- Mini chocolate bars (about 1 cup) – Think fun-size Snickers, Milky Way, or Twix. The chocolate balances the pure sugar of the candy corn. I like using a mix of milk and dark chocolate.
- Chocolate-covered pretzels (about 1 cup) – The salty crunch is essential. Snyder’s makes good ones, or you can use store brand. If you can find Halloween-themed ones with orange and black sprinkles, even better.
- M&M’s in Halloween colors (about 1/2 cup) – Those orange, brown, and green ones add a pop of color. They’re also great for filling small gaps on the board.
- White chocolate melts or bark (about 1 cup, broken into pieces) – The creamy sweetness adds another layer. You can use almond bark or white chocolate chips if that’s what you have.
For Salty and Savory Contrast
- Salted pretzel sticks or twists (about 1 cup) – The salt cuts through all that sugar. Pretzel sticks work well because they’re easy to grab and add vertical interest to the board.
- Roasted and salted peanuts (about 1/2 cup) – Another salty element that pairs surprisingly well with candy corn. Trust me on this one—the sweet-salty combo is addictive.
- Popcorn (about 1 cup) – Plain or lightly salted popcorn adds volume and a light, airy texture. It’s also a good filler for larger boards.
For Fresh and Fruity Elements
- Apple slices (1-2 apples, sliced) – Granny Smith apples are perfect because their tartness balances the sweet candy. Toss them in a little lemon juice to prevent browning.
- Orange slices or clementines (about 1 cup) – The citrus brightness works beautifully with the Halloween theme and adds a fresh note to all that sugar.
For Dips and Extras (Optional)
- Caramel sauce (about 1/2 cup) – For drizzling over apple slices or dipping pretzels. Store-bought is fine, or use homemade if you’re feeling ambitious.
- Peanut butter (about 1/2 cup) – A small bowl of peanut butter for dipping pretzels or apple slices adds protein and richness.
- Halloween sprinkles (a small handful) – For scattering over the board for a festive finish. Totally optional, but they look great in photos.
Equipment Needed
You don’t need much for this board, which is part of why I love it. Here’s what you’ll want to have on hand:
- A large wooden board or platter – A cutting board, a baking sheet, a large plate—anything flat and big enough to hold everything. I use a rectangular wooden board about 18 inches long, but round works too. If you don’t have a board, a rimmed baking sheet lined with parchment paper does the job perfectly.
- Small bowls or ramekins – For holding dips, sauces, or smaller items like M&M’s and peanuts. I use 3-4 small ceramic bowls. Mini mason jars work great too and look cute for Halloween.
- Serving spoons or tongs – Small tongs for the pretzels and a couple of spoons for the dips. Nothing fancy needed here.
- Parchment paper (optional) – If you’re using a board that might stain or if you want easy cleanup, line it with parchment paper. It also adds a nice rustic look.
- Small spatula or spreader – For the peanut butter or caramel sauce if you’re serving them in a bowl.
That’s really it. No special tools, no fancy gadgets. This is the kind of recipe (if you can even call it a recipe) that proves you don’t need a fully stocked kitchen to create something impressive. I’ve made this board on a cookie sheet when my good board was being used for something else, and it looked just as good.
Preparation Method
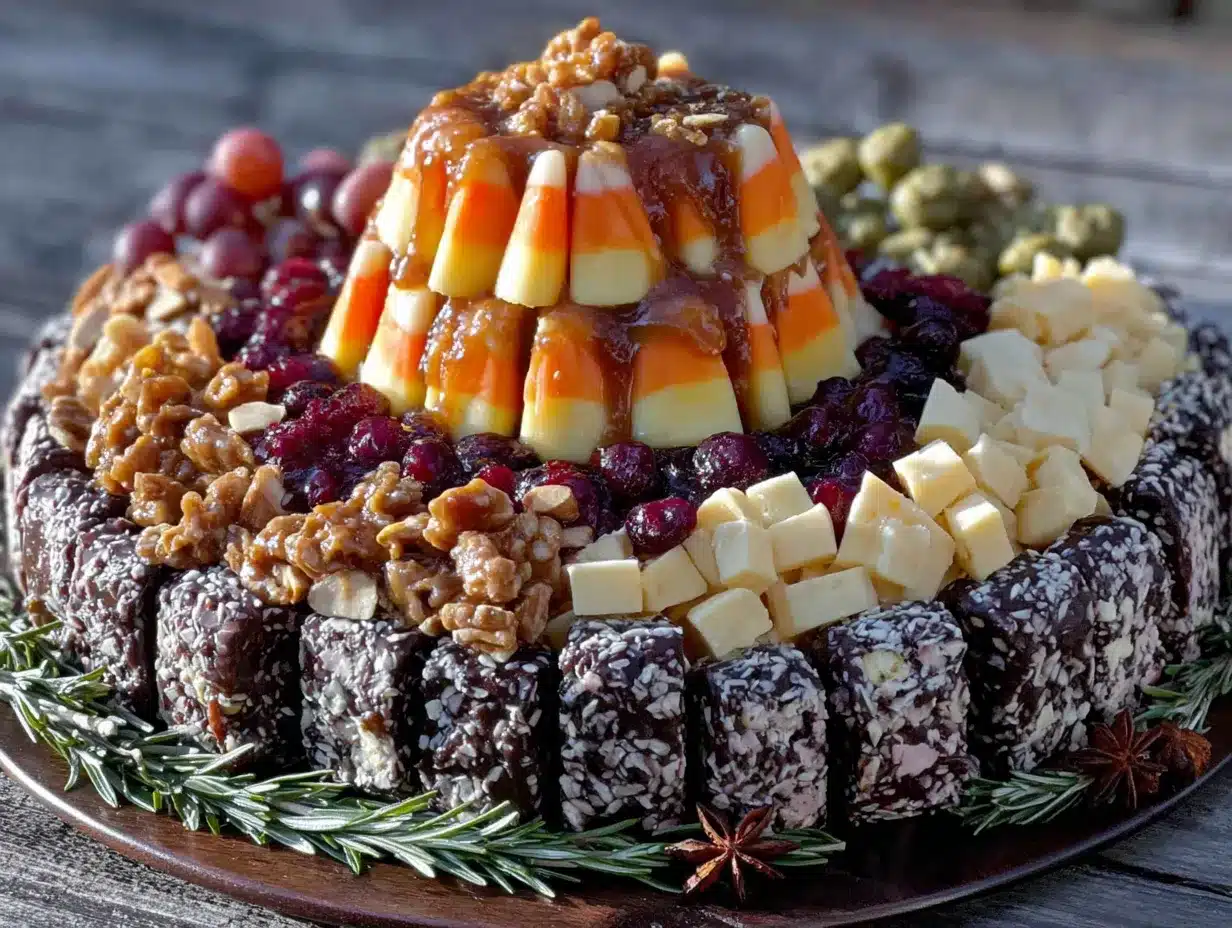
This is the easiest part. There’s no actual cooking involved, just arranging. But the way you arrange things makes a difference between a board that looks thrown together and one that looks like it belongs on a magazine cover. Let me walk you through it.
Step 1: Choose Your Board and Base
Start with your board or platter. If you’re using parchment paper, lay it down now and trim the edges so it fits neatly. Place your small bowls on the board first—this is important because they’ll anchor your arrangement. I put them in a triangle pattern: one for caramel sauce, one for peanut butter, and one for M&M’s. Leave space between them for the other ingredients.
Step 2: Add the Larger Items First
This is the golden rule of charcuterie board building. Start with the biggest items and fill in around them. Place your chocolate bars in small clusters around the board. I like to break some of them in half and stand them up for visual interest. Group them in twos and threes rather than spreading them out evenly—it looks more natural that way. Add the white chocolate pieces in a couple of spots.
Step 3: Create Lines and Sections
Now add the candy corn. Instead of dumping it all in one pile, create a few small clusters or even a line of candy corn running diagonally across the board. This is where the visual magic happens. The bright orange and yellow creates a striking contrast against the darker chocolate and pretzels. I usually make three or four small piles of candy corn in different spots, with a few scattered pieces between them for a casual look.
Step 4: Add the Salty Elements
Place the pretzels in a couple of piles. I like to arrange some in a stack and leave others loose. Add the peanuts in small clusters near the pretzels. The saltiness needs to be accessible, not buried under candy. Think about how someone will grab things—you want easy access to both sweet and salty without having to dig.
Step 5: Fill in with Popcorn and Fruit
Popcorn is your volume filler. Use it to fill any empty spaces on the board. It adds height and texture, and it’s neutral enough that it works with everything. Place your apple slices in a fan pattern near the caramel sauce bowl. Arrange the clementine segments in a small pile or scatter them around. The fresh fruit adds a pop of color and a refreshing bite that breaks up all the sugar.
Step 6: Add the Finishing Touches
Now go back and fill any gaps. Scatter a few extra M&M’s around. Place a few candy corn pumpkins in empty spots. If you’re using Halloween sprinkles, give the whole board a light dusting—not too much, just enough to catch the light. Step back and look at it. Does it feel full? Does it look balanced? Adjust anything that feels off. Sometimes I move a cluster of pretzels or add another pile of candy corn if a section looks bare.
Step 7: Serve Immediately or Store
This board is best served within an hour of assembling. If you need to make it ahead, cover it loosely with plastic wrap and keep it in a cool place. Don’t refrigerate it—the chocolate can bloom, and the pretzels can get soft. If you’re making it for a party, I recommend assembling it right before guests arrive. It takes 15 minutes, I promise.
Cooking Tips & Techniques
I’ve made this board more times than I can count, and I’ve learned a few things along the way. Here are the tips that make the difference between a good board and a great one.
Don’t Overthink the Arrangement
The biggest mistake people make is trying to make it perfect. Charcuterie boards look best when they feel effortless. Group things in clusters, leave some space between items, and don’t worry if everything isn’t perfectly symmetrical. The slight chaos is part of the charm. I’ve learned this the hard way—my first few boards were so arranged they looked like a store display. Once I relaxed, they started looking better.
Balance Sweet and Salty
The whole point of a board like this is the contrast. If you only put candy on it, people will get overwhelmed by sugar and stop eating. Make sure you have enough salty elements to balance things out. I’ve found that a ratio of about 60% sweet to 40% salty works perfectly. The pretzels and peanuts are essential, but don’t be afraid to add other salty snacks like popcorn or even potato chips if that’s what you have.
Think About Texture
Variety in texture keeps people interested. You’ve got the crunchy candy corn, the smooth chocolate, the salty crunch of pretzels, the creamy peanut butter, the crisp apple slices. Each bite should feel different. If you notice you have too many soft or chewy items, add something crunchy. If everything is crunchy, add something creamy like the caramel sauce or peanut butter.
Use Color Intentionally
Halloween is all about orange, black, and purple. Use that to your advantage. The candy corn brings the orange. The dark chocolate and black licorice (if you like it) bring the black. Purple M&M’s or grapes add that third color. The visual appeal of the board is half the fun, so think about how the colors work together. I once made a board that was all brown and orange, and it looked flat. Adding green apple slices and white chocolate made it pop.
Make It Accessible
Think about how people will actually eat from the board. Don’t put dips in the center where people have to reach over everything. Place them near the edges. Make sure there are napkins nearby because candy corn can be sticky. And for the love of all that is good, put out small plates. Otherwise, people will double-dip and make a mess. I learned this one after a party where the caramel sauce bowl became a communal disaster zone.
Variations & Adaptations
One of the best things about this board is how easy it is to adapt. Here are some variations I’ve tried and loved.
The Healthier Version
Swap out some of the candy for more fruit and nuts. Use dark chocolate (which has less sugar) and add dried fruit like apricots or cranberries. Replace the candy corn with roasted chickpeas or pumpkin seeds for a savory crunch. You can still make it festive without all the sugar. I’ve done this for school parties where parents appreciate a slightly healthier option.
The All-Candy Version
For the sugar lovers in your life, go all out. Fill the board with every Halloween candy you can find—fun-size Snickers, Kit Kats, Reese’s cups, Twizzlers, and of course, lots of candy corn. Add gummy worms for a creepy touch and candy eyeballs for fun. This version is pure indulgence, but sometimes that’s exactly what you need.
The Gluten-Free Version
Make sure your pretzels are gluten-free (many brands now offer them). Use gluten-free cookies or crackers instead of regular ones. Check your chocolate bars—most are gluten-free, but some contain malt or other gluten ingredients. Everything else on the board is naturally gluten-free, so this adaptation is pretty straightforward.
The Nut-Free Version
Skip the peanuts and any chocolate bars that contain nuts. Use seeds like pumpkin seeds or sunflower seeds instead for that salty crunch. Make sure your candy corn and other candies are produced in a nut-free facility if allergies are a concern. This version works well for school parties where nut allergies are common.
The Spooky Theme
Add some spooky elements for extra Halloween flair. Use gummy worms crawling over the board. Add plastic spiders (clean ones!) for a creepy touch. Arrange the candy corn in the shape of a spider web. Use black licorice strings to create web lines. I did this for a Halloween party last year, and the kids went crazy for it. The adults thought it was clever too.
Serving & Storage Suggestions
This board is best served at room temperature. The chocolate tastes better, the pretzels stay crunchy, and the candy corn has the right texture. If you’ve refrigerated anything, let it sit out for about 15 minutes before assembling the board.
For presentation, I like to put the board on a table where people can gather around it. Place it at eye level or slightly lower so everyone can see what’s on it. Add a few small plates, napkins, and maybe some Halloween-themed cocktail napkins for extra festive points.
If you’re serving this at a party, consider pairing it with some other easy appetizers. I’ve found that this board works great alongside something savory like our creamy jalapeno popper chicken dip or our easy pepperoni pizza sliders. The contrast between sweet and savory keeps people coming back for more.
For storage, this board doesn’t keep well once assembled. The candy corn can get sticky, the pretzels can get soft, and the apple slices will brown. If you have leftovers, separate the components and store them in airtight containers. The candy corn will keep for weeks. The pretzels and chocolate should be eaten within a few days. The apple slices won’t last more than a day, even with lemon juice.
Flavor-wise, the board is best within the first hour of assembly. After that, the textures start to change. But honestly, in my experience, there are rarely leftovers. People just keep picking at it until it’s gone.
Nutritional Information & Benefits
Let’s be honest—this is a treat board, not a health food. But that doesn’t mean it’s all bad. Here’s a rough breakdown of what you’re looking at per serving (about 1/6 of the board):
- Calories: Approximately 350-450 calories per serving, depending on what you include
- Fat: 15-20 grams (mostly from chocolate, nuts, and peanut butter)
- Carbohydrates: 50-60 grams (mostly sugar from candy and fruit)
- Protein: 5-8 grams (from nuts, peanut butter, and chocolate)
- Fiber: 3-5 grams (from apples, nuts, and popcorn)
The health benefits here come from the nuts (healthy fats and protein), the apples (fiber and vitamin C), and the dark chocolate (antioxidants if you use it). The candy corn is pure sugar with no nutritional value, but that’s okay in moderation. This board is about enjoyment and celebration, not daily nutrition.
If you’re watching your sugar intake, this board might not be for you. But if you’re looking for a fun, festive treat that brings people together, it’s perfect. I always remind myself that one night of indulgence doesn’t undo a week of healthy eating. Balance is everything.
Conclusion
This easy Halloween candy corn charcuterie board has become my go-to for every Halloween gathering. It’s simple, it’s fast, and it always gets compliments. People can’t believe it only took 15 minutes to put together. The secret is in the variety—the mix of sweet and salty, crunchy and creamy, bright and dark. Every bite is different, and that’s what keeps people coming back.
I love this board because it lets me be creative without any pressure. I can change it up based on what I have, what my guests like, or what looks good at the store. It’s forgiving and flexible, which is exactly what I need during the busy Halloween season. Plus, it makes me look like I put in way more effort than I actually did. That’s a win in my book.
I’d love to hear how your board turns out. Did you add something unexpected? Did you find a new favorite combination? Drop a comment below and let me know. And if you’re looking for more Halloween ideas, check out our spooky witch finger pretzel treats or our easy spider web charcuterie board for more festive fun. Happy Halloween, and happy snacking!
Frequently Asked Questions
Can I make this board ahead of time?
You can prep the ingredients ahead, but I recommend assembling the board no more than an hour before serving. The pretzels can get soft, and the apple slices will brown. If you need to prep ahead, wash and slice the apples (toss with lemon juice), portion out the candy, and store everything separately. Then assemble right before guests arrive.
What if I don’t like candy corn?
No problem! You can swap it out for any other Halloween candy. Try candy pumpkins, autumn mix, or even gummy worms. The board is totally customizable. The key is to keep the variety of textures and colors, so whatever you choose, make sure you have a mix of sweet, salty, crunchy, and creamy elements.
How many people does this board serve?
This board serves about 6-8 people as a snack or dessert. If it’s the main treat at a party, it might serve 4-6 people. I always make a little extra because people tend to eat more than you expect. It’s better to have leftovers than to run out.
Can I make this board nut-free?
Absolutely. Skip the peanuts and any chocolate bars that contain nuts. Use pumpkin seeds or sunflower seeds for that salty crunch. Check all your candy labels to make sure they’re produced in a nut-free facility if allergies are a concern. Everything else on the board is naturally nut-free.
What’s the best way to arrange the board?
Start with your small bowls for dips and smaller items. Then add the largest items like chocolate bars and pretzel clusters. Fill in with candy corn and popcorn. Add the fruit last. Step back and look at it—if something looks bare, add more candy or popcorn. The key is to make it look abundant and casual, not overly arranged. Think clusters and piles, not straight lines.
Pin This Recipe!
Easy Halloween Candy Corn Charcuterie Board in 15 Minutes
A quick and festive Halloween snack board featuring candy corn, chocolate, pretzels, and fresh fruit. Ready in 15 minutes with no cooking required, perfect for parties or movie nights.
- Prep Time: 15 minutes
- Cook Time: 0 minutes
- Total Time: 15 minutes
- Yield: 6-8 servings 1x
- Category: Appetizer
- Cuisine: American
Ingredients
- 2 cups candy corn (preferably Brach’s)
- 1 cup pumpkin-shaped candy corn
- 1 cup mini chocolate bars (fun-size Snickers, Milky Way, or Twix)
- 1 cup chocolate-covered pretzels
- 1/2 cup M&M’s in Halloween colors
- 1 cup white chocolate melts or bark, broken into pieces
- 1 cup salted pretzel sticks or twists
- 1/2 cup roasted and salted peanuts
- 1 cup popcorn (plain or lightly salted)
- 1–2 Granny Smith apples, sliced and tossed with lemon juice
- 1 cup orange slices or clementine segments
- 1/2 cup caramel sauce (optional)
- 1/2 cup peanut butter (optional)
- 1 small handful Halloween sprinkles (optional)
Instructions
- Choose your board or platter. If using parchment paper, lay it down and trim edges. Place small bowls for dips and smaller items in a triangle pattern.
- Add larger items first: place chocolate bars in small clusters around the board, breaking some in half for visual interest. Add white chocolate pieces in a couple of spots.
- Create lines and sections with candy corn: make 3-4 small piles in different spots, with a few scattered pieces between them.
- Add salty elements: place pretzels in piles, some stacked and some loose. Add peanuts in small clusters near the pretzels.
- Fill in with popcorn and fruit: use popcorn to fill empty spaces. Fan apple slices near caramel sauce. Arrange clementine segments in a small pile or scatter them.
- Add finishing touches: scatter extra M&M’s, place candy corn pumpkins in empty spots, and lightly dust with Halloween sprinkles if using.
- Serve immediately or within an hour. Cover loosely with plastic wrap if making ahead, but do not refrigerate.
Notes
Best served within an hour of assembly. Do not refrigerate as chocolate may bloom and pretzels may soften. For nut-free version, skip peanuts and use pumpkin seeds or sunflower seeds. For gluten-free version, use gluten-free pretzels and check chocolate labels.
Nutrition
- Serving Size: 1/6 of board
- Calories: 350450
- Sugar: 3545
- Sodium: 200300
- Fat: 1520
- Saturated Fat: 58
- Carbohydrates: 5060
- Fiber: 35
- Protein: 58
Keywords: Halloween charcuterie board, candy corn board, easy Halloween snack, no-bake dessert, party appetizer, sweet and salty board